How to Remove Jr Emperor Center Band

Signed-In Members Don't See This Ad

Charles651

Member
Joined
Jan 14, 2016
Messages
3
Location
Bowling Green, KY
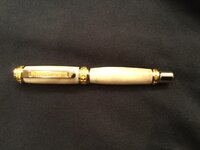
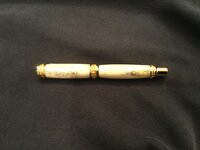
Hello, all. I'm a new member here and would really appreciate some advice. I turned a Jr Emperor pen out of deer antler. The end result is beautiful but.....When assembling the pen I thought the plastic coupler was just a disposable protector as it was stuck on the bottom component.

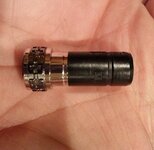
I didn't realize until it was too late what the coupler was and that it should have been pressed into the upper tube along with the center band! Now, I can't get the center band off, even using two pairs of soft jaw pliers to hold the pen while attempting to pull out or twist out the center band. I can turn the center band but it otherwise won't budge. My grip strength is not that great, so I may have to get someone who's stronger to attempt to remove the part. I also thought about trying to remove the top end cap with a punch and pushing the coupler into the tube from the top, but I'm afraid I won't be able to get it far enough down the tube and it will end up stuck.

This is a really nice pen, and I'd prefer not to lose my $50 dollar investment in the kit. Please let me know your ideas to fix my stupid mistake. Thanks!!
 
Last edited:
Signed-In Members Don't See This Ad

bobleibo

Member
Joined
Mar 15, 2007
Messages
2,130
Location
Utah
Charles
Sorry to hear about the problem with a very expensive kit.
First and foremost......DO NOT grip or twist anything with pliers. That's just asking for heartache.
I'm going to assume the piece you are talking about is the one in the picture below. If so, the best way to remove the center band is with some transfer punches (2nd pic). If you've already assembled the finial, remove that first with a transfer punch by gently tapping it out from the center band end. The opening in the center band is large enough to get the correct punch in. Take your time and just keep tapping until the top finial comes out. It might take awhile but it's better than ruining the kit. Then reverse the process with a larger punch to remove the center band and replace the plastic piece. Then you can reinstall the assembled center band. In both processes, use the largest punch that will fit thru the hole. That will help grab the edges of the piece you're removing.
Good luck
Bob
 

Attachments

  • 20160114_181305.jpg
    20160114_181305.jpg
    74.8 KB · Views: 182
  • 20160114_181544.jpg
    20160114_181544.jpg
    97.8 KB · Views: 149
Last edited:

lwalden

Member
Joined
Nov 3, 2005
Messages
1,238
Location
Trophy Club, Texas, USA.
any chance you have the harbor freight 28 piece transfer punch set? If not, might want to pick one up. They run about 11 bucks. If the black plastic threaded piece is not in the tube, you can use the 27/64" punch to (gently) drive out the cap- and should go without saying, but use the end that is flat to go against the face, other wise the pointy end will knock the gold accent piece out. While it's possible to reseat the accent piece, better to avoid that. once the cap end is out, you can use the 29/64" punch to knock the center band out of the tube. I find that holding the barrel in the kind of flexible gripper material they sell in kitchen stores for use in opening lids on jars that might be stubborn is a good way to hold the barrel without marring it, while tapping on the transfer punch with a small hammer. I've used a grinder to take the sharp points off of most of my transfer punches, just to make the process easier. Hope that makes sense- good luck.

ooops, looks like Bob's quicker at typing than I am!!
 
Last edited:

Charles651

Member
Joined
Jan 14, 2016
Messages
3
Location
Bowling Green, KY
Great Suggestion

Thanks, Bob and Lyle! Bob, the plastic part in photo you posted is indeed the part I left out. I actually bought a pen disassembly punch set this week, but had not thought about being able to use one of the punches to remove the center band. I'm going to give this a shot tomorrow! I appreciate the prompt feedback. I'm just getting back into turning pens after several years and look forward to being a member of the IPA because of the helpful members like you guys.
 

SteveG

Member
Joined
Dec 21, 2009
Messages
2,989
Location
Eugene, Oregon 97404
When you tap these components out, use many,many light taps. There is a temptation to keep going harder with the hammer. DO NOT GIVE IN TO THAT TEMPTATION!! Keep tapping with light taps. Using a smaller hammer is a good idea. It will work. Good thing you asked before you broke anything! :)
 

Mr Vic

Member
Joined
Aug 11, 2008
Messages
1,865
Location
Falcon, CO
Just a thought, why knock out the center band? Once you have the finial and clip out you should be able to press the plastic insert through to the center band
 

Charles651

Member
Joined
Jan 14, 2016
Messages
3
Location
Bowling Green, KY
SUCCESS!

Thanks, everyone for your advice. I was able to use the punch set to remove the finial and the the center band. The pen reassembled with no issues. I've attached a couple of photos and solicit your critiques. The finish is ten coats of CA sanded with micromesh to 12,000 grit, then followed by plastic polish. The finish is glossier than it appears in the photos but not so much it looks likes plastic.

There are two things that bug me. One is the "grain match" of the deer antler. The darker portions on the back of the pen are on opposite ends. I tried to match the grain when preparing the blank, but I'm thinking the two pieces of antler were not continous part of the antler because the darker sections of the grain do not match. When I was laying out the ends of the tube and had the two ends with the dark portions together, the grain did not flow, so I intentionaly place them at opposite ends. What are your opinions of the grain?

The other thing that sort of bothers me is the inclusion in the dark section of the bottom tube. I thought I would leave this as a character mark of the antler and didn't have enough thickness left in the blank to turn or sand it completely out. From the photo, do you think it looks like I chipped the antler and didn't fix it?

Again, guys, thanks for all your great advice to an once again pen turning newbie!
 

Attachments

  • image.jpeg
    image.jpeg
    119.9 KB · Views: 146
  • image.jpg
    image.jpg
    280.8 KB · Views: 142

SteveG

Member
Joined
Dec 21, 2009
Messages
2,989
Location
Eugene, Oregon 97404
I am glad you got it all apart and back together with no mishaps. Great work on that. There will be more in the future that require disassembly...it just comes with the territory when turning pens.

As to your questions, the pics have too much washout out for me to see the natural grain int he antler. I am guessing the camera was in "auto" mode and averaged the dark background and the relatively bright pen, and thus overexposed the pen. I am not a "photographer", but do know that there are ways to get the right settings for the camera for the object. The simplest, if you want to use an automatic set camera is to have a background similar to the pen, but still with enough difference to distinguish the pen. The averaging done by the camera will give a better result. The Photo-Guys will have better suggestions.

On your second question, my opinion is that this component set is very "refined" in its design and style. So the barrels should follow that style. I would fill and smooth the antler rather leave in its natural state.

Just another input that you did not ask for: many turners, including myself, will turn the barrels straight (bushing-to-bushing) on this specific component set, thinking that is the best look for it. Just do a search for "Emperor", on SOYP, on IAP. You will see that to be the case, and perhaps see why as you view multiple images. This is all opinion, of course. So putting a curved profile on the Emperor is certainly OK, if that is what you like. :):) That is the cool part here: we get to do what we like!
 

randyrls

Member
Joined
Feb 2, 2006
Messages
4,829
Location
Harrisburg, PA 17112
That is a good save. And the pen looks great!

When grain matching, mark the inside of the center of the nib and cap barrels. Press the nib into the lower barrel, then screw on the cap center band until it is snug (tight) on the nib end. Now match the grain of the cap barrel to the nib barrel and press the cap barrel onto the centerband.
 
Top Bottom