How do I proceed?

Signed-In Members Don't See This Ad

Warren White

Member
Joined
Aug 27, 2014
Messages
497
Location
Livermore, CA
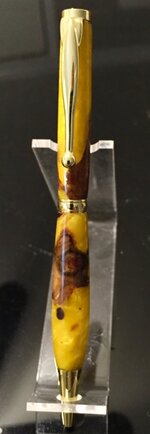
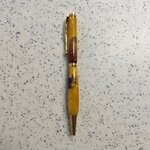
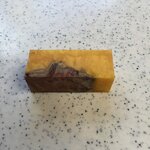
I have a blank that appears to me to be part acrylic and part wood. (Picture below)

I don't know where I got it, but more importantly, I don't know how to finish it. If it is wood, I use CA. If it is acrylic, I go through the MM sanding. What the heck do I do if it is (as it appears to me) a hybrid?

Your help is, as always, most appreciated!
 

Attachments

  • IMG_0279.jpg
    IMG_0279.jpg
    199 KB · Views: 160
Signed-In Members Don't See This Ad

jttheclockman

Member
Joined
Feb 22, 2005
Messages
19,132
Location
NJ, USA.
Finish as you normally do wood. CA right on top of it. It is glue it will stick to the acrylic. Nothing special to do. Good luck.
 

TonyL

Member
Joined
Mar 9, 2014
Messages
8,915
Location
Georgia
I finish those all of the side with CA just as if it was all wood. Here's a Triton that I finished that way.
 

Attachments

  • a triton red burl 2.jpg
    a triton red burl 2.jpg
    228.9 KB · Views: 169

Charlie_W

Member
Joined
Nov 16, 2011
Messages
5,918
Location
Sterling, VA USA
Being that it contains wood, do not wet sand. Dry sand only.
You don't want to introduce moisture and then encapsulate it with CA. It will come back to haunt you later.

Also, I recommend trimming or sanding the corners off before headed to the lathe. Just might save your blank.
 

Warren White

Member
Joined
Aug 27, 2014
Messages
497
Location
Livermore, CA
John, Akula, Tony and Charlie

Thank you all for the quick replies. As I began turning the blank, I came to the same conclusion as John and Tony: It needs to be finished with CA because the wood part of the blank does not appear to have been infused with anything. It is just held in place by the acrylic. I am sure that it is more to it than that, but the wood part appears to be...wood.

As for sharp tools, Akula is right on. Tools and techniques that work for the acrylic part are ineffective on the part that is predominately wood. Charlie, I was lucky in the turning; nothing broke off and it is intact. Turned and dry sanded at this point; I don't wet sand until I have put the CA on, so I am hoping for the best.

What a challenge! I think it will be a very nice pen; not like anything I have done before. I will post a picture later today when I am done.

Thanks again!
 

SteveG

Member
Joined
Dec 21, 2009
Messages
2,988
Location
Eugene, Oregon 97404
Warren, based on the discussion in this thread, I am prompted to add this input. When I turn a blank that contains wood (stabilized or not), I always do this:

When ready to mount the blank for CA finishing (to me, this means the ends have already been squared, and sanded smooth), I place a few drops of THIN CA on one of those little bags the components arrive in. I dip one end of the blank into the thin CA and then immediately sling off excess CA by a quick arm movement, leaving a small trail of CA drops on the floor. (You may prefer to protect the floor if desired, if you try this.) I then switch ends and do the same for the other end. I may do this process once or twice, depending on the wood. I want to be satisfied that the blank end has had CA absorbed into it and is fully sealed.

This process is done when no further work is to be applied to the end of the blank, except perhaps some light finish sanding after the CA finish is applied to the entire blank. By using this quick procedure, I have insured that no moisture will manage to absorb into the blank during wet sanding, nor when the completed pen is in use.

This added step became part of my routine after having a few blanks ruined my moisture seepage. That does not happen any more.:) :)
 

southernclay

Member
Joined
Sep 6, 2013
Messages
2,260
Location
Dawsonville, GA
I dry sanded through 600 then dry micro meshed prior to finishing them. I had one with micro scratches under a CA finish on the acrylic so go through the pads really quick to remove those prior. More recently I wet sanded with either thin CA or wipe on poly, and then went into a regular sanding progression then finished with Pens Plus and worked just fine.
 

Warren White

Member
Joined
Aug 27, 2014
Messages
497
Location
Livermore, CA
To all who responded:

Thank you so much for your excellent suggestions. Warren and Steve, thanks for explaining your procedures also.

Well, I am quite pleased with the results. I used my regular CA finish procedure plus Steve's suggestion for sealing the ends. Basically, two or three coats of thin CA, followed with 6-8 coats of medium CA; then dry sand starting with 220, then 320, then 400 (with the lathe on slow speed, then off for lateral sanding at each grit), clean with DNA. Then wet sand with MM and finish off with a buffing.

The IPhone isn't the best camera, and there isn't any lighting other than on the ceiling, but the pen turned out much to my satisfaction. Your comments and critique are always most welcome.

Thanks again to all!
 

Attachments

  • IMG_0281.jpg
    IMG_0281.jpg
    79.6 KB · Views: 146

Warren White

Member
Joined
Aug 27, 2014
Messages
497
Location
Livermore, CA
UGH!

Don't like that picture much. It looks squat because of the angle.

This one is much better.
 

Attachments

  • IMG_0282.jpg
    IMG_0282.jpg
    239.6 KB · Views: 124
Top Bottom