An experiment with glue and PC

Signed-In Members Don't See This Ad

Dale Allen

Member
Joined
Oct 27, 2012
Messages
1,384
Location
Massillon, OH
I recently had a brass tube move within the cured PC blank and nearly ruined everything.
This has happened before but I did not want to use the PC anyway.
In this case I was able to remove the brass tube without damage to the PC.
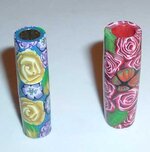
In the first image, the most recent one on the left is after the brass tube was glued back in with 5-min epoxy and the previous one on the right that I never did throw away.
This situation is very much like the blank that EdStreet was working on in his post that reviewed the disassembly of a PC pen.
After the tube was glued back in it turned without issues.

But, I wanted to find a solution to this problem. Somewhere I read that a glue made by Crafter's Pick, called The Ultimate glue, could be used as a bond before the clay was applied. Polymer clay will not bond to the brass tube when it is heat cured. I have also tried a liquid PC before the base layer but that is no different in that the liquid will cure the same as the base layer. What the Ultimate Glue supposedly does is gets re-activated during the heating and glues the PC to the metal.
Unfortunately I cannot find this glue anywhere close to me and being that it is probably not freeze-thaw stable, I do not want to have it shipped to me.

So, I tested the ones I already have in the shop.
The most promising is the 5-minute epoxy, same stuff I used to glue the tube back in.
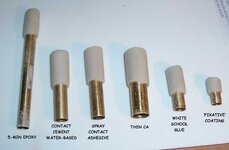
The first picture of test items below are as noted. These were all prepped by using 400 grit sandpaper on the brass tubes and the glues were applied to the tubes. They were all allowed to dry overnight. Then enough clay was applied to about half of the glued area.
These were all baked at about 280 degrees for 30 minutes. None of the exposed glue areas showed signs of being damaged or in any way effected by the heat.
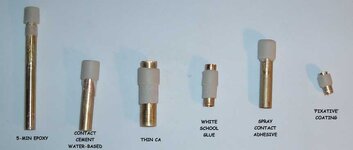
All subjects were then trimmed and put between centers and a portion of the clay was turned off with a ½" wide scraper tool. Yea, I know, that is not the best tool for the job but it is the most aggressive and that is what I wanted for this test. I have first hand experience that a scraper can turn a PC blank to pieces in short order.

Anyway, the last picture shows that the clay either came loose from the tube or shattered away in pieces on all but the one where the epoxy was used.

Eventually I will do this same test on a tube with the Ultimate glue but for now, I will use some epoxy and maybe this problem won't continue to be an issue.
 

Attachments

  • tubes.jpg
    tubes.jpg
    38.5 KB · Views: 325
  • B4_turning.jpg
    B4_turning.jpg
    38.5 KB · Views: 396
  • after_turning.jpg
    after_turning.jpg
    31 KB · Views: 320
Signed-In Members Don't See This Ad
Joined
Dec 23, 2012
Messages
2
Location
Eastern Kentucky
I build fishing tods or somtimes repair the guides, I have found if I use 5 mimute epoxy to install the tip I can heat it with a sording gun it will come off and I can replace the tip, but if I use 30 minute or 1 hour epoxy there is no getting it off with heat. It may be the 5 minute epoxy may break down from heat.
 

Dale Allen

Member
Joined
Oct 27, 2012
Messages
1,384
Location
Massillon, OH
Larry, that may be the case when the glue is being heated. If so, maybe that is how it is re-activated. It seems to be very hard now that it is again cooled.
Time will tell if it will cause any problems such as allowing the clay to sag or pull away from the tube while being heated. I have not yet done an entire blank with his method.
 

edstreet

Member
Joined
Aug 12, 2007
Messages
3,684
Location
No longer confused....
I don't really see to big of a problem with being able to change the tubes out. There are many cases where the tube can become damaged and needs to be replaced. However if the clay is thick enough it should be no problem replacing the tube as I did in the repair post I made :) I have not tried this with a sierra, yet, and there may be some issues with that due to thickness on the ends.

I use E120-HP for my all purpose go-to epoxy which is some $$ and very high end industrial epoxy. The PC will break long before the glue bond. My other choice to use was 324 speed bonder and I know that would never come loose.

The knife testing that was performed a few years back a 1" wide strip of metal was held in a vise and another section was epoxied to that in a 90 degree angle. From the end of the strip a bucket was attached and weight was added to the bucket to see how much weight it would take to break the bond. With E120HP and 324 speedbond it took somewhere around 100 pounds in the bucket and out performed all others in that test, E120 was a very close second.

The 5 minute epoxy's was among the weakest contenders of all the epoxy's used and also the testing showed hand down that loctite is perhaps the best brand to use for strength and durability.

Some words of wisdom to follow also came out of the great epoxy testing.

The second learning:
Surface preparation is more important to a successful glue up than is the adhesive its self. Please don't underestimate surface preparation. A mediocre adhesive with an excellent surface preparation will out perform an excellent adhesive with a poor preparation by a large margin.

Third learning:
Read up on your adhesive. With the Internet, there really isn't a reason you can't completely understand what you are working with.

Eighth learning:
Industrial adhesives are generally better than adhesives packaged for retail sales to the general public. There are exceptions of course but it generally holds true.


Heat is the enemy of all adhesives. Most will break down when you reach the 350F temp mark, some will go higher and many, i.e. JB weld, breaks down easily in the dish washer and boiling temps. Oh and the devcon 5 minute epoxy and others fails easily in the 150-175F temp range.

Also remember, all epoxy is toxic, keep it off your skin.
 
Last edited:
Joined
Aug 7, 2009
Messages
700
Location
Jamestown, NC
I apply a thin layer of the crafters choice glue to all of my tubes before covering with clay. I have never tested if it actually helps, but I haven't had one break loose since I have been doing it. Not wanting to mess with a good thing I continue to use it. Before applying the glue to the brass I typically rough up the tube with a course file. The file tends to make deeper gashes in the tube which has worked better for me with clay than using course sandpaper.

Some glues will react with the polymers in the clay so do plenty of research. The reaction is slower with some glues than others, but there are plenty of PC sights with good info on glue. The same can be said for clear coats applied once the piece is cured.
 

edstreet

Member
Joined
Aug 12, 2007
Messages
3,684
Location
No longer confused....
is that the E600 glue?

I apply a thin layer of the crafters choice glue to all of my tubes before covering with clay. I have never tested if it actually helps, but I haven't had one break loose since I have been doing it. Not wanting to mess with a good thing I continue to use it. Before applying the glue to the brass I typically rough up the tube with a course file. The file tends to make deeper gashes in the tube which has worked better for me with clay than using course sandpaper.

Some glues will react with the polymers in the clay so do plenty of research. The reaction is slower with some glues than others, but there are plenty of PC sights with good info on glue. The same can be said for clear coats applied once the piece is cured.
 

Dale Allen

Member
Joined
Oct 27, 2012
Messages
1,384
Location
Massillon, OH
Keith, exactly which glue do you use? There is a 'Crafter's Choice brand and there is also a 'Crafter's Pick' brand.
Also, do you apply the glue to the rough tube and allow it to dry before applying the poly clay. Seems to me that is a better choice so that it does not have a chance to react to the clay.

The issue here is not so much the strength of the glue as it is finding a glue that will make a bond between the brass tube and the 'cured' polymer clay. Such a condition needs to take place while it is in the heating and cool down process. I doubt ANY glue has ever been designed with this process in mind. Most of the glues I used in this test did not degrade but also did not create the intended bond.

I cannot image any case where the tube of a pen would be damaged and not the covering, be it wood, clay or otherwise. Damage to the tube is typically the result of severe damage that ruins the entire pen.
It is very difficult, make that impossible, to turn or sand the surface of the clay blank when it is spinning on the tube and you cannot put pressure on the ends of the clay and expect it to not move as that will crush it end-to-end.
Gluing in the brass tube, if you can successfully remove it, is not the intended or preferred scenario!
 
Joined
Aug 7, 2009
Messages
700
Location
Jamestown, NC
I went out and looked and the one I use is the crafters pick "the ultimate". Typically I make 10-12 blanks at a time. I rough up the tubes, apply the glue, and then condition and get the clay ready. The glue is dry by the time I start covering with clay. If it's still wet I find the tubes to be a bit slippery and the chances of developing air pockets increases (bad news). I have had several blanks that just didn't turn out right after baking and it's extremely hard to cut the clay off to salvage the tube.
 

Dale Allen

Member
Joined
Oct 27, 2012
Messages
1,384
Location
Massillon, OH
Keith, that is good information. I appreciate your checking. I'm going to have to get me some of that glue.
More questions though, if I may.
How long does the glue take to dry under normal conditions?
Also, you said it is hard to cut the clay off of tubes when it does not turn out right. Can you mount the tube on the lathe and turn the clay off? Is it stuck to the tube well enough to do that. I know when I tried that on the ones that did not adhere to the tube the clay would just stop spinning and the tube spun inside of it. Ended up using some CA to try and glue it on long enough to turn it off. That sounds silly doesn't it!:tongue:
 
Joined
Aug 7, 2009
Messages
700
Location
Jamestown, NC
The drying time is pretty short. usually within 5+ minutes it's all clear. when the Crafters Pick glue dries it has a "gel like" texture to it. As for turning it off I can honestly say I never tried that. You probably could, but I typically just grab a utility knife and go to town on it. I started making the sports blanks before I had a lathe, so I guess old habits die hard:biggrin:.
 

Dale Allen

Member
Joined
Oct 27, 2012
Messages
1,384
Location
Massillon, OH
Is that the boiling point before it is allowed to dry? It is water based so that temp would make sense in that regard.
Is there a specification of how it reacts to heat 'after' it is dry?
 

edstreet

Member
Joined
Aug 12, 2007
Messages
3,684
Location
No longer confused....
Is that the boiling point before it is allowed to dry?
Is there a specification of how it reacts to heat 'after' it is dry?

Sadly it does not say which form but still it does show to be water based 'white glue'

This glue in question is a PVA type, polyvinyl acetate. Classically neither water nor heat resistant.

Polyvinyl acetate is a component of a widely used glue type, commonly referred to as wood glue, white glue, carpenter's glue, school glue, Elmer's glue (in the US), or PVA glue.
 

pshib

Member
Joined
Oct 20, 2012
Messages
122
Location
Dallas
In my experience scuffing the tube helps the PC hold to to tube. Also if it does break loose a drop of CA on the tube while it's partially out of the blank tends to be enough to hold it. I have yet to ruin a blank doing it this way. I have broken blanks by not not waxing the bushing while doing a CA finish.
 

Dale Allen

Member
Joined
Oct 27, 2012
Messages
1,384
Location
Massillon, OH
Sanding or scuffing the tube helps, but only slightly. The problem seems to be that the clay shrinks slightly during curing. It cannot be much but it seems to be enough to allow the tube to have less contact with the clay.
Also, the clay is not really hard when cured. It has some 'flex' to it that creates another problem. It flexes when you try to turn it. That action is such that the clay covering is being pushed in the opposite direction of the tube, which has all the force of the lathe behind it. Even sanding the blank does this but not as aggressively. That is why many prefer to sand down the blank rather than use tools. I prefer the skew as it is less agressive.
Image if you waxed the inside of a wood blank after drilling it and then glued in the tube. The wax would create a barrier between the wood and glue and prevent the bond. You could probably turn it but it would have a very real chance of just spinning on the tube.
The goal here is to find an adhesive that does something that probably few glues were designed to do. React to the heat and become glue again. Hyde glue and some old fashioned 'melt it to use it' types of glue react to heat in a similar way but I'm not sure they can tale 300 degrees.
Knowing the melting point or flash point of a glue in it's 'bottled' form is of little use because in this case the glue is being allowed to dry or cure in a layer on the tube prior to the application of the clay.
Then when it is heated we are looking for that 'magic' to happen that makes it a glue again and bonds the cured clay to the brass.
This is more like trial-and-error than science.
 

pshib

Member
Joined
Oct 20, 2012
Messages
122
Location
Dallas
When I'm doing clay I use the bushing to get close to finished size and just sand after baking. If the clay breakes loose I pull the tube partially out and put a small drop on it and push it back in.
 
Joined
Jan 4, 2013
Messages
403
Location
Chesapeake, VA
What brands of clay do you use Dale? 280 degrees is okay for Premo and Kato but is too hot for new Fimo. New Fimo clay baking temperature of 230† F / 110†C.
 

Dale Allen

Member
Joined
Oct 27, 2012
Messages
1,384
Location
Massillon, OH
Tina, I mostly use Premo. I have 1 or 2 Fimo soft, which I don't like.
Have not tried Kato yet but may soon.
I am baking at a slightly higher temp than before as I think my thermometer is about 15 degrees off. I have another batch ready for tomorrow so I'll see how they turn out.
Early on I tried one cake of regular Fimo and it was so hard to work that I threw out about half of it. It may have been old, not sure
 
Joined
Jan 4, 2013
Messages
403
Location
Chesapeake, VA
Tina, I mostly use Premo. I have 1 or 2 Fimo soft, which I don't like.
Have not tried Kato yet but may soon.
I am baking at a slightly higher temp than before as I think my thermometer is about 15 degrees off. I have another batch ready for tomorrow so I'll see how they turn out.
Early on I tried one cake of regular Fimo and it was so hard to work that I threw out about half of it. It may have been old, not sure

If you look in the polymer clay info by Garie Sim in the IAP library...he has done some glue testing (bottom of the page). He has been testing the different PC brands for several years.
 
Joined
Jan 4, 2013
Messages
403
Location
Chesapeake, VA
[QUOTE="Dale
Early on I tried one cake of regular Fimo and it was so hard to work that I threw out about half of it. It may have been old, not sure[/QUOTE]

Most PC reverts back to its natural ingredient states if it sits around long enough but it can be used again if properly reconditioned. There are products you can buy for clay conditioning...some people add baby oil.
 
Top Bottom