Drilling and polishing problems

Signed-In Members Don't See This Ad

micklen

Member
Joined
Apr 6, 2008
Messages
13
Location
Northampton, United Kingdom.
Hi all

I hope you can help me out here

I am new to turning and pen making but am making good progression

Now, I am experiencing 2 problems. Firstly I am getting occasional splitting at the bottom of thinner hardwood blanks such as Snakewood and Kingwood. I am using a 7mm Triton woodbit http://www.woodworkingcentreshop.co.uk/acatalog/Triton_Wood_Bits.html
It seems to get very hot although I am turning at quite a slow speed and as I say occasionally blows out the bottom of very hard wood.
Do I have the correct drill bit??? Any further tips please

Second I am occasionally getting almost invisible marks in the pen finish. They are only really visible in close up photography
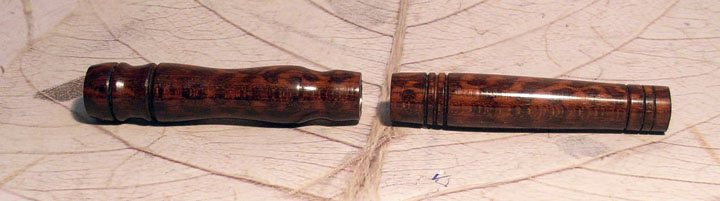
Here is an example
You can see the faint marks here on this olivewood slimline
I THOUGHT I had got the wood very smooth using 240 through to 1200 and finishing with a Nyweb ultrafine cloth
Is it marks in the wood or is it a polishing problem
I used 4 or 5 layers of Chestnut Friction polish
If it is the wood HOW can I make sure the wood is mirror smooth

ANY hints and tips would be gratefully received

Mick
 
Signed-In Members Don't See This Ad

aurrida

Member
Joined
Jan 12, 2008
Messages
139
Location
Germany.
drilling:

1. the brad should be no problem depending on its quality. the obvious is make sure that it is sharp.
2. support the exit point with scrap wood.
3. take it easy, on some wood i drill very slowly, 1 or 2 mm at a time and take frequent rest to ensure no heat build up.

scratches:

see russ fairfields tutorial on sanding. excellent. sorry dont have link

a quick summary from memory so i am sure its not perfect.

1. sand along the grain after every grade of sanding material and dont skip any grades. certainly sanding down with the grain to 1200 is more than efficient.
2. make sure your using good quality paper
3. take off high points on sanding paper by rubbing it on a piece of steel.
4. try a very light touch
5. make sure circular deep scratch marks are gone before changing grades.
6. forgot to add, clean dust off between grades

i now only sand with the grain by hand after initially sanding down to 280 on the lathe.
 

micklen

Member
Joined
Apr 6, 2008
Messages
13
Location
Northampton, United Kingdom.
Thank you very much for the replies so far

I tried drilling a bit slower then at the last fraction of an inch of blank I raised it up in the vice so the bottom was supported BY the vice in the V and then went through gently and that seems to be AN</u> answer

Now, the finishing

I have just turned this olivewood slimline, sanded with 120, 240 down to 1200, going along the blank with each grade after turning, and then nyweb ultra fine and put on a little teak oil to remove the dust
I took the pic with flash to try and pick out any lines
I know how difficult it is with a pic but does it look good enough??


Thanks so much :):)

Mick
 
Joined
May 12, 2006
Messages
217
Location
Nashua, NH, USA.
When you say that you were moving the blank up in the vise so that the bottom was supported by the vise, you are actually doing very little to prevent blow-out. You need to have a sacrificial piece of wood pressed up against the end (bottom) of the blank, so that when you drill through the bottom of the blank you are immediately drilling into the backing wood. That way the bottom of the blank is supported when the drill breaks through. This is the primary way to preventative blown-out.
 

fafow

Member
Joined
Dec 27, 2007
Messages
159
Location
Los Angeles, CA, USA.
Mick,

I don't see any scratches on the latest picture. You ask if it is good enough. IMHO "good enough" is whatever you are comfortable with. If scratches are not easily seen, then the majority of people receiving your pens will never notice the scratches. To them the beauty of the wood and the fact that you made it are all they will see. I recently made one pen that I wasn't really thrilled with and sold it to a friend for her son. I pointed out the reasons why I was selling it for a reduced price and they didn't matter to her at all. If I had known that, I would have sold it to her for full price. As you make more pens you will get better at removing all (or almost all) scratches, making sure the wood perfectly meets the fittings, etc.

In my work area I have a few fluorescent lights and one or two "regular" incandescent lights. One of those is on a swingarm with a big magnifying lens to look through. I use that to check for scratches between sanding grits. I found out through some reading recently that fluorescent lighting does not show scratches but the incandescent light does a much better job of that. Also, if the scratches are showing up only on the finish, you might want to try wet sanding on the finish.
 

Rifleman1776

Member
Joined
Dec 18, 2004
Messages
7,330
Location
Mountain Home, Arkansas, USA.
micklen said, in part, "I am getting occasional splitting at the bottom of thinner hardwood blanks such as Snakewood and Kingwood."
The comment about "thinner" blanks is puzzling. Do you mean very large holes, such as for Gents, in small blanks?
You should know that the Snakewood is just looking for an excuse to split. Looking at it cross-eyed, drilling on Sundays or during full moons is enough to make it split. Really. I would suggest that your first step would be to never use Snakewood again, or Pink Ivory or Ebony. Kingwood is usually trouble free. Suggestions given are good. Cut over length, drill to depth needed and cut off bottom, or support bottom. I have blow-outs with synthetics. But that is only because synthetics know I don't like them. Really.
Finishing suggestions have been given that will help. But, understand, finishing is tricky and we all are constantly working at improving our techniques. You will get there.
 

micklen

Member
Joined
Apr 6, 2008
Messages
13
Location
Northampton, United Kingdom.
You need to have a sacrificial piece of wood pressed up against the end (bottom) of the blank, so that when you drill through the bottom of the blank you are immediately drilling into the backing wood.
Ah, I understand Rincewind. Thanks

The comment about "thinner" blanks is puzzling. Do you mean very large holes, such as for Gents, in small blanks?
No Rifleman, The particular pair of Snakewood blanks I have here are only around 13mm which is very small even for a 7mm tube
Well it is to me anyway [xx(]

As to using snakewood I am afraid when people saw the key ring I had made from the good half of the blank they all wanted pens and I have only been doing this 4 days [:p]
I have ordered some 3/4" snakewood blanks [8D]

Mick
 

aurrida

Member
Joined
Jan 12, 2008
Messages
139
Location
Germany.
There are some woods you should treat as a long term project, snakewood!

after you are sure it has stabalised, then drill slowly over hours rather than minutes then leave it for another month.

glue in your tube and turn it to within 2 mm of finished dimensions, again slowly over a day then leave for another month.

turn and sand to dimensions, leave for another month before filling in cracks and finishing and leave for another month before assembling pen.

And, a tip, sand down the inside of the tube so less force is needed on assembly, preferably push fit and glue in place

after all this effort you might be lucky!
 

micklen

Member
Joined
Apr 6, 2008
Messages
13
Location
Northampton, United Kingdom.
There are some woods you should treat as a long term project, snakewood!

after you are sure it has stabalised, then drill slowly over hours rather than minutes then leave it for another month.

glue in your tube and turn it to within 2 mm of finished dimensions, again slowly over a day then leave for another month.

turn and sand to dimensions, leave for another month before filling in cracks and finishing and leave for another month before assembling pen.

And, a tip, sand down the inside of the tube so less force is needed on assembly, preferably push fit and glue in place

after all this effort you might be lucky!
Oh dear [:I]

Mick
 

Dan_F

Member
Joined
Nov 8, 2007
Messages
959
Location
Spokane, WA, USA.
Originally posted by micklen

Hi all

I hope you can help me out here

I am turning at quite a slow speed and as I say occasionally blows out the bottom of very hard wood.
Any further tips please

Mick

If you are drilling at any less than 2000 RPM, it's too slow. The object is to generate as little heat as possible. This is better accomplished by faster drill speed, but smaller bites.

Dan
 

Rifleman1776

Member
Joined
Dec 18, 2004
Messages
7,330
Location
Mountain Home, Arkansas, USA.
Originally posted by Aderhammer

2000 is too fast imho, faster spinning equals more heat. I stay in about the 950 range, fast enough to eject chips but not too fast.

Agreed, faster means more heat. But, there is a mind set among some that disputes that. I drill at about 550 rpm.
 

Aderhammer

Member
Joined
Dec 4, 2007
Messages
541
Location
Allentown, Pennsylvania, USA.
Originally posted by Rifleman1776

Originally posted by Aderhammer

2000 is too fast imho, faster spinning equals more heat. I stay in about the 950 range, fast enough to eject chips but not too fast.

Agreed, faster means more heat. But, there is a mind set among some that disputes that. I drill at about 550 rpm.
I'm going off personal experience too. Blew out alot of acryllics and woods at the 2300 rpm range, now i have no problem.
 

micklen

Member
Joined
Apr 6, 2008
Messages
13
Location
Northampton, United Kingdom.

rherrell

Member
Joined
Aug 22, 2006
Messages
6,334
Location
Pilot Mountain, NC
I'm with Frank on this one. I drill at 550 and back the drill out every 1/4". Near the end every 1/8". Since I started this technique I can't remember the last time I had a blowout. Always keep some scrap wood TIGHT underneath the blank to help prevent blowout. Also, FOR ME the brad points are too aggressive so I stick to the standard 118 degree bits.
 
Top Bottom