decals on acrylic

Signed-In Members Don't See This Ad

rtodasr

Member
Joined
Apr 29, 2007
Messages
15
Location
Toledo, Ohio, USA.
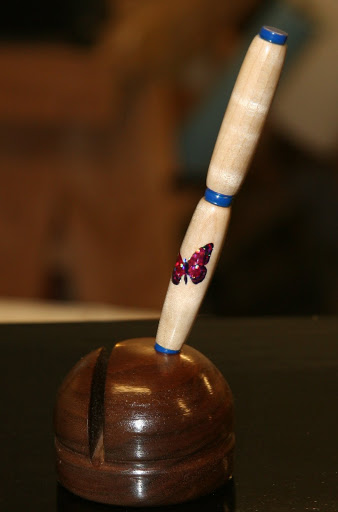
I am thinking about trying to put a decal on an acrylic pen and would like suggestions on how to protect it from coming off. The decal is one that you apply with water and is removable with alcohol. I've had suggestions of clear fingernail polish, spray laquer with an airbrush, just plain canned spray laquer with the acrylic taped off... I wetsand the acrylic with mm to 12000 (love the shine!) then apply the decal. I've tried just beall buff with carnauba wax but you can still feel the decal.

Any suggestions before committing this to a kit???
 
Signed-In Members Don't See This Ad

ribanett

Member
Joined
Dec 15, 2007
Messages
381
Location
Kenner, LA, USA.
It's Easy But Takes A Little Time

Rick

Here is how I do it, I have done well over 200 pens with water-slide decals.

Sand down to 12k MM

Apply 3 costs of CA thin and sand with 12k MM. This is to be sure the acrylic is smooth. I have found that ANY rough surface will show thru the decal.

Apply the decal, making sure the edge is in contact with the surface all around the decal and no air bubbles under the decal.

Allow the decal to dry. I put them in my hotbox for a least a hour.

Apply 5 coats of CA thin and allow to fully cure.

Sand lightly with 12k MM

Look at the edge using a low-angle light, if you can see the edge, apply one or two coats of CA med, sand with 12k MM and look at the edge again. Repeat this process until the edge is gone.

After the edge is gone I apply 3 coats of CA med and polish.

Done!

This works for me, may not work for you.
 

jttheclockman

Member
Joined
Feb 22, 2005
Messages
19,132
Location
NJ, USA.
Rick

Here is how I do it, I have done well over 200 pens with water-slide decals.

Sand down to 12k MM

Apply 3 costs of CA thin and sand with 12k MM. This is to be sure the acrylic is smooth. I have found that ANY rough surface will show thru the decal.

Apply the decal, making sure the edge is in contact with the surface all around the decal and no air bubbles under the decal.

Allow the decal to dry. I put them in my hotbox for a least a hour.

Apply 5 coats of CA thin and allow to fully cure.

Sand lightly with 12k MM

Look at the edge using a low-angle light, if you can see the edge, apply one or two coats of CA med, sand with 12k MM and look at the edge again. Repeat this process until the edge is gone.

After the edge is gone I apply 3 coats of CA med and polish.

Done!

This works for me, may not work for you.


Larry

Thanks for posting your how-tos. Question for you, do you over turn the acrylic to make up for that many layers of CA??? If so by how much??? Have you ever had the CA chip off the acrylic.??? Thanks for the reply.
 

ribanett

Member
Joined
Dec 15, 2007
Messages
381
Location
Kenner, LA, USA.
Thanks for posting your how-tos. Question for you, do you over turn the acrylic to make up for that many layers of CA??? If so by how much??? Have you ever had the CA chip off the acrylic.??? Thanks for the reply.

John

Sorry I forgot a step. I over-turn two or three thou to allow for the CA.

I had a few pens come back with chipped CA when I was using accelerator. I have stopped using it and no none have been returned.

Be sure to apply CA thin to the end of the barrel to seal the tube to the acrylic.
 

sbwertz

Member
Joined
May 11, 2010
Messages
3,654
Location
Phoenix, AZ
IMG_2295.JPG
This is on wood, and it isn't a decal...it is just one of those "laser stickers" that is sort of holographic. I put on 3 coats of CA/BLO, then wiped it down with a little DNA to remove any traces of BLO. I stuck on the sticker and applied a coat of thin CA, and misted it lightly with accelerator. Then I put on more coats of CA/BLO until I could no longer feel the raised sticker. They are pretty thick stickers so it took about 12 coats of medium CA/BLO.

Turned out nice though. This is on curly maple. I also did a rose on Lauan.
 
Last edited:

AceMrFixIt

Member
Joined
Oct 1, 2008
Messages
625
Location
Jacksonville, FL
Rick

Here is how I do it, I have done well over 200 pens with water-slide decals.

Sand down to 12k MM

Apply 3 costs of CA thin and sand with 12k MM. This is to be sure the acrylic is smooth. I have found that ANY rough surface will show thru the decal.

Apply the decal, making sure the edge is in contact with the surface all around the decal and no air bubbles under the decal.

Allow the decal to dry. I put them in my hotbox for a least a hour.

Apply 5 coats of CA thin and allow to fully cure.

Sand lightly with 12k MM

Look at the edge using a low-angle light, if you can see the edge, apply one or two coats of CA med, sand with 12k MM and look at the edge again. Repeat this process until the edge is gone.

After the edge is gone I apply 3 coats of CA med and polish.

Done!

This works for me, may not work for you.

Thats about how I do it too. My first Grandchild.
 

Attachments

  • 100_0562.jpg
    100_0562.jpg
    27.2 KB · Views: 345

Seer

Member
Joined
Jan 3, 2009
Messages
1,769
Location
Glendale,Arizona
Ok here is my question if I may? When you print the labels in your inkjet do you have to print the whole page and if not when you reinsert the paper after just getting one lable off do you have any problems with feed or jamming?
 

jasonbowman

Member
Joined
Jun 20, 2007
Messages
87
Location
MARIETTA, GA, USA.
Seer: That depends. If you are peeling the label off the sheet then no jam issues. If you are trimming the label on the sheet prior to removal, you have to tape a "patch" (another piece of paper cut just over sized of the hole and taped on the feed side and the sides) over the hole you cut. When I label tubes to cast, I trim the label to the exact size of the tube (length and circumference) with a no. 11 scalpel blade (which leaves a hole in my label sheet). I then tape a patch in place the next time I print a label. Haven't messed up a sheet of labels since...
 

gt64155

Member
Joined
Oct 20, 2008
Messages
78
Location
Davenport Iowa
decals on pens

I just blindly stumbled across the thread. If I understand everything correctly, so can buy some sort of clear label material that you can use in a ink jet printer and make you own decals. What is the material that you guys buy? This opens up a whole new dimension to pen making.

Thanks,
Bill
 

Gulfcoast

Member
Joined
Apr 24, 2004
Messages
264
Location
Florida, USA.
--- be also advised that there are also two types of ink jet decal paper, (also available in the laser paper) Clear and White. The White decal paper is generally used where there is a dark background that may hide the details of the decal picture. The Clear decal paper is used generally on light colored materials that will not interfere with the decal picture detail.

I've attached a picture of two decal pens, one using the Clear decal paper, and one using the White decal paper. I know the picture is not the greatest, however, for demonstration I think you can see the difference.

Joe
 

Attachments

  • DogsCombined (Large).jpg
    DogsCombined (Large).jpg
    21.7 KB · Views: 116
Top Bottom