Can't seem to have a successful pen

Signed-In Members Don't See This Ad

BobGast

Member
Joined
Nov 27, 2016
Messages
79
Location
Round Lake Beach, Illinois
Just in November I bought the largest Harbor Freight lathe. Prior to that I haven't turned anything ever in my life. I'm 65 and just retired last July 29, 2016. Prior to this I have had a fountain pen addiction so when I discovered that I can make pens I was ecstatic. Here is my latest effort. It is a slimline with Cocobolo wood. The refill will not extend through the nib so I can't write with it and when I tried to press the cap and clip in, it cracked.
 

Attachments

  • use this one.jpg
    use this one.jpg
    196.2 KB · Views: 297
  • use this whole pen picture.jpg
    use this whole pen picture.jpg
    264.5 KB · Views: 318
Signed-In Members Don't See This Ad

Skie_M

Member
Joined
Aug 7, 2015
Messages
2,737
Location
Lawton, Ok
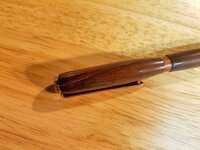
1 ... the slimline's transmission was not pressed in far enough to extend out of the tip of the nib. Take the back of the pen off, REMOVE THE REFILL (it can't take the pressure of pressing), and press the transmission in further. Take it in very small increments, as you don't want to press it in too far.


2 ... You forgot to ream the brass tube to remove any and all glue obstructing the opening before pressing the finial and clip assembly. You should go ahead and disassemble the back of the pen, clean the dried/cured glue out of the barrel, and then you could press your parts again. The crack will possibly disappear when you disassemble it, as it may no longer be under pressure from inside ... you can reinforce the wood with some CA (superglue) to try to ensure that the crack will not spread again and be visible. I suggest that you may be able to "hide" any visible crack or seam by orienting the clip to cover that section of the pen barrel.


Cleaning/reaming each end of each barrel before any assembly or even mounting on the lathe can help with so many issues ... turning out of round, binding on the mechanism, too much pressure when pressing parts, causing finish or barrel itself to crack or fail, ect. It's an important part to remember! :)


Also, if you closely examine the transmission of the pen kit (and the instructions for assembly), it will give you estimated numbers for how far to push the transmission in ... but the best way is to just press it in a little, and check with the refill to see how far you still have to go. Turn it all the way to extend it as far as it can go, when checking. Always remove it before you try to press it in again. You'll learn from experience soon that you can typically press it in to a certain point (I generally press it till the brass part is inside the tube completely) and then start checking to see how much more you need to go.


Both issues are merely a matter of experience, which you are gaining quickly ... good luck, and welcome to your new addiction. For additional assistance in how to get in over your head, please click the link in my signature!


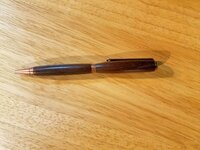
(edit - bushings) I also noticed, in examining the pics closely, that your barrels are a bit proud of the bushings ... typically you want to at least get close to the bushings, with your lathe chisels, and then take it down the rest of the way with sandpaper. Try not to actually hit the bushings or sand them directly too much, as that can change their size and then you'ld need to replace them. Good Luck! :)
 
Last edited:

thewishman

Member
Joined
Mar 9, 2006
Messages
8,182
Location
Reynoldsburg, Ohio, USA.
I know how frustrating that can be.

Two questions:

If you remove the refill, does the tip fit through the nib from the outside in?
(If it does fit through, you may need to push the transmission in a bit further. If it doesn't fit through, take a small round file and clean out the nib.)

How are you pressing the parts together?
(When I started, i used a hand clamp from HF - it was difficult to keep the parts lined up and straight. I later got n arbor press from HF and it made the assembly much easier. A pen press makes it even better.)

If your assembly is good, it may be there is still some glue in the tubes, that would cause cracking , too.

Slimlines are very hard pens to make, the slightest thing can cause the barrels to crack. A Sierra or Wall Street kit is much, much easier.
 

JimB

Member
Joined
Mar 18, 2008
Messages
4,682
Location
West Henrietta, NY, USA.
If the transmission (the twist mechanism) works then most likely the reason the tip does not extend far enough is because you didn't press in the transmission far enough during assembly.

As far as the cracking issue goes that is most likely caused by there being glue inside the tube from when you glued it in. If you only did a visual inspection there is a good chance you didn't see the glue. Even the smallest amount inside the tube will cause issues. Pressing in parts when there is glue in the tube cause pressure on the tubes and your wood causing it to crack. I use a small round file or sandpaper to clean out the inside of the tubes. This issue can also make it difficult to get the transmission in correctly.

Don't worry, we have all been through what you are experiencing.
 

duncsuss

Member
Joined
Jun 29, 2012
Messages
2,160
Location
Wilmington, MA
For disassembly of pressed-in pen components, I find this set of transfer punches from HF to be perfect --

LINK

Slide the largest one that fits into the brass tube, hold the barrel using a piece of "grippy rubber" (from the supermarket, they sell them as an aid for getting the lids off food jars), and tap gently on the punch with a sledge hammer (such as THIS ONE). The extra mass of the hammer means you don't have to take wild swings at it, just gentle taps work.
 

campzeke

Member
Joined
Jun 28, 2015
Messages
577
Location
Tampa, FL
You have a Woodcraft store in Woodridge. Check with them to see it they offer a basic pen turning class or if they know of any woodturning clubs in your area. I am sure you could find someone in your area that will help you with some basics and get you on your way to making some beautiful pens.
 

KenV

Member
Joined
Oct 28, 2005
Messages
4,720
Location
Juneau, Alaska.
Bob -- been there, and learned some from the errors.

Love the line -- you don't know what you don't know. It fits well when beginning.

Do figure out why things did not work, so you have some knowing and do not repeat the same actions that have undesired outcomes.

Have also turned wood off tubes and started over.
 

duncsuss

Member
Joined
Jun 29, 2012
Messages
2,160
Location
Wilmington, MA
... now I will attempt to solve the problems with this pen.

If you knock out the components from the tube ends, inspect them for glue stuck to the inside walls of the tubes.

I find if I take a strip of 220 grit sandpaper, roll it into a "cigarette" just a bit smaller than the tube opening, and give a couple of twists, it highlights any glue remnants (the brass becomes shiny, the glue becomes powdery). Then I use a thin-blade utility knife to scrape away the gunk. That's by far the most common cause of my blanks splitting when I insert the components. (Misalignment is the second most common reason for me.)
 

MTViper

Member
Joined
Jul 22, 2009
Messages
734
Location
Clyde, Texas
Bob,

For future reference. If you're making a pen that uses a Cross-style refill, press the transmission into the lower barrel until the top of the transmission to the bottom of the nib is 10.1 cm. Should get perfect tip extension every time.

Steve
 

magpens

Member
Joined
Feb 2, 2011
Messages
15,911
Location
Canada
Cocobolo is one of the crackiest woods, in my experience ... especially on a slimline.

Slimline is one of the most difficult kits to "get everything right", partly because of the thinness of blank material near the bushings.

My suggestion for an easy pen to make with a reasonably thick wall material and straight sides is the Exemplar (Professor) kit from ExoticBlanks.com ... they probably have the best price with readily available instructions on their website.
This is a satisfying pen to make.
 
Last edited:
Top Bottom