CA finishing

Signed-In Members Don't See This Ad

jttheclockman

Member
Joined
Feb 22, 2005
Messages
19,148
Location
NJ, USA.
Was in the shop practicing my CA finish on some blanks and what I did was take them off the mandrel and put them between centers using a couple of center points. My problem came when I had to take them off and there was a build up of glue on the sides. I ran my pen mill through them but it chiped some glue off the face edges. So that practice is not going to work. What is your method of applying CA and not having to run into this problem??? By the way I was impressed with the finish though. I am going to try some lacquer next and compare. Then some poly. Thanks for the replys.
 
Signed-In Members Don't See This Ad

Rudy Vey

Member
Joined
Jan 26, 2004
Messages
2,032
Location
South Plainfield, NJ, USA.
I apply it with the bushings on - I do turn mandrel-less. If the bushings ever sticking to the blank, they can be "broken" off easily - just wiggle the bushings and they break free. The few attempts when I was trying to use a pen mill on finished blanks always resulted in disasters. My recommendation would be using a craft knife and very carefully cut away what had built up.
 

PaulDoug

Member
Joined
Mar 2, 2008
Messages
3,488
Location
Benton City, WA.
I've cleaned up the ends two ways with success. But before I take it off the mandril, I use a parting tool to turn the glue off of the bushing and as close to the blank as I dare. Once the blank is off I clean up the ends as you said you did using the pen mill, turned by hand, or I put the blank in my collet chuck and clean up using the parting tool and the lathe turning pretty slow. This way I can also indent the in of the blank a little for a better fit to the nib, centerband or finial which ever end it is.
 

Rick_G

Member
Joined
Nov 30, 2007
Messages
1,994
Location
Bothwell, Ontario, Canada.
I use some 220 grit sandpaper on a flat surface and sand the glue build up on the ends. Seems to work pretty good and I don't get any chips. I rotate the blank in my hand frequently just in case I am applying more pressure to one side as I sand to even things out.
 

jrc

Member
Joined
Jun 1, 2004
Messages
647
Location
Bristol, Vermont, USA.
I use a skew to cut between the bushing and wood. I took a short piece of mandrel glued a bushing on it, ruffed it up with edge of a file just below the bushing where the brass tube fits snug. I put it in my drill press, slide the barrel on the short mandrill turn it on and take a piece of sandpaper placed on a piece of plexi press up and sand the rough edges. It gives the ends of the barrel a nice smooth clean look and no more chipping of the ca finish.
 

Attachments

  • 1.JPG
    1.JPG
    76.2 KB · Views: 127
  • 2.JPG
    2.JPG
    59 KB · Views: 123
  • 3.JPG
    3.JPG
    59.8 KB · Views: 122

leehljp

Member Liaison
Joined
Feb 6, 2005
Messages
9,329
Location
Tunica, Mississippi,
For another method - I use a sharp razor knife (box opener) to delicately cut the glue off of the ends. I make a cut and rotate the blank into the blade. Then I use sandpaper or Lee Thomas mill sander to smooth everything perfectly.

Early on in pen turning, I used a lot of oily blanks (ebonies and BOW). Even using a parting tool to clean the glue off of the bushing as close to the blank as I dared, that last little snap to break the bushing free would often cause a slight lift of the CA - on 1 in 2, or 1 in 3 oily blanked pens. I tried cutting small rings of nonstick material and wax, but the problem on oily blanks always centered on the little "snap" causing a lift. It wasn't a matter of it sticking to the blank but the "snap" in the breaking away from whatever was there. I still have some left over "rings" in a box. Waxing did help prevent bushings sticking hard but the "snap" still caused CA lifting on the oily blanks.

This is what drove me to try the mandrel-less method. But I still take the bushings off when finishing with CA.

I did not have the problem with non-oily blanks. But since I do this with oily blanks, I do it with all as a habit.

Jim (JRC) has a great idea above!
 
Last edited:

markgum

Member
Joined
Apr 8, 2008
Messages
3,825
Location
Keenesburg, CO
after sanding I put a little wax or vaseline on the bushings where they contact the pen blank. This seems to keep things from sticking (so far). I have also heard of putting a 'washer' of wax paper between the bushing and blank to keep from gluing the two together.
 

JimB

Member
Joined
Mar 18, 2008
Messages
4,682
Location
West Henrietta, NY, USA.
I do the same as Rick, placing a piece of sandpaper on a flat surface and rubbing the end of the blank on it. I also rotate it for the same reason he does. I then use a tiny spec of Hut Ultra Plastic Polish on a clean cloth and rub the end a bit by twisting the blank in the cloth to give it a final smoothing.
 

DurocShark

Member
Joined
Jul 26, 2008
Messages
3,622
Location
Anaheim, CA
I have a box of homemade tapered bushings I use for finishing. Made 'em out of pine or some such. They only last a couple of pens each.

I pull the correct bushings off and replace them with these. They don't fit flush to the ends, but they do keep the finish from getting inside the tubes. Just like mandrelless turning. But with a mandrel.

After finishing I use a parting tool to cut the finish and the tapered bushing right against the blank. It leaves a slight bit usually, and that can be cleaned up with 320 paper on the bench. A bit of PlastX polish to get rid of the white look and I'm off.
 

rherrell

Member
Joined
Aug 22, 2006
Messages
6,334
Location
Pilot Mountain, NC
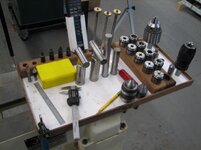
Here is the method I came up with...............
attachment.jpg

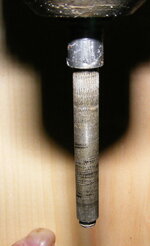
Those are Delrin dead centers that I make 2" long and put a bevel on each end. On the left is my Beall chuck and on the right is a "live" Jacobs chuck. It rotates just like a live center and can be used for all kinds of things.
attachment.jpg

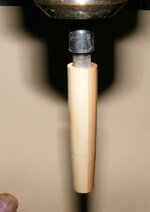
Here's a blank mounted.
attachment.jpg

This is the tool holder I made that fits on the end of the lathe. What I wanted to show you is the extra Delrin centers. Each center will do about 5 pens or so before they need cleaning. Even though they're Delrin a little glue will stick sometimes so when they all get glue on them I clean them up all at once. About 5 minutes and they're all like new. The red handle in the picture is an Xacto knife. 99% of the time they pop right off but if I get sloppy then I use the Xacto knife to cut the CA about 1/32" from the end with the lathe on at about 2000 rpm.
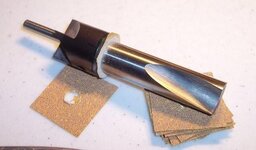
After I'm done applying CA I clean up the ends with this......
attachment.jpg

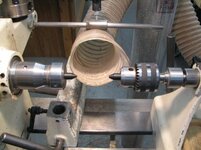
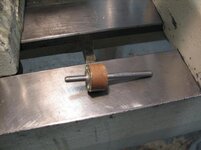
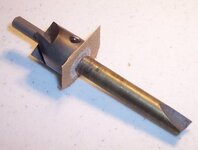
This is a sanding mill I made a long time ago. I was going to make a little tutorial on how to make one but another member started selling metal ones and I didn't want to step on his toes. This took about an hour to make and it probably has less than $2 worth of material in it. I've been using it for about 2 years and it's still going strong.
Here's a photo of it ready to go................
attachment.jpg

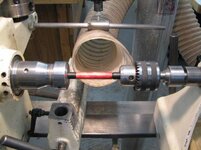
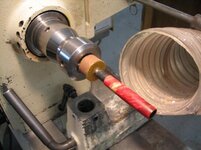
The black part is a Delrin sleeve. I make all my sleeves for my pen mill out of Delrin. The shaft on the sanding mill is the same size as the shaft on my pen mill so they are all interchangable. A couple quick licks with the lathe at about 750 and I'm good to go.
 

Attachments

  • 1.jpg
    1.jpg
    43 KB · Views: 152
  • 2.jpg
    2.jpg
    42.2 KB · Views: 150
  • 3.jpg
    3.jpg
    37.8 KB · Views: 147
  • 4.jpg
    4.jpg
    33.8 KB · Views: 145
  • 5.jpg
    5.jpg
    41.9 KB · Views: 151

Chasper

Member
Joined
Mar 22, 2007
Messages
1,987
Location
Indiana
I use a sharp knife to trim the excess CA from the turning. Immediately after polishing I remove the turnings from bushing, or points when I'm going bushingless, and cut off the excess CA. Give it 10 minutes to harden fully and it will chip either in removing from bushings or cutting.
 

lwalden

Member
Joined
Nov 3, 2005
Messages
1,238
Location
Trophy Club, Texas, USA.
take the head off of your pen mill and flip it around backwards. Use adhesive sand paper on the back (flat) side. Not sure who I stole this idea from, but was someone on this site..... works great to sand down the CA buildup on the ends, and doesn't chip the finish. I normally use 180 or 220 grit.
 

Attachments

  • pen mill sander.jpg
    pen mill sander.jpg
    32.1 KB · Views: 75
  • pen mill sander II.jpg
    pen mill sander II.jpg
    25.6 KB · Views: 94

jttheclockman

Member
Joined
Feb 22, 2005
Messages
19,148
Location
NJ, USA.
Rick I hate seeing such a well organized work area. Serious though I thank all for the suggestions and hits. By the way Rick I do something similar to your setup but the problem is I was getting glue on the points and when I went to take the blank off it chipped on the ends. I will try the knife thing. I tried the skew thing but afraid to cut into the blank. I like the reversal of the mill. Will try that one. Thanks again. I just need to keep practicing and find a solution that works for me. I have another question about applying the CA but I will start a new thread.
 

DurocShark

Member
Joined
Jul 26, 2008
Messages
3,622
Location
Anaheim, CA
take the head off of your pen mill and flip it around backwards. Use adhesive sand paper on the back (flat) side. Not sure who I stole this idea from, but was someone on this site..... works great to sand down the CA buildup on the ends, and doesn't chip the finish. I normally use 180 or 220 grit.


I had that exact idea last night. :eek:
 
Top Bottom