CA Finish not adhering

Signed-In Members Don't See This Ad

wortmanb

Member
Joined
Nov 20, 2012
Messages
96
Location
Jeffersonton, VA
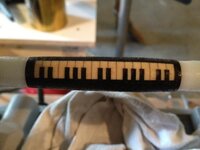
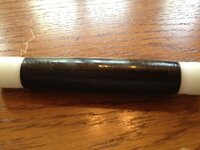
I've got a Kallenshaan blank (blackwood with holly inserts) that is absolutely gorgeous. It turned quite nicely, but now that I'm trying to give it a CA finish I'm having all sorts of trouble. I get spots where, after sanding, there's just no finish at all. These might be high spots, because I can't sand this kit (due to possible contamination of the holly with blackwood dust) but I'm not convinced.

Lately a number of my attempts to use CA have been ... frustrating. The cure is really slow when using BLO & medium CA (Stickfast brand, from Woodcraft). The finish gets rougher as I add layers and I invariably have to use a skew or my Woodchuck Pen Pro to knock it down before sanding.

It's enough to make me swear off wood pens altogether!

Any ideas for how to finish this project? It's for my sister, so I really want to get it right....
 

Attachments

  • IMG_4636.jpg
    IMG_4636.jpg
    44.9 KB · Views: 295
  • IMG_4638.jpg
    IMG_4638.jpg
    56.8 KB · Views: 264
Signed-In Members Don't See This Ad
Joined
Feb 25, 2010
Messages
1,799
Location
webberville, mi
Hoping you'll get a few replies here. I'm thinking you should get 100 replies and 101 different ways to do it. HOWEVER - My offering would be to sand all the way down to bare wood and redo but eliminate the BLO.

I've spent the last year or so "perfecting" my CA finish (not done yet, but getting there) and the first "big improvement" came when I got rid of the BLO. I found it easier to build up a workable thickness of CA without it.

Lately I've been alternating thin/medium until I get about 10 coats. Yes, it gets rough. Yes, I use accelerator - but not with every coat.

The last couple months I have found that on some woods (bocote, for example) it really helps to let the CA cure several days before sanding.

Once I get a nice buildup of cured CA, I sand (low speeds, light touch) starting with, maybe, 400. Then I do a light sand longitudinally. When I get a flat surface and am up to 1000, I eliminate the radial sanding and just go longitudinal. I sand up to 2000, then do Novus. Then I buff of the BEALL wheels.

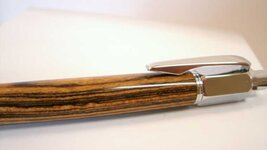
It's a lot of work, but I am actually getting happy with the results (see sample pic below)
attachment.php
 

Attachments

  • 2.jpg
    2.jpg
    63.5 KB · Views: 592

lucky13

Member
Joined
Feb 1, 2013
Messages
121
Location
Saint Peters, MO
I had the same problem about 2 months ago when I ran out of accelerator, and found that the problem was the humidity in my area was very very low. CA like humid conditions to cure.
 

Dan Masshardt

Member
Joined
Jan 30, 2013
Messages
4,806
Location
Mechanicsburg, PA
It's interesting how everyone does things very differently. I've not finished these woods before, so I can't comment specifically about them.

However, I use blo and stick fast medium ca on every pen now and have had so few problems I hardly believe it. I only use one wipe o blo before starting ca, not with every application if that's what you mean.

One thing that I do often is sand really light and quick with 400 between coats of ca if I feel any sort of ridges / unevenness at all.
 

keithbyrd

Member
Joined
Sep 2, 2011
Messages
2,493
Location
Mount Wolf, PA
I used BLO when I first started but kept getting inconsistent results. I agree with Ted - Sand it down! I apply 3-4 coats of thin and 5-10 medium- depending on porosity and voids to fill - lot of voids it might take 15. No sanding until all coats are on - I use a light spritz of accelerator on each coat. all put on at slow speed 4-500, start sanding with 400, 600, 800 with longitudinal sanding between grits. Up the speed to 3500 and use micro mesh first 2-3 grits only, polish with Huts ultra gloss plastic polish, finish with light coat ren wax - its not perfect but I have had very few problems in the last two years!
Good luck with that - it will look great!
 

jcm71

Member
Joined
May 5, 2011
Messages
1,660
Location
Chattanooga, TN
Try nitrile gloves (cut off one finger per pen and use as a condum). Slow speed. No accelerator. Slows the process down but worth the time. Start with thin, then go to medium thickness CA. Apply as many coats as fits your wishes, needs or wants. Then wet MM starting with black. PS. Do not use laetrile gloves. Forget the BLO.
 

wortmanb

Member
Joined
Nov 20, 2012
Messages
96
Location
Jeffersonton, VA
I used BLO when I first started but kept getting inconsistent results. I agree with Ted - Sand it down! I apply 3-4 coats of thin and 5-10 medium- depending on porosity and voids to fill - lot of voids it might take 15. No sanding until all coats are on - I use a light spritz of accelerator on each coat. all put on at slow speed 4-500, start sanding with 400, 600, 800 with longitudinal sanding between grits. Up the speed to 3500 and use micro mesh first 2-3 grits only, polish with Huts ultra gloss plastic polish, finish with light coat ren wax - its not perfect but I have had very few problems in the last two years!
Good luck with that - it will look great!

I gave up on accelerator after a gorgeous BLM pen developed a cloudy finish about a week after I completed it. Just the cap, though, and the cap was done with accelerator where I used BLO on the body. Not sure why, I was just experimenting. So I stopped using accelerator. Maybe I'll revisit it again. It does seem to cure faster than the BLO.
 

wortmanb

Member
Joined
Nov 20, 2012
Messages
96
Location
Jeffersonton, VA
Use an extremely sharp skew and skip the sanding, this eliminate the black getting on the white.

That's what I did, and it worked. My technique with a skew needs improvement, which is why I think I've got some unevenness. For this, I'm scraping, using the tool edge-on instead of trying to shear with it.
 

wortmanb

Member
Joined
Nov 20, 2012
Messages
96
Location
Jeffersonton, VA
Try nitrile gloves (cut off one finger per pen and use as a condum). Slow speed. No accelerator. Slows the process down but worth the time. Start with thin, then go to medium thickness CA. Apply as many coats as fits your wishes, needs or wants. Then wet MM starting with black. PS. Do not use laetrile gloves. Forget the BLO.

After gluing my finger to a paper towel too many times to mention, I always use one nitrile glove on my left hand. Hold the paper towel in that hand, drip the glue with my right, and use the left (gloved) hand to wipe the glue across the blank for about 3-5 seconds with medium pressure. Lathe speed at 500. Wait about 10-15 seconds, then put about 5 drops of BLO on a second paper towel section and wipe with that. No sanding between coats.

But, as we've determined, this isn't working for me. So I'm back to experimentation and will try some of your methods to see if I can find one that works better. I'll also probably replace my glue as I really think it's taking a very long time to cure.
 

wortmanb

Member
Joined
Nov 20, 2012
Messages
96
Location
Jeffersonton, VA
Once I get a nice buildup of cured CA, I sand (low speeds, light touch) starting with, maybe, 400. Then I do a light sand longitudinally. When I get a flat surface and am up to 1000, I eliminate the radial sanding and just go longitudinal. I sand up to 2000, then do Novus. Then I buff of the BEALL wheels.

What's Novus?

I hadn't thought of just doing the longitudinal sanding when I get to micromesh, but it's certainly a thought. I do my radial sanding at 500 with the sanding material in constant motion (I use abranet up to 500 and then switch to MM -- when I'm sanding a CA finish, I normally hit it first with my skew or Pen Pro and then start right off with the 4th or 5th MM pad, wet) but may have to give your approach a try. See if it saves some of the acrylic thickness.
 

tomas

Member
Joined
Jul 12, 2010
Messages
482
Location
Rio Rancho, NM
After turning, I use Abranet up to 600 at mediuim speed, constantly moving side to side. Then I wipe down with a liberal dose of DNA. With the lathe at its slowest speed I apply 16 coats of medium CA. 2-3 drops on a paper towel applied with medium pressure side to side on the blank being sure to go beyond the ends. I apply 2 spritzes of accelerant between coats. I then use wet MM through all the colors. If I ever get rough spots, they are at the ends where I failed to go off the end of the blank or they are due to me me taking one swipe too many with the paper towel on a coat.

Worth what you paid for it.

Tomas
 

bradh

Member
Joined
Mar 9, 2005
Messages
688
Location
Aurora, Ontario, Canada.
African Blackwood is loaded with oils and needs to be cleaned of oil before finishing. The spots are where the CA did not stick due to oil in the wood. I use accetone, others use DNA to clean the oil from the blanks.
I would use accetone to strip the CA off, let dry, lightly sand from 2400MM up and then try the finish again. You should see a big improvement when the oil is gone from the wood.
Spring and fall are the toughest time of year for CA finishes because the humidity is changing rapidly, what worked great all winter long stops working now. Humidity in the air has the biggest influence on CA set times. That is why you often see people from dry areas prefer thin CA and people from humid areas prefer medium CA. You could try to switch CA, or add accelerator or even switch paper towel brands to help the CA set faster.
 

wortmanb

Member
Joined
Nov 20, 2012
Messages
96
Location
Jeffersonton, VA
African Blackwood is loaded with oils and needs to be cleaned of oil before finishing. The spots are where the CA did not stick due to oil in the wood. I use accetone, others use DNA to clean the oil from the blanks.

I did use DNA (I always use DNA before any finish application to remove sanding dust) but will try acetone after stripping it down again.
 

JH Customs

Member
Joined
Apr 22, 2013
Messages
74
Location
San Antonio, TX
I sand down blank to 800 grit, then 4 coats of thin CA ( shot of accelerator after each ) then 4 coats of medium ( shot of accelerator after each ). I apply CA at around 500 rpm. with paper towel. Use small bags that components come in on finger. Then I start with micromesh and run through them at around 2500 rpm. Has worked great for me so far (knock on wood!)
 

longbeard

Member
Joined
Jan 26, 2012
Messages
2,700
Location
West Virginia
Once I get a nice buildup of cured CA, I sand (low speeds, light touch) starting with, maybe, 400. Then I do a light sand longitudinally. When I get a flat surface and am up to 1000, I eliminate the radial sanding and just go longitudinal. I sand up to 2000, then do Novus. Then I buff of the BEALL wheels.

What's Novus?

Novus Scratch Remover for Plastics

My method for a CA finish: Once the wood blank is sanded( i go thru the MM pads dry) i then dna the blank to clean it. Then i only use med CA( satellite city hot stuff super t ) going from right to left, hit it with accelerator, wait a few seconds, then left to right, accelerator, repeat. I do this anywhere from 4 to 12 times depending how much i turned or sanded the blank below the actual size needed. I don't worry about ridges while appling ca because when i wet sand it,( start MAYBE at times with 400 grit then MM, then i use novus #3 then #2) everything is smooth as glass when finished to actual size of the pen components.
 
Last edited:

Kretzky

Member
Joined
Jul 6, 2012
Messages
313
Location
BC Canada
Bret, how old is your CA? I have some that has worked great for a long time but I noticed last time I used it that it has definitely thickened up & takes forever to dry (even with accelerator). Time (for me at least) to get some new supplies I think.
With wood, I too sand longditudinally with MM. (but I don't with acrylics) I also use novus to bring up the shine & then a paste wax.
Good luck, hope you can solve the problem.
 
Last edited:
Joined
Feb 25, 2010
Messages
1,799
Location
webberville, mi
Bret - The thought behind the reduction in radial sanding was just that - too much CA removal when doing both radial and longitudinal. One thing to note is that this method is "variable" - I quit doing radial sanding as soon as the CA surface is "smooth" - no depressions or ridges of CA. Regardless of what grit I'm at.

BTW - Good luck - looking forward to seeing your pics of clear, flawless finishes.
 

stolicky

Member
Joined
Mar 14, 2008
Messages
820
Location
Loudonville, NY, USA.
Blackwood is oily. As mentioned above, use something like DNA prior to applying CA. Assuming you don't have any of the other countless things that could go wrong (high humidity, old glue, full moon, 3rd Thursday of the month, not matching socks, etc.) it helps.

Good luck.
 

wortmanb

Member
Joined
Nov 20, 2012
Messages
96
Location
Jeffersonton, VA
Bret, how old is your CA? I have some that has worked great for a long time but I noticed last time I used it that it has definitely thickened up & takes forever to dry (even with accelerator). Time (for me at least) to get some new supplies I think.
With wood, I too sand longditudinally with MM. (but I don't with acrylics) I also use novus to bring up the shine & then a paste wax.
Good luck, hope you can solve the problem.

Not yet a year old, but who knows how long it sat on the shelf before I got it. I'm picking up a fresh bottle today and we'll see if that changes anything. I'm also going to ditch the BLO for a while and see if just using accelerator will work for me without the ghosting I got on that one cap.

Thanks, everyone. Looking forward to making a few slimlines just to practice my technique!
 

wortmanb

Member
Joined
Nov 20, 2012
Messages
96
Location
Jeffersonton, VA
Once I get a nice buildup of cured CA, I sand (low speeds, light touch) starting with, maybe, 400. Then I do a light sand longitudinally. When I get a flat surface and am up to 1000, I eliminate the radial sanding and just go longitudinal. I sand up to 2000, then do Novus. Then I buff of the BEALL wheels.

What's Novus?

Novus Scratch Remover for Plastics

My method for a CA finish: Once the wood blank is sanded( i go thru the MM pads dry) i then dna the blank to clean it. Then i only use med CA( satellite city hot stuff super t ) going from right to left, hit it with accelerator, wait a few seconds, then left to right, accelerator, repeat. I do this anywhere from 4 to 12 times depending how much i turned or sanded the blank below the actual size needed. I don't worry about ridges while appling ca because when i wet sand it,( start MAYBE at times with 400 grit then MM, then i use novus #3 then #2) everything is smooth as glass when finished to actual size of the pen components.

Ahh. I've been using HUT Pen Polish. May have to give Novus a try.
 
Joined
Feb 25, 2010
Messages
1,799
Location
webberville, mi
Bret - Sorry - missed your question. Novus is a 3-step liquid scratch removal "system". It starts out with Novus 3 which they call a "heavy scratch remoer". Not really, but it's a wonderful initial polish once you've gotten to, maybe, 2000 or better. I I use a small squeeze on a hunk of old cotton t-shirt. Then wipe it off with some more cotton t-shirt. Should look pretty good at this point. Same steps for Novus 2 which they call a "fine scratch remover". Should look "wowish" here.
Heck, I think you could polish the mirror on the Hubble telescope with this stuff.
I don't use the 3rd step.

As I mentioned before, I also do a quick buffing with the Beall wheels. Might be a bit on the overkill side, but I'm a belt and suspenders kind of guy sometimes.
 
Top Bottom