Blowout repair

Signed-In Members Don't See This Ad

Sandy H.

Member
Joined
Apr 4, 2013
Messages
101
Location
Charlotte, NC
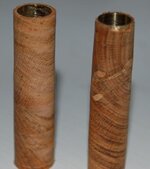
In the attached picture, the right blank has a small blow out near the top. I'm thinking the correct way to salvage it is to turn the last 1/8" or so on that end down to the brass tube, drill a 25/64" hole in a walnut segment and epoxy it in place, then turn it back to finished size.

My 2 questions are:

1: Would this be your recommended fix? On large wood projects, its common to glue sawdust in place, but I think this wouldn't work on something this size/level of detail.

2: Would thick CA (or another adhesive) be preferred to 5 minute epoxy?

For reference, I think the blowout occurred due to the orientation of the blank grain, as well as my still poorly developed skew technique. I used 5 minute epoxy to bond the coarsely sanded brass tube to the Apricot wood.

Any other thoughts or comments are appreciated.

Sandy.
 

Attachments

  • apricot blowout.jpg
    apricot blowout.jpg
    31.3 KB · Views: 271
Signed-In Members Don't See This Ad

KenV

Member
Joined
Oct 28, 2005
Messages
4,720
Location
Juneau, Alaska.
Sandy, the addition is often called an "oops ring".

Thechipping is often an indication that the glue was spotty and the wood was not attached to the brass tube at that location.

Some use epoxy and others prefer CA glue (commonly medium). Think about an identical ring on the other end for balance
 

plantman

Member
Joined
Jan 2, 2012
Messages
3,437
Location
Green Bay, Wi
Sandy; Since you are never going to match the grain exactly, and you don't want it to look like an add on. I would take both blanks down an equal amount on the ends and add dark contrasting rings such as the walnut, ebony, blackwood, or, metal rings to them. This will balance out your pen and also add a little more interest to it. Just my way of correcting the ops factor. Or, as Harry says, you can shorten the barrel if it is the cap end. I use thick CA. Than you can return to you work in seconds. Jim S
 
Last edited:

plano_harry

Member
Joined
Jan 12, 2012
Messages
1,959
Location
Plano, TX 75093
Sandy, option 1 for me would be, can I shorten this tube and the pen still assemble properly? You didn't lose much wood, so that might be the easy way out. Your ring idea should work. Following the advice of Ken and Jim for balanced design.

Harry
 

JD Combs Sr

Member
Joined
Jan 30, 2010
Messages
767
Location
Owingsville, KY
Sandy, all of the previously mentioned options are good to "correct" the blowouts. Here is a little tip to help prevent the next one. Anytime I make a wooden pen barrel I will soak the wood area around the ends of the tube with thin CA. I will do it just before squaring the ends and just after squaring them. After the post squaring application I will just "touch" the area again with the squaring mill to insure that the applied CA is nice and flat. Since I started doing this I have yet to have a blow-out when squaring or turning.
 
Joined
Feb 24, 2012
Messages
4,368
Location
Claremont NH
A nice bright acrylic would also look good for an oops ring here. Just take your parting tool and cut away what you want to replace and keep that end nice and straight. drill out a piece of acrylic to the right size hole and cut out the oops rings from it. I usually chuck the acrylic in my chuck on the lathe, drill it then use my parting tool to get the pieces I need then glue them up on the tube and clamp it right in a mandrel or in a clamp. Make sure you reverse paint the acrylic or you won't get a nice repair. Also as mentioned balance it out on each end. Treat this as a segmenting experience. Welcome to segmenting.
 

Sandy H.

Member
Joined
Apr 4, 2013
Messages
101
Location
Charlotte, NC
Wow, thanks for the quick replies. I was hoping to have gotten a few views, not 5 responses so fast!

The pen is one of Smitty's Classic Convertibles. This is my first one, so I'm not sure how much latitude there is for space. I'll try a test assembly to see what I can. Nothing wrong with learning something.

As far as segmenting goes, that's what I've been doing for the last 5 or 6 pens. Nothing ground breaking, just learning techniques. The rub here is that I've been assembling the segmented pieces with Titebond first and turning, i.e. the conventional way. I figured that epoxy would be the way to go and that does sound like an acceptable way to go about it.

If I can fit things by shortening the tube, that is probably what I'll do, because I wanted to have another simple wood pen. If not, I will definitely take the idea of balancing the oops ring on the top and bottom to heart. Pretty obvious when someone else says it. . . :)

Thanks again for the replies. I'll post a pic when its done.

Sandy.
 

Hendu3270

Member
Joined
Mar 13, 2012
Messages
919
Location
Pearland, Texas
As others have said, this is the perfect opportunity for some segmenting. Nothing fancy, just a contrasting wood with aluminum sandwiched between would work well. Maybe do the same on the second blank. Post a pic of what you end up doing though.
 

Jeff Leslie

Member
Joined
Jan 10, 2013
Messages
10
Location
Kiewa
The main lesson here is not in the fix. Why did the blowout occur in the first place? I suggest it wasn't the glue but the use of the skew chisel on short grained wood. Pick out is almost a certainty using a skew in those circumstances when used in the conventional way ie cutting, not scraping. IMHO.
 

randyrls

Member
Joined
Feb 2, 2006
Messages
4,829
Location
Harrisburg, PA 17112
Sandy, all of the previously mentioned options are good to "correct" the blowouts. Here is a little tip to help prevent the next one. Anytime I make a wooden pen barrel I will soak the wood area around the ends of the tube with thin CA. I will do it just before squaring the ends and just after squaring them. After the post squaring application I will just "touch" the area again with the squaring mill to insure that the applied CA is nice and flat. Since I started doing this I have yet to have a blow-out when squaring or turning.

JD; Like you, I do this with a lot of woods that are "chippy" or prone to blow-out on the unsupported end grain at the blank ends. Spectraply and Dymond wood are two examples. Like you, a drop of thin CA on a plastic baggie; dip the blank end in, reverse and let dry.

Sandy; make sure no CA gets inside the tube
 

Sandy H.

Member
Joined
Apr 4, 2013
Messages
101
Location
Charlotte, NC
Thanks for the continued help, guys.

I pulled the parts and instructions out for the SPW Classic and it looked like shortening the lower tube would be a non-issue, so I went that route. I was able to use a flat file to remove the problem. At this point, I think the original plan for a simple/plain Apricot pen will work out.

As far as the cause, my technique could definitely be the culprit. I originally thought a skew was only used to scrape, but after reading some and watching some videos, I realized I was incorrect. I have been practicing slicing the material instead of scraping and maybe this wasn't the best place to do that. I guess the proper method would be to slice the majority of the material down and finish with the scraping motion?

Also, I am becoming a convert to the different uses of CA, so I'm completely on board with wicking some in the end grain if that will resolve future issues. Thus far, I have been finishing with brushing lacquer and will need to check and see if the CA will affect the appearance of the finish. I'm not opposed to learning how to do a CA finish, but so far have not tried it. I guess the best solution will be to turn some more pens to experiment!!! :)

Great information from all of you. I greatly appreciate it.

Sandy.
 

jttheclockman

Member
Joined
Feb 22, 2005
Messages
19,132
Location
NJ, USA.
One thing I would like to add also. Yes learning to use the skew will in the long run be a great help to you in all your blanks. Slicing instead of peeling or scraping is the way to get clean cuts. Keep the skew sharp.

But the one thing that gets overlooked alot of times when turning these pen blanks down. You need to learn to turn the ends down first before you work the middle. You keep doing this untill you get close to final shape. What this does is gives the skew more material to rest against and shear against. when you cut to the end or bushing there is no material to support your cut thus chip out. If you cut into the blank this will be avoided.
 
Top Bottom