Block trimmer blowing out blank

Signed-In Members Don't See This Ad
Joined
May 27, 2008
Messages
60
Location
Canon City, Colorado, USA.
I've been having a lot of problems with blocks splitting or chunks breaking off when using the block trimming tool. I've tried running it faster & slower RPMs, I've tried the high speed steel 5/8 dia. and the 3/4 dia. Those only lasted long enough to do the blocks for 10 or at most 15 pens.
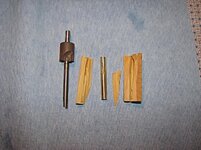
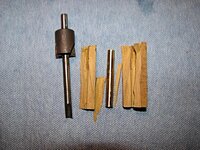
So I went all out and got the PSI carbide trimmer. After trimming only about 5 blocks it split a piece of Yellow Heart in half, broke the corner off of a block of Zebra wood and just mangled another Zebra wood block. Doesn't matter what speed I've tried, from around 250 RPM, 450 RPM, 700 RPM, 1200 RPM. It still wants to split every thing. Grain doesn't matter either, strait or angled. Strait gets split, angled gets mangled.
Here's a couple picture of the yellow heart the carbide trimmer split. This is the only one that I've taken a picture of, so far. I've had to go back to trimming them with the disc sander but that just fills the shop with dust.
I got one of those funky self centering vise's, but it wont repeat holding the same block in the same position for the top and the bottom is even worse. I can put a block back in the vise and never get the hole to line up. And it's a brand new 12 inch, 1/2 hp Drill Press that I bought last spring. I've checked the table with a dial indicator and its right on square with the spindle. Since I can't use the vise I Have to use Chanel lock pliers to hold the blocks.
Any body else out there having this problem? Is this something that's pretty common and just have to put up with it? I hate having to use the disc sander cuz of all the dust.
Does anybody know where to order a good quality cutter &/or some place to send them to be sharpened?
Thanks Y'all
 

Attachments

  • pen 1.jpg
    pen 1.jpg
    101.4 KB · Views: 257
  • pen 2.jpg
    pen 2.jpg
    94.4 KB · Views: 306
Signed-In Members Don't See This Ad

AceMrFixIt

Member
Joined
Oct 1, 2008
Messages
625
Location
Jacksonville, FL
Your trimmer looks like it has seen better days. You may be using a dull trimmer and too much downward pressure. Just like any other blade, let it do the cutting, dont force it into the work. I sharpen mine with a diamond stone.
 

rherrell

Member
Joined
Aug 22, 2006
Messages
6,334
Location
Pilot Mountain, NC
Looks more like a glue problem to me.
If the tube was glued correctly I don't think the trimmer would have busted it apart like that. The photo clearly shows poor glue coverage so that's where I'd start.
Tell us your gluing routine and maybe we can help.:wink:
 

fitzman163

Member
Joined
Apr 1, 2005
Messages
390
Location
Middletown,PA via The Coal Region,Pittston, PA, US
I ran into that problem I think to much glue got inside the tube when gluing. I now clean the glue out with a little screwdriver it scrapes out no trouble. I also clean it out with nail polish remover because my wall st II transmission would not work correctly. Good luck.
 

cnirenberg

Member
Joined
Jan 26, 2004
Messages
2,700
Location
Fort Myers, Fl
I agree with Rick, It appears from your blowout (up?) that the glue wasn't spread thoughout when the tube was inserted. How do you your glue ups? What type of glue do you use? Also that mill needs sharpening. There are articles/treads and tutorials on sharpening them yourself, check the classified section for IAP members who sharpen or who sell quality tools to do what you need. When trimming don't use to much pressure, the mill will catch and .... well you see the result in front of you.
 

leehljp

Member Liaison
Joined
Feb 6, 2005
Messages
9,326
Location
Tunica, Mississippi,
I have done a thousand or so and had a few "catch" with only one or two blowouts. I have regular non-carbide and carbide. I know it can happen at any time, but it tends to happen when too much force is put on it. Trimming up square is not a "quick" cut situation. This is not like a circular saw on a cross-cut. This is dealing with end grain most of the time and end grain is prone to what happened to you. End grain and bias grained woods need slow feed rates with moderate pressure at best.

Until a year ago, I use a TS (or BS) to cut the end off of a glued up blank to as close as possible - maybe 1/32 inch or 1/64 inch from the tube. Now I use a trimmer sander for the last 1/32 or 1/64 inch. NO problems with a sander trimmer.

In using the barrel trimmers, I would place the blanks in a wood vise, have only about 1/4 inch sticking above the top of the vise, clamp tight and use my battery powered drill driver to turn down to size. I am sure that the clamping force on two sides had lots to do with preventing blowouts.
 
Last edited:

fyrcaptn

Member
Joined
Apr 30, 2008
Messages
94
Location
Mills River, NC, USA.
?

How much wood are you trying to remove with your trimmer?
The problems I've had have come when I didn't get rid of excess wood with a saw and use the trimmer to trim the ends and square the ends to the blank.
If you get a catch and 'power through' with the trimmer, most drills have plenty of power to turn your trimmer into a power splitter.
 

GouletPens

Member
Joined
Nov 9, 2008
Messages
1,449
Location
Ashland, VA
Another vote for glue. Try using two part epoxy, it'll help in so many ways. That barrel trimmer also looks like it got beat up in the parking lot after school. I don't have the carbide one, but I sharpen mine probably every 10 blanks or so (I guess that's every 5 whole pens) lightly with a diamond hone. A few seconds is all it takes if you keep up with it. Even the carbide cutterhead needs to be sharpened, despite what PSI advertises. Either in the workshop or in the kitchen, there is no such thing as a blade that never needs to be sharpened!!!
 
Joined
Aug 29, 2008
Messages
116
Location
Summit, NJ
Glue definally a issue you can see on the inside of hte blank it didn't cover, also are scuffing up the tube with sandpaper they look pretty shiney. I try to avoid the drill press for the trimmer it turns it into a power splitter as mentioned above and is to easy to put to much pressure on it or force the cutter in the wrong direction.
 

GouletPens

Member
Joined
Nov 9, 2008
Messages
1,449
Location
Ashland, VA
I've been using the drill press for the sanding mill WITH the blank vise and never once had a split. I say fix your glue, sharpen your cutterhead, and take your time. I've done maybe 300-400 this way and never had a split, and that's with a lot of burls and stuff too.
 

thewishman

Member
Joined
Mar 9, 2006
Messages
8,182
Location
Reynoldsburg, Ohio, USA.
Glue definally a issue you can see on the inside of hte blank it didn't cover, also are scuffing up the tube with sandpaper they look pretty shiney. I try to avoid the drill press for the trimmer it turns it into a power splitter as mentioned above and is to easy to put to much pressure on it or force the cutter in the wrong direction.

Amen. Epoxy works much better for me and a hand held drill works well. Blow-outs an the lathe are another thing that can result from poor glue coverage.
 

GaryMadore

Member
Joined
Jan 25, 2007
Messages
775
Location
Ottawa, Ontario, Canada.
I'm having trouble wrapping my brain around glue (or lack of it) contributing to a blank blowout while trimming.

It seems to me that, if there wasn't enough glue, the tube would just spin in the blank - but I don't see how this could cause the surrounding wood to be rended, ripped, and torn.

Questionable wood? Sure.

Bad trimmer blades? Sure.

Too much pressure? Sure.

Not going straight in? Sure.

But... Glue?

Somebody please help me understand this, else I'll not sleep again...

Cheers!

Gary

P.S. My personal technique? I chuck the cutter in my drill press and hold the blank in my (gloved! DAMHIKT!) hand. I turn the press on, and slide the blank up onto the pilot shaft and use hand-pressure to press the blank against the trimmer head. I nibble away until I see shiny brass and then slip the blank off the (still rotating) trimmer. Oh, and I always keep my hand away from the bottom of the blank (again, DAMHIKT!) Never had a blowout yet - but that may only because I've been lucky. Ruined a couple of leather work gloves along the way... Definitely lucky there ;)
 

ed4copies

Local Chapter Manager
Joined
Mar 25, 2005
Messages
24,527
Location
Racine, WI, USA.
Gary (oh, wide-eyed one!)

IF there is no glue holding the wood to the tube, and the spinning "facing blade" catches, it is MUCH easier to throw the wood around. (Cause a breakup, so to speak).

This DOES happen. Also, if he succeeds in facing the blank, then tries to turn it, the wood will break off near the ends (where there is no glue holding it to the tube) in any kind of "catch".

Gluing IS important. Use THICK CA (because it does not set rapidly) and insert from the nib end, spin it around, push in, pull out, just get the glue to spread. Then take the tube out and insert from the "center", after recoating the tube with CA. Again, turn, push in and out, etc to spread the glue. Finally push the tube in to just below the wood (resin) and let it set overnight. You will complete a lot more pens.

Oh, if you like epoxy, that works too - same procedure. DON'T use thin CA, it sets too fast. Don't do this procedure when your blank is still warm (from drilling) or wet.
 

ngeb528

Member
Joined
Mar 4, 2009
Messages
808
Location
Deland, FL
We've never had the problem you're having.

We scuff the tube, all the way around, using sandpaper. We put thick CA glue on the tube and spread it using the side of the glue bottle spout. Then, using a tube insertion tool, we rotate the tube into the hole in the wood and wipe of the excess glue on the end of the blank, being careful not to get glue into the tube.

We use the trimming blade in a drill and hold the blank in a vise. Don't use a lot of pressure, as stated earlier, let the blade do the work.

This process has worked consistently for us.
 
Last edited:

GouletPens

Member
Joined
Nov 9, 2008
Messages
1,449
Location
Ashland, VA
We've never had the problem you're having.

We scuff the tube, all the way around, using sandpaper. We put think CA glue on the tube and spread it using the side of the glue bottle spout. Then, using a tube insertion tool, we rotate the tube into the hole in the wood and wipe of the excess glue on the end of the blank, being careful not to get glue into the tube.

We use the trimming blade in a drill and hold the blank in a vise. Don't use a lot of pressure, as stated earlier, let the blade do the work.

This process has worked consistently for us.
So THAT'S the secret.....:wink::wink::wink:
 
Joined
May 27, 2008
Messages
60
Location
Canon City, Colorado, USA.
Glueing the tube in

I'm having trouble wrapping my brain around glue (or lack of it) contributing to a blank blowout while trimming.

It seems to me that, if there wasn't enough glue, the tube would just spin in the blank - but I don't see how this could cause the surrounding wood to be rended, ripped, and torn.

Questionable wood? Sure.

Bad trimmer blades? Sure.

Too much pressure? Sure.

Not going straight in? Sure.

But... Glue?

Somebody please help me understand this, else I'll not sleep again...

Cheers!

Gary

P.S. My personal technique? I chuck the cutter in my drill press and hold the blank in my (gloved! DAMHIKT!) hand. I turn the press on, and slide the blank up onto the pilot shaft and use hand-pressure to press the blank against the trimmer head. I nibble away until I see shiny brass and then slip the blank off the (still rotating) trimmer. Oh, and I always keep my hand away from the bottom of the blank (again, DAMHIKT!) Never had a blowout yet - but that may only because I've been lucky. Ruined a couple of leather work gloves along the way... Definitely lucky there ;)


I've been using the, what is it, USA GOLD THICK CA GLUE, from Wood Craft in Colorado Springs. That's where I first got everything to get started with last year. As for how I glue the tubes in.
1- I use the insertion tool from PSI to hold the tube and use 100 grit sand paper to roughen the brass.
2- I put a few of drops of glue on the end of the tube to put some glue in the bottom end of the block, opposite end from drilling. I run the tube with the glue in about half way and back out with a twisting motion to spread it good. this puts some glue in where I have found it doesn't get any if the tube is just run all the way in from one end.
3- Then I put some more glue along the tube and insert it in the same end as drilled from. Twisting it around and in and out a little to get maximum coverage running it all the way in. then let it setup till I can remove the insert tool.
If there's a better way to do it, I can't think of it. As for the trimmer head in the picture, I guess I should have cleaned it up a little with some mineral spirits. the last thing that I had tried to use it on was some red Paduaka(sp?)
But it never did cut right from the first time I tried it. It always just wanted to rub on the block. I've seen a video of a guy just holding the block in plyers and lift it up against the cutter and it cut fine. When I first got this one I tried that and I couldn't even put enough force on it by hand to get it to cut.
It makes me wonder if it got skipped being ground before it was shipped from the factory that made it. Cuz to me it doesn't look like it has any relief angel on the bottom of the cutting head.
I guess that I'm going to need get a diamond hone thing and try to sharpen it.
And the piece's shown are from a block of Yellow Heart wood. I started with ten blanks of it. What I've done with some of it so far makes me want to get some more.
 
Joined
May 27, 2008
Messages
60
Location
Canon City, Colorado, USA.
Using drilling vise

I've been using the drill press for the sanding mill WITH the blank vise and never once had a split. I say fix your glue, sharpen your cutterhead, and take your time. I've done maybe 300-400 this way and never had a split, and that's with a lot of burls and stuff too.

This is one thing that is a sorta sore spot with me. I got one of those $40+ self centering drilling vise. The one I got sucks. It wont repeat for any thing. I can use a good square, strait grain blocks. Sand the ends square and useing the center marks on the side before cutting I can put the same side of both halves of the block in the vise the same way. The hole will come out in different locations, sometimes close to an 1/8" different. Using the same marks to put the piece back in the vise to trim it, and the trimmer doesn't even come close to lining up. I did get a piece of Zebra wood line up but it blew out any way.
And as for drilling strait. One block will be right on on both ends. The other block will drill so crooked that the bottom of the block will just barely clean up when turning.
So since I cant use the vise to hold it I use a pair of self adjusting plyers to hold the block and set it on top of the drilling vise. I clamp a thin strip between the vise jaws to keep them from moving and leave a space for the end of the trimmer shaft to go through.
Well thanks for all the feed back.
 

NewLondon88

Local Chapter Leader
Joined
May 15, 2008
Messages
5,077
Location
Claremont NH
I'm having trouble wrapping my brain around glue (or lack of it) contributing to a blank blowout while trimming.
Somebody please help me understand this, else I'll not sleep again...

I find that one important part of end milling or trimming is to remove the
glue at the end before trying to remove the glue from inside the tube.

Glue bonds to glue VERY well, and if you have some leftover glue inside the
tubes and glue on the outside of the tubes (ends of the blanks) they tend
to form one solid piece. If you start removing the glue from the inside, the
glue is still bonded to the glue and wood on the outside. That puts a lot of
torque on the ends of the blank. So when you try to use the end mill on
the inside of the tubes, that glue is still getting a lot of support from the
glue attached to the end grain.

SOMETHING has to give .. and it might just be the blank.

What has worked for me so far is to apply the CA to the inside of the
tubes using chopsticks, insert the tubes and then a quick shot of the
activator. But this leaves the inside glue attached to the outside glue.

If I've left enough length (I try to) then I can cut the ends of the blanks
back enough to break that glue bond between the ends and the inside.
That way, the glue inside the tubes doesn't get any additional strength or
support from the glue on the end grain. And when you try cleaning up the
tubes with the end mill, it just tends to pop out since it isn't attached to
anything else. (a little wax or oil inside the tube might even make it easier,
but I haven't tried it or needed to)

I have no idea if this applies to what has been happening here or not,
just thought I'd throw in my $.02 while I enjoy my coffee.. :biggrin:
 

Tn-Steve

Member
Joined
Dec 8, 2008
Messages
271
Location
Clarksville, TN
What the heck, I'll throw my .02 in.

Gluing - I used to (and still do on occassion) build golf clubs. The heads are attached to the shafts with epoxy, and I use the same technique with pens. Plug the ends with Play-Dough, rough them up with 100 grit, wipe them off with a little DNA (gets the dust and more importantly, the lube that they put on the metal as it gets drawn into tubes off)

I don't mess with tube tools or anything else. I put on my blue gloves, mix up some 6 minute epoxy, put a couple of lines along the blank, insert with rotating motion, moving it in and out. You don't have to really butter up the tube, the turning motion spread it out. I then take the tube out, bit more epoxy, and reinsert from the other end. Use the stir stick to clean any excess from the ends, make sure that it's about where I want it, do the next.

If I use Thick CA, same techniques apply.

Once the glue dries (and I allow 30 minutes at a minimum for the 6 minute glue, prefer an hour), I knock out the plugs with a HF punch, and use that to knock out any extra glue that got in. If it really wants to fight me, a touch with a round file cleans it up.

I try to cut the blanks 1/8th overlength, so I should only have about 1/16th or so to trim off. I've been using the cutter in the lathe, set up just like when I drill them. Great control, no chatter, haven't busted one yet. I sharpen (hone) the FLAT sides of the flutes from time to time, I don't have the touch or jigs to even think about hitting that small angled edge. Seems to work ok for me

If I'm doing them by hand, same idea, I use my Cordless Drill set on low speed (screw-driving mode). grip them in a plain old wood clamp, don't get carried away with pressure, and if it's not cutting, touch up the edges on the cutter.

Well, I guess that's more like .04 cents worth,

Steve
 

bitshird

Member
Joined
Aug 27, 2007
Messages
10,236
Location
Adamsville, TN, USA.
I know it's messy and can push tubes out if you don't put tape or rubber bands over the ends, But, I've had blow outs using Epoxy, I've had blow outs using thick CA, BUT I have yet to loose a blank that's had the tubes glued in with Polyurethane glue the only drag is the time, I wait at least 8 hrs, also don't own a blank squaring tool, how ever I think they work better if you use them before you turn the blank, once you have the blank turned, consider how thin the wood is at the end.
Rick Herrell (sorry if I miss spelled your name Rick) sells a small sanding device that will work much better for squaring a turned blank than a cutter. he lists them in individual classified's , I just use my roughing gouge to square with, haven't lost any with that either you can also use a skew to trim your blanks but either of those two methods require a chuck of some type.
 
Top Bottom