Best Practices in Pen Making

Signed-In Members Don't See This Ad

PenMan1

Member
Joined
Jul 8, 2009
Messages
6,380
Location
Eatonton, Georgia
I've been teaching an "alternative materials" turning class. At the end, I mentioned "best practices". A question came. "What would YOU always do the same way, if you could only do ONE thing the same each time". In other words, what is THE most important thing?

Since we had been working with very brittle acrylics and making two piece pens, my answer was "always drill from the centerband toward the ends on every two piece pen". They "got" this because of the difficulty in pattern matching around cracks.

With this body of pen makers, we have an opportunity to make a "BEST PRACTICES" list that should be observered every time we set out!

If this thread turns out as I hope, we'll have a "BEST PRACTICES IN PEN MAKING" tutorial for the library.

Please consider carefully and add your best answer.
 
Last edited:
Signed-In Members Don't See This Ad

TerryDowning

Member
Joined
Apr 27, 2011
Messages
520
Location
Newhall, CA
Always use sharp tools! Dull tools are dangerous to you and your finished product. Invest the time and/or money in a sharpening system that works for you and use it regularly.
 

BRobbins629

Passed Away Dec 28, 2021
In Memoriam
Joined
Mar 8, 2006
Messages
4,037
Location
Richmond, VA, USA.
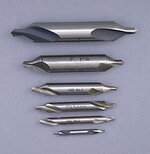
Drilling

Use a centering bit to start hole prior to drilling.
attachment.php

Takes a minute or two longer, but is one key to drilling a straight hole through the blank. Particularly important for segemented blanks. If you need a hole all the way through a blank, make it longer than needed, stop drilling before the end and cut it off. These techniques with a sharp bit will prevent many potential disasters.
 

Attachments

  • CenterDrills123456.jpg
    CenterDrills123456.jpg
    7.3 KB · Views: 875

ctubbs

Member
Joined
Sep 12, 2010
Messages
3,588
Location
Murray, Kentucky
Always use the best abrasives available.
Keep all tools in top notch condition (lathe, saws, drill press, etc)
Use all safety equipment (dust collection, mask, safety glasses)
Learn how to sharpen.

Charles
 

witz1976

Member
Joined
Jun 28, 2009
Messages
2,144
Location
Bucksport, Maine, USA
When purchasing tools always think ahead to what you would like to be doing with the tool before purchasing. If you need to save, then continue to work with what you have until you can afford to do so. Follow up with don't always buy the cheapest tools on the market unless you want junk.
 

its_virgil

Member
Joined
Jan 1, 2004
Messages
8,119
Location
Wichita Falls, TX, USA.
Cut blanks long. Drill short of the total length. Then cut them approx length exposing the "exit" hole and square. Cutting long, drilling short, and trimming will eleminate chip out on the "exit" end of the blank. Takes an extra minute or two but well worth it.
Do a good turn daily!
Don
 

bitshird

Member
Joined
Aug 27, 2007
Messages
10,236
Location
Adamsville, TN, USA.
Andy DON"T use southern Yellow Pine!!!,

Seriously the safety issue is the highest priority, it happens twice, once when you are just beginning and don't know any better and then it becomes a problem after you've done it forever you get SOOO GOOD that you can ignore safety I've seen it and done it far too many times. SAFETY is the first thing any one working on any kind of power tool or equipment has to learn..
 

PenMan1

Member
Joined
Jul 8, 2009
Messages
6,380
Location
Eatonton, Georgia
Andy DON"T use southern Yellow Pine!!!,

Seriously the safety issue is the highest priority, it happens twice, once when you are just beginning and don't know any better and then it becomes a problem after you've done it forever you get SOOO GOOD that you can ignore safety I've seen it and done it far too many times. SAFETY is the first thing any one working on any kind of power tool or equipment has to learn..

ROTFLMAO!
Ken:
Down here, we call it Georgia Fat Wood or Fat Lighter. The joke (which is really NOT a joke) is that it takes 3 people to turn fat lighter: One to handle the tools, one to man the fire extinguisher and one to call 911.

I may change this one to "Be familiar with the properties of the materials you are about to turn"..........OR NOT!:biggrin::biggrin:
 

Padre

Member
Joined
Dec 2, 2009
Messages
1,841
Go over your lathe at least once a week:
Clean it
Lube it
Make sure the belts are fine
Assure bearings are good
Make sure the tailstock and toolrest slide along the bed easily. If not, lubricate.
Clean out your morse tapers
Make sure tool rest is smooth with no nicks or divots.
 
Last edited:

MorganGrafixx

Member
Joined
Jan 20, 2009
Messages
290
Location
Snelville, GA
NEVER...........and I mean NEVER tell your wife over the phone that you're only getting a few things from the local Woodcraft! And this next part is most important; If her reply is "fine" or "I don't care, do what you want", this is a coded WARNING that you should not ignore!!! For the love of all that is holy, put your purchases back on the shelf, go over to the acrylics, find a pretty pink blank, buy it, take it to her and tell her you are going to make her something pretty for your anniversary (which you didn't forget....again).
 

TerryDowning

Member
Joined
Apr 27, 2011
Messages
520
Location
Newhall, CA
NEVER...........and I mean NEVER tell your wife over the phone that you're only getting a few things from the local Woodcraft! And this next part is most important; If her reply is "fine" or "I don't care, do what you want", this is a coded WARNING that you should not ignore!!! For the love of all that is holy, put your purchases back on the shelf, go over to the acrylics, find a pretty pink blank, buy it, take it to her and tell her you are going to make her something pretty for your anniversary (which you didn't forget....again).

I think this falls under the safety warnings. Sometimes I'm glad I don't have a woodcraft nearby.:cool:
 

Seer

Member
Joined
Jan 3, 2009
Messages
1,769
Location
Glendale,Arizona
The one thing I would do the same every time is wearing the proper safety equipment ie: face shiled/respirator etc. I say this because we may try to turn the blank the same it will always be a little different but safety COMES FIRST in my eyes.
 

leehljp

Member Liaison
Joined
Feb 6, 2005
Messages
9,326
Location
Tunica, Mississippi,
Finish! The best made pen is still ugly with a rushed finish. Have this attitude: If you spend an hour or so getting the pen made, be willing to spend that much time or more in getting it finished if needed. If I spend 3 or 4 hours to "make" the pen, I am willing to spend as much time as needed to complete the job.

That old adage of - the clothes make the man . . . well the finish makes the pen be all that the insides can be! A good finish reveals the insides, a great finish showcases it.

In flatwork (woodwork) I know people who will spend 40 to 60 hours on a project and spend 4 to 6 hours on the finish, and it shows.

For customers, at the point if delivery, the feel and finish is as important as the design inside.
 
Last edited:

MarkHix

Member
Joined
Jul 6, 2007
Messages
982
Location
Carrollton, Texas, USA.
all the responses are good....my #1 would have to be don't skimp on the sanding. use the grits in order, don't skip one; use a good light so you can see what you are sanding;use good sand paper and use it like your neighbor gives it to you for free. Just changing to a decent brand of sandpaper made finishing less of a chore.
 

tjseagrove

Member
Joined
Apr 25, 2011
Messages
557
Location
Hoosick Falls, New York
MarkHix said:
... Just changing to a decent brand of sandpaper made finishing less of a chore.

What is considered "decent brand"? And, I am ready to get a dozen answers to that one.

This is a good thread for folk like me. I would rather learn from the wisdom found here than personal experience on these matters. There will be, I am sure, moments I don't believe and then learn from experience.

My suggestion would be to track your costs so you know where your money is going. So far mine has gone to a number of you!!!!

Tom
 

paintspill

Member
Joined
Apr 17, 2011
Messages
891
Location
toronto, ontario, canada.
when it comes time for assembly, i lay out all the pieces out on white paper or paper towel very methodically. stop. breath. check that everything is there. stop. breath. assemble. i learned this one the hard way.
 

Lenny

Member
Joined
Jan 6, 2009
Messages
3,475
Location
Searsport, Maine
tjseagrove;1227429 My suggestion would be to track your costs so you know where your money is going. So far mine has gone to a number of you!!!! Tom[/quote said:
Best practice in that regard is to have 2 sets of books .... One that shows your actual costs and then the other one that you show to your wife/significant other, that looks like your actually breaking even! :biggrin:
 

OKLAHOMAN

Member
Joined
May 17, 2006
Messages
10,228
Location
Costa Rica
When buying tools but the best you can, it's so much cheaper when you only buy once. And this only comes second to SAFETY!!!!!
 

robutacion

Member
Joined
Aug 6, 2009
Messages
6,514
Location
Australia - SA Adelaide Hills
Invest on some breading "apparatus", depending on the conditions (area, enclosement) you are working on. CA fumes, some woods and other materials are/can be very toxic or provoke allergies that be minimized or prevented with a good breading mask, a good ventilation systems to filter the air environment you are working on or simply a fan located close to you and orientated to blow the air away from you, taking most of the dust and fumes away from your lungs...!:wink:

Cheers
George
 

JimMc7

Member
Joined
May 12, 2009
Messages
731
Location
NE Oklahoma
  1. Use high speed air from a shop vac to cool the bit when drilling brittle pen blanks and, just in case....
  2. Always drill the cap blank 1st on large tube diameter pens such as JGII, Baron and Cambridge. If you crack the larger cap blank, you can still salvage the pen section 1/2 blank by making a Sierra or Aero/EB (and drill slower, cool more often on this one!).
 

robutacion

Member
Joined
Aug 6, 2009
Messages
6,514
Location
Australia - SA Adelaide Hills
Have the lathe set up at the correct weight for you, too low or too high will cause you back/neck problems.

Many times building a small wood box (step) will bring you to the correct hight. Extending the lathe bed legs, will lift the lathe up if you are a tall person.

There is no such thing as a unique correct working hight for when turning but, having the elbows matching the hight of the tool rest, when in the working position, is known as the most preferred position...!

Cheers
George
 

Daniel

Member
Joined
Jan 1, 2004
Messages
5,921
Location
Reno, NV, USA.
So many good replies here. I find most of them are generally given attention by the average member. Sharp tools, quality materials and equipment, practices that produce a quality writing instruments in general. But the one that stuck out to me was the one about paying attention to your spouse. I believe there is a discipline that develops with the quality of work. It is a behavior that does not cut corners to get things done faster. that wil not grab a unsharpened tool and try to make that pen. This behavior I believe also carries over to every area of life. For me the top thing you can practice is, responsibility. Be responsible for every effect yoru turnning has, even those on your wife, Husband, children and others. I know my wife does not mind the time I spend in the shop. Btu she does mind when I want money to buy pen kits and she is struggling to buy groceries. We now have it so my turhing money is completely separate from the rest of our money. I earn it separately and I keep it in a separate account. I sitll tell her when I am spending money on it, but that is more to include her. It never causes stress on her. That and I have been known to buy her gifts out of those funds at times. Pens are fine and I want mine to be even finer. But so is my wife and that matters even more.
 

snyiper

Member
Joined
Aug 24, 2009
Messages
1,601
Location
St Inigoes, MD
I would have to add something that to me appears to be common sense. Measure with a micrometer the parts for the kit and match the material with it. Do not rely on the bushings being exact or the pen parts to be consistant.
 

azamiryou

Member
Joined
Aug 14, 2010
Messages
1,015
Location
Silver Spring, MD USA
Many of these best practices seem to be generic to woodworking, or to tool-based hobbies in general, or even just to life. Personally, I'm most interested in seeing pen-specific practices (actual techniques, not philosophies) that might not be obvious or occur to everyone, and aren't in the instructions. So far in this thread, I've seen several of these:

  • Drill from the center of the blank for the best grain-matching.
  • Cut the blank long, don't drill through, and cut off the end to avoid blow-outs when drilling.
  • Use a centering bit to start holes for drilling.
  • Don't rely on bushings for accurate sizing - measure the pen parts.
I'll add:

  • When squaring then ends of a blank, square to the tube (hole), not the outside of the blank.
 

Padre

Member
Joined
Dec 2, 2009
Messages
1,841
When gluing the blanks, clean out the tubes using q-tips BEFORE the glue hardens/cures. Especially helpful when using polyurethane or epoxy glues.
 

leestoresund

Member
Joined
Oct 27, 2009
Messages
647
Location
Marietta, GA
The other side of that is get in good with your dentist. If you make pens for him/her and staff you can probably get lots of that pink wax dentists use so that you can easily plug the ends of the tubes to keep the glue from getting inside.

Lee
 
Signed-In Members Don't See This Ad

woodgraver

Member
Joined
Nov 8, 2010
Messages
262
Location
Federal Way, WA
Inspect you pen kits at point of sale or when they arrive in the mail. Look for finish problems, operate the transmission, make sure all parts are in the bag. Nothing like meeting a deadline only to find that your last pen kit has a fatal flaw.
 
Top Bottom