Attempting a dip

Signed-In Members Don't See This Ad

ToddMR

Member
Joined
May 3, 2010
Messages
1,715
Location
Columbus, OH
So I ordered some dip finish, assuming its like poly off of PSI. However it dries in 30 mins. My problem with CA is only that I can not successfully cut off the bushings. I have tried using a utility knife. This causes raised glue on the ends which will flake off. I know I could get delrin finishing bushings, but that gets too pricey with all the kits out there. Anyhow, I should receive the high gloss dip tomorrow. So this morning I disassembled two of my cigar pens. Ebony & Canary woods and dipped them in poly from miniwax. I used Hercules hooks to put them on since it has a strong curve and let me dip them. I then hung them up in the garage before I left this morning. I am curious to see how this will work. The dip I got from PSI only takes 30mins to dry, where the poly takes 3-4 hours and then 24 hours after the final coat. I am anxious to get home tonight and see how well the poly worked using the dipping method.

I am not totally banning CA as a finish for me, I just like to experiment.
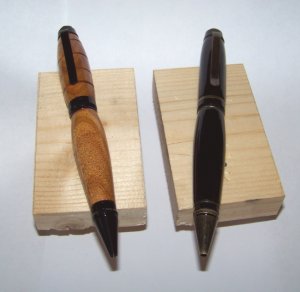
 
Signed-In Members Don't See This Ad

ToddMR

Member
Joined
May 3, 2010
Messages
1,715
Location
Columbus, OH
The amount of dip in the tubes isn't really going to concern me. Since its brass it tends to run off pretty quickly. If I need to I can always scrape the inside. However, I am not expecting any issues with the parts going in the tubes.
 

skywizzard

Member
Joined
Jan 15, 2009
Messages
351
Location
Canton, GA
Try putting a little Ren wax, or other wax on the end of the blank before mounting. That seems to work for me.
 

Jim Smith

Member
Joined
Jul 27, 2008
Messages
1,962
Location
Lakeland, FL
I agree with Wendell on this one. If you give your bushings a coat of Renwax including the "shoulders/vertical faces" as well as the part of the bushing you see when you're turing, you'll find that 90+% of your CA sticking problems will go away.

Jim Smith
Conyers, GA
 

soligen

Member
Joined
May 11, 2010
Messages
1,085
Location
Sterling Heights, Michigan
I use small pieces of brass tubing as bushings when finishing. I still get CA on them, but becasue the tube is lower than the wood, any "break-off" damage is on the end, which I can clean up with a quick swipe of a barrel trimmer (by hand only)

I then use 1000 , 1500, 2000 grit to knock off the sharp edge left from the trimmer. I try not to go through all the CA when trimming so I dont have bare wood on the end.

If I buff to a gloss, then I do it after this procedure.

May be a better way - I'm a rookie, but its worked so far.
 

ToddMR

Member
Joined
May 3, 2010
Messages
1,715
Location
Columbus, OH
I use small pieces of brass tubing as bushings when finishing. I still get CA on them, but becasue the tube is lower than the wood, any "break-off" damage is on the end, which I can clean up with a quick swipe of a barrel trimmer (by hand only)

I then use 1000 , 1500, 2000 grit to knock off the sharp edge left from the trimmer. I try not to go through all the CA when trimming so I dont have bare wood on the end.

If I buff to a gloss, then I do it after this procedure.

May be a better way - I'm a rookie, but its worked so far.

I never even thought about using spare/junk tubes for finishing. That is a good idea. Thanks for sharing that one. I still am giving the dip method a chance. I have a feeling if it turns out well for me then in the long run I won't be buying CA glue as often.
 

DurocShark

Member
Joined
Jul 26, 2008
Messages
3,622
Location
Anaheim, CA
I just use scraps of wood or resin or whatever and turn them into cones. For slims they're between centers. For larger tubes I drill them with 1/4" and put them on the mandrel. They're disposable, so I use the parting tool to cut the blank off them.
 

wb7whi

Member
Joined
Aug 29, 2008
Messages
304
Location
Spokane WA
Ok, dipping workes fine but there is a technique to it. Just dipping and hanging is a problem as the finish will collect on the bottom of the blank. Russ Fairfield addressed this issue in one of our club meetings and I have tried it and it works well.

First you need wood, something like a scrap blank is fine. Drill a 1/4 inch hole through the blank.

Now, between centers, turn the blank and create three steps in the blank. First step fits inside the tube of the blank to be finished. Second step is flush with the outside of the sanded blank. Leave some space to let the dip collect and create the last step, actually you dont have to do anything here if it is like a half inch in dia. You will need 2 of these bushing for each blank to be dipped.

Last step is to place 1/4 inch bolts with a washer and a nut into the blank to be dipped. With the wood bushing held in place by the bolt drill a hole in some scrap large enough to accomodate the larger part of the bushing. The bolt should be long enough to create a handle so you can work with the blank without touching it after dipping.

Dip the blank and set the unit into the hole you drilled to accomodate it and let dry. What happens is the finish will slide to the bottom of the blank but instead of collecting there it will continue to slide off onto the wood bushing. When dry you may want to take the unit appart and reverse it and redip to try and make the coating more even should it need it.

I did it for a serria and it works slick.
 
Last edited:

ldb2000

Member
Joined
Sep 11, 2007
Messages
5,381
Location
Laurence Harbor, NJ, USA.
You do realize that the dip finish dries in 30 minutes but takes 24 hours to several days or longer to fully cure and you shouldn't sand them until they are fully cured . There are no easy , quick finishes that don't have drawbacks of somekind or a learning curve .
 

Rangertrek

Member
Joined
Sep 10, 2008
Messages
2,104
Location
Bossier City, Louisiana, USA
Just use a cheap furniture paste wax on the bushings prior to applying the ca finish. No need to use expensive Renwax for that. It has worked for me many times in the past.

I now use delrin material for finishing. I bought a stick form johnnycnc and just made a set of tapered bushings for use on most all pens.
 

ToddMR

Member
Joined
May 3, 2010
Messages
1,715
Location
Columbus, OH
You do realize that the dip finish dries in 30 minutes but takes 24 hours to several days or longer to fully cure and you shouldn't sand them until they are fully cured . There are no easy , quick finishes that don't have drawbacks of somekind or a learning curve .


Yes I do realize that as it tells me on the product label. :) But being able to apply another coat after 30 minutes is better than 3-4 hours. I am well aware of the 24 hours for it to cure. Below are pictures of the two pens I dipped and set. I had no issues with collection at the bottom of the blanks. In the ebony pen you will see something to the right of the pen, that is a nail through the wood it is sitting on. Both pens dried for 24 hours using the poly. I am not looking for a quick way for the end result, sorry if that was the impressions people got, what I am looking for is something that is less hassle for me personally. That is why there are different methods because some people like one method better than the other. For me I like the quickness of the CA but there imo are too many variables for me personally to get it to work the way I want it to. That's just how I am. Who knows I might go back to that, but I am liking my results here. Thank you to everyone for all the tips and suggestions on both methods.

 
Last edited:

Rob73

Member
Joined
Feb 11, 2010
Messages
749
Location
Chicago Heights
It took me awhile to get my CA finish technique down. I had the same problem with CA coating the bushings and cracking off. I ended up combining a couple techniques I've seen a couple guys post here on youtube. Now I don't have any problems.

I've been thinking of trying to dip as well. My worry was build up and runs. I'll have to look into the method WB was referring to.
 

ldb2000

Member
Joined
Sep 11, 2007
Messages
5,381
Location
Laurence Harbor, NJ, USA.
I know I'm starting to sound like a broken record but aside from a couple of problem woods , people have only one main problem with a CA finish , they try too hard and they think that it has to be complicated . They HAVE to use BLO and HAVE to use a certain paper towel and they HAVE to use accelerator and HAVE to ....... add your favorite complication . Everyone says that their method is the right one , the only one , and if you don't stand on one foot while wearing yellow socks you won't get a good finish .
I was not a fan of Bill Clinton but he did have one thing right in my book , "KISS" . "Keep it simple , stupid" , it's a very profound thought .
Start with the simplest method , get it working , then complicate it if you must . Use three coats of thick , let it dry between coats then sand it smooth . No BLO , no DNA , no accelerator , no special CA finish chant . Does this work on every type of wood , no , but it works on most . The exception woods are oily woods and the only thing you need to do to those woods it to just give them a quick wipe with Acetone and let it dry then finish like every other wood .
Watch this video http://www.youtube.com/watch?v=8zsJ...14BAEC82&playnext_from=PL&playnext=1&index=12 and you will do a good CA finish the first time out .
Is this the only way to do a CA finish ? is it the best way ? no it's a starting point . With this method you will get a good finish every time , can it be improved upon , yes but that's something that you will have to try on your own .
Is this the method I use , no . I struggled with CA for over a year and gave up . I then tried every other type of finish there is looking for a quick , simple , lasting finish with limited success . Then I took a simple base method , got it working consistently , then changed it to do what I wanted it to do .
 

ToddMR

Member
Joined
May 3, 2010
Messages
1,715
Location
Columbus, OH
Thanks Butch I am comfortable I have the method down for CA that is best for me, its just that last part. Which I have been given plenty of ideas on how to fix. Its not that I can't apply it or anything like that. My intent isn't to start a finishing war on the site lol. I hold all you guys who have been doing this a while and know what works and what doesn't in high regard. I have to try the dip, only because I need to experiment. Who knows I might go back to CA quicker than I think. I have some simple solution ideas to prevent the sticking to the bushings thanks to all of you.

Thanks again for all the guidance.
 

DurocShark

Member
Joined
Jul 26, 2008
Messages
3,622
Location
Anaheim, CA
Butch is absolutely right. The basic method will work for everybody. The variables are smoothness of the applied finish and cure time.

Where it gets crazy is how we address those two problems. How do you get the smoothest finish possible for minimal sanding? How do you get it to cure if you're in a dry, cold region/shop/etc?

I started out just dribbling CA on while I smoothed it with a parts baggie on my finger. Works great, but takes more coats so you have more room to sand down the inevitable ridges. But it worked and looks great. (I have more than a few pens out there in the wild with this finish and they're doing great.)

That was when I explored options like BLO, accelerator misting, melted plexi, and so on. I have a highly refined technique now that works for ME. I doubt it would work for anybody else, at least not in the same way.

My recommendation is to turn a scrap of hardwood round approximately pen diameter. Then practice applying CA to it. Do an inch or so at a time. Get a great finish then move onto the next inch. Keep doing this until you're confident with your finish, then do a real pen. You'll be much happier in the long run with CA than with any other finish.

The closest alternative finish I've found is the melted plexi. Just as fast and nearly as tough. I've done lacquers, polys, shellac, and others, but none had the depth, shine, or durability of CA.
 

ToddMR

Member
Joined
May 3, 2010
Messages
1,715
Location
Columbus, OH
I have ordered the ELIMINATOR 805 REV II Finishing Bushings just now. So we shall see if this works for me. Thanks again everyone.
 

ldb2000

Member
Joined
Sep 11, 2007
Messages
5,381
Location
Laurence Harbor, NJ, USA.
Todd , I understand where you are coming from and you are absolutely right . Experimentation is the only way to learn and I applaud your trying new things . The dip method with the PSI Dipping lacquer was one that I had some success with . It does work well and seems to hold up well , I have a few pens that were finished this way that are still holding up well after two years . Then I hit a snag on a couple that took several days to fully cure and one that took over a week , in fact it never did fully cure . They were oily woods and even though I wiped them down with acetone they still gave me problems . I also found that the finish becomes very brittle when it gets older and crazes if banged . But it otherwise is a good finish . Don't give up with it , my post was really meant for people looking for a good fast alternative for a CA finish because they can't get it to work for them , and seeing your post think that this is the best way to go and give up trying to find a better way .
You say you also tried Poly which I found to be one of the best of all finishes but takes way too long to FULLY cure and stays too soft until it is fully cured . Keep trying , maybe you'll find something I missed . In the mean time don't give up on CA either because so far it's the best finish that I have found and if you sell or give your pens as gifts you'll want a finish that lasts .
 
Top Bottom