tdsmart
Member
I'm relatively new here, a couple of months. Haven't posted much, but I read everyday and have learned a great deal. One of the things I've learned is that if you have a problem someone here has already had it, solved it and is generous enough to coach others through a solution or tell us how to make sure we don't encounter it again.
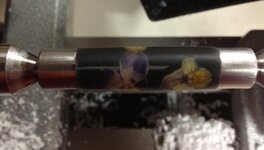
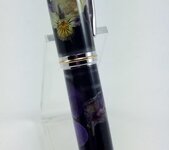
I am working on a blank greated by Marla that has embedded violas (little flowers for those like me that are not gardeners). It has developed what appears to be a separation along the axis of the blank. It looks like it runs behind the flowers. It wasn't there when I started turning. It wasn't there when I was half way done.
Normally I would chalk this up to a learned lesson and move on, except for 3 things. First, these are pricey little devils and I'd like to save it without the mar if at all possible. Second, I don't know how I've caused it and I don't want to repeat the error. Because, third, this is the second blank I've had a problem with. The first was a Christmas gift for my gardener wife. The marks on that one went around the blank rather than along the axis. I had micro mesh wet sanded that and thought I had a bit of water invasion, especially since it shifted down the length of the tube a little and changed shape after the pen was assembled. Wives overlook those errors and happily show off their flower pens to gardener buddies. Hence, my second attempt for gardener buddy.
Has anyone worked with these and had a similar issue? Is it possible I have tightened the centers too much and the separation developed as the material got thinnner and had less support? Is there a way to fix this beyond putting it under the pen clip? I still have the bottom to turn and, at least as of now, it hasn't got any marks on it.
Thanks, tom.