Advice wanted for antler blanks....

Signed-In Members Don't See This Ad

redneckmedic

Member
Joined
Dec 15, 2012
Messages
265
Location
Greenfield, IN USA
I just received 2 full sets of elk antler pairs from a buddy. I will be cutting these down down over the next week or so into blanks and I'm looking for advice.

I know that linear is my friend and curves aren't.

These races are years aged and dried.

I know that close to the skull is much denser and would make a nice knife handle.

I know that the small thiner tines make great for singlets unturned.

What don't I know?

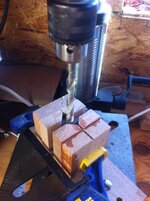
Tips for drilling. Cutting? Turning? Sanding? Finishing? Mating? Stablizing?

All advice is welcome, I have a band and table saw.

Thanks,

RNM
 
Last edited:
Signed-In Members Don't See This Ad

its_virgil

Member
Joined
Jan 1, 2004
Messages
8,117
Location
Wichita Falls, TX, USA.
Elk antler is not my favorite antler. You will find a thin layer of bone and a large amount of bone marrow. The layer of bone will most likely end on the floor. The porus marrow can be filled with CA. But, I have one customer who loves pens made from elk antler....those are the only pens I use elk antler to make.
Do a good turn daily!
Don
 

orbit308

Member
Joined
Oct 10, 2009
Messages
40
Location
Corpus Christi
Drill them on the lathe. You will have much better results in drilling a straight line. I think there's a youtube video or one on here about drilling antler on the lathe. Just put your drill bit in a drill chuck on the head side and a live center on the tailstock. Line up the two points on where you want the holes to be. You will have to hold the antler by hand (while drilling & advancing the tailstock with the other hand) and push it through when you get close to the end. Just remember to mark your bit with the length of the antler with tape or something. I started doing mine like this and have had much less mistakes than with the drill press. Just be careful holding the antler.
 
Joined
Jan 22, 2012
Messages
307
Location
Laurens,SC
Of course orbit308 meant for you to hold the blank with pliers.Good description.I'm looking forward to the ones I have drying out.
 

Phillikl

Member
Joined
Oct 3, 2012
Messages
86
Location
Brighton, TN USA
Tried to find the youtube video of what I used as a foundation; but as you would know it, can't find it. The creators main point though, was getting good cuts. If you take your blanks, and lay them on the antlers you should be able to arrange them to cut out most of the curves.

To drill them, I use my drill press. I built a jig to hold just about anything I can clamp it. The back part is attached and when doing square stuff can use the other side to make a good tight hold. You will have to adjust the antler some to get inline with the drill bit, a rotating table helps too. Some good practice is to get some round odd shaped tree limbs, and get a feel for getting everything lined up.
 

Attachments

  • press jig.jpg
    press jig.jpg
    40.7 KB · Views: 208

Dminelli

Member
Joined
Dec 30, 2012
Messages
5
Location
Chicago
Just my 2 cents.....Deer antler is a much better antler to turn. The elk seems softer to me and has more voids as mentioned above. I'm told many peeps fill these with crushed stones/powders and the like before finishing with super glue. While I've never tried this it does seem like a cool option to make a unique looking pen. Good luck and I look forward to seeing some pics.
 

Kenny Durrant

Member
Joined
Sep 11, 2012
Messages
2,496
Location
Sachse Tx. 75048
I just finished a pen with porous deer antler. I'm going to post pictures and more details on everything I've done, just haven't had time. Basicly I pressureized with pr and turned with no problems. I'll try to post more information asap.
 

rd_ab_penman

Member
Joined
Jun 1, 2007
Messages
1,646
Location
Red Deer, Alberta, Canada.
RNM,
For porous Elk or Deer antler I over turn 0.001, sand to 400x, blow all the sanding dust out of the pores with compressed air, build up with Med CA completely filling the pores, turn down the dried Med CA to size, sand to 400x, buff with extra fine steel wool and polish with Huts Ultra Gloss.
The trick is not to do any sanding until the pores a completely fill to avoid getting white CA sanding dust into the pores.

Les
 

philipff

Member
Joined
Jun 21, 2009
Messages
597
Location
Williamsburg, VA
I turned some deer antler yesterday. I find that putting the piece between centers to start with - -and adjusting the points -- to find a minimum displacement shadow as it turns -- helps get the drill bit going thru the correct path. I turn the antler piece as round as possible then drill on the lathe- - -slowly, with a sharp bit and an occasional spray with water to keep the whole thing cool. When I have a good blank then I glue in the tube, etc. Good luck! Philip
 

chevyguy65

Member
Joined
Nov 25, 2012
Messages
24
Location
New Berlin, Wi
we turn to just proud of bushings.. sand to 600 then seal with 1-2 coats of wood turners finish clear. sand again to 600 then polish with hutts ultra gloss. leaves the "pores" slightly darker and gives the blank a more antler look to it. :)
 

Hexhead

Member
Joined
Oct 25, 2006
Messages
185
Location
Fayetteville, AR, USA.
I like the bark on my antler pens. I put them in a swivel vise and at the drill press I put on the drill bit and then put the blanket behind it. I then eyeball it in move the swivel vise until I can get a straight line through it. I try to get the drill bit is close to the bark is I can.
 

redneckmedic

Member
Joined
Dec 15, 2012
Messages
265
Location
Greenfield, IN USA
I've turned 3 blanks in the last two days... here is what Ige learned.

Drilling/turning antlers smells fantastic!
Boring with a chuck/drill bit and center is most certainly the way to go!
antler blanks turn very smooth
Antler grain is beautiful!

Waiting to finish when I get my eliminator bushings
 
Top Bottom