
You are using an out of date browser. It may not display this or other websites correctly.
You should upgrade or use an alternative browser.
You should upgrade or use an alternative browser.
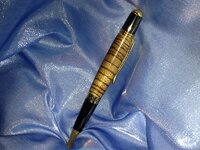
Zebra Wood--comments on photo setup
- Thread starter mharvey
- Start date
Signed-In Members Don't See This Ad
See more from mharvey

I use an iPhone for all my pictures and think they turn out ok. If your having a problem with lighting, step out side and take the picture in the shade (has to be a sunny day of course).
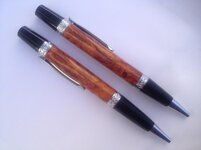
The attached was taken on a white piece of paper.

Signed-In Members Don't See This Ad
Haynie
Member
I would not use the fashion run way fabric if you are going to sell. Get closer to the pen on a shine free back ground.
fitty
Member
Can you comment on the no shine background...what color...or just not shiny...yes...did this with my iPhone...need a better camera...and closer...and need to get more lighting...still wroking the setup...thanks...
I use an iPhone for all my pictures and think they turn out ok. If your having a problem with lighting, step out side and take the picture in the shade (has to be a sunny day of course).
The attached was taken on a white piece of paper.
Attachments
gbpens
Member
Gray backgrounds tend to work on a colors. They offset the pen well without drawing attention away from the pen. You want people to focus on the pen not the background.
ctubbs
Member
Highly recommend a photo program to adjust your photos. I use PhotoShop, but there are other 'FREE' programs out there that will do anything you need to with your photos. Learn to crop and adjust light temperature. There are several articles in the Library and in the Photo forum that will be of great help with your photos. An easier to work camera might be helpful, however, nothing real fancy is needed to produce great photos. Some of the best photos I ever saw were shot with a simple box camera. Practice with your camera until you become very familiar with exactly how it works and your eye for composition starts to be second nature. It will come, seriously. It just takes practice. Try to see the photo, not all the pretty colors. Look at the photo, yes the prize winner you just shot, as thou your worst enemy were the photographer and you were trying to really put him down. Be critical of yourself before anyone else has the chance. Shortly you will become your own worst critic. Look up some of the great pen photos here and try to figure out how each was lighted and the photo was taken. When in doubt, ask. I'll guarantee you will receive many answers, but be sure to put on your thick skin coat, some may be a bit harsh, but sent with love.
Charles
Charles
I have had some good success with a dark grey and a medium tan background depending on the colors in the pen. My pictures have gotten much better since I made a light box. cost about 15.00 and makes a big difference. I further enhance the pictures with a photoshop program just to add crispness to the photo.( When I say "I" of course I mean my wife uses the photoshop!) Phones make taking pictures easier to post, but most lack the resolution for an outstanding picture. I think a great picture is the first step it an internet sale. If it looks bad, people will pass it over. Get their attention! From there your craftsmanship will speak for itself.
Further, get or make a small stand. I find that laying them flat takes away from the product. Prop it up with something, keep it off the background as it shows some depth and more of the features and characters of the pen and material.
Further, get or make a small stand. I find that laying them flat takes away from the product. Prop it up with something, keep it off the background as it shows some depth and more of the features and characters of the pen and material.
Last edited: