Whiskey barrels, charcoal, and pens...oh my!

Signed-In Members Don't See This Ad
See more from TimS124

TimS124

Member
Joined
Apr 11, 2012
Messages
735
Location
Asheville, NC
Late last year, we moved from the west coast to the east coast. A couple weeks ago, a buddy from the west coast came to visit and while they were out this way, they toured the Jack Daniels distillery.

I've made a couple pens for him in the past so when he said he has a collection of Jack Daniels stuff, I had to point out that there are pen blanks available that were cut from the staves of used Jack Daniels whiskey barrels.

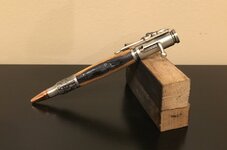
So, here's one of the two Jack Daniels pens I'll be sending him as soon as I make a custom case. The pen kit is the antique pewter "Deer Hunter" from Penn State and I'll swap out the kit's ink for Schmidt Easy Flow 9000 refills.

The black stripe is original charred surface from the inside of the barrel stave this blank came from! Drilling a 3/8" diameter hole that close to the edge was uneventful (I truly expected to blow out the side during drilling).

While the epoxy holding the tube in place was drying, I applied generous amounts of thin CA to the charred surface to strengthen it. After turning and sanding, that left some shiny spots in the deep crevices where the sand paper couldn't reach.

The Oak body was finished with 4 coats of Liberon Finishing Oil. Each coat was applied with 0000 steel wool which helped knock down the charred section's shiny spots.

I'll put a better photo in a later response here once I figure out where my photography booth ended up during the move (or whip up a reasonable substitute).
 

Attachments

  • Deer Hunter - charcoal copy.jpg
    Deer Hunter - charcoal copy.jpg
    141.2 KB · Views: 395
Signed-In Members Don't See This Ad

Alex D

Member
Joined
Oct 3, 2013
Messages
103
Location
Redondo Beach, CA
Nicely done!

I used that same technique on a Jack Daniels pen for a buddy. The only difference was that I cast the whole thing in PR (no pressure pot, just warmed PR) after the offset turning was done. The casting is not the easiest since you have to get even closer to the edge when you drill to allow room for the resin and still match the kit diameter, however, it does eliminate the shiny spot issue you noticed.

Gotta love the way those blanks smell when drilling and turning!

Cheers,
Alex
 

TimS124

Member
Joined
Apr 11, 2012
Messages
735
Location
Asheville, NC
Nicely done!

I used that same technique on a Jack Daniels pen for a buddy. The only difference was that I cast the whole thing in PR (no pressure pot, just warmed PR) after the offset turning was done. The casting is not the easiest since you have to get even closer to the edge when you drill to allow room for the resin and still match the kit diameter, however, it does eliminate the shiny spot issue you noticed.

Gotta love the way those blanks smell when drilling and turning!

Cheers,
Alex


The whiskey smell was pretty obvious when I drilled but not so much during turning. I saw a suggestion in another thread about including a bit of the offset from the scrap with the pen...a bit of fresh whiskey applied to the scrap can revive the scent...

Do you have a picture of your cast version? I took a couple phone photos of how close the hole was to the edge in order to preserve the charring...might be easier to build up layers of CA instead of trying to drilled another couple molecules closer to the edge to have room for resin. :)

Thankfully, the steel wool took care of the shiny spots with minimal effort.
 

Woody1969

Member
Joined
Oct 12, 2013
Messages
13
Location
Northampton, uk
A beautiful pen. I have three whiskey blanks at the moment but they are all too wet at 20%. I'm not sure if I dare drill so close to the edge but "he who dares wins" :) good idea about including the offcut.
 

TimS124

Member
Joined
Apr 11, 2012
Messages
735
Location
Asheville, NC
A beautiful pen. I have three whiskey blanks at the moment but they are all too wet at 20%. I'm not sure if I dare drill so close to the edge but "he who dares wins" :) good idea about including the offcut.

There's a trick to making that hole much less likely to blow out the side than it looks. The final size is 3/8" diameter so I pulled that bit out of my DeWalt set that has 1/64th increments...then I counted downwards three bits and pulled that one out...then did that two more times.

I drilled a pilot hole full depth with the smallest of those bits. It was tiny enough that there was plenty of wall thickness to prevent blowing out the side of the blank.

Then I drilled with the 2nd smallest bit, the 3rd bit I'd pulled out, then finally the 3/8" bit.

The last 3 bits each only skimmed the sides of the hole. They widened it by about a half mm on each side. That left plenty of room for the chips to clear (though I drilled in short increments, raising the bit often to clear it and keep it plenty cool).

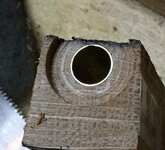
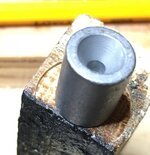
I've enclosed a phone photo of the resulting hole after the tube was glued in so I could easily show just how close to the edge the hole has to be for the charring to stay intact in the final pen:
 

Attachments

  • hole with tube (pen 2).jpg
    hole with tube (pen 2).jpg
    225.7 KB · Views: 198

endacoz

Member
Joined
Feb 5, 2014
Messages
716
Location
Brookfield, NY
Great photos and idea! I just glued up some JD blanks but the char will not be staying on them this time. Next time they will!
 

eharri446

Member
Joined
Mar 17, 2016
Messages
1,036
Location
Marietta, GA
Try using some hot melt glue and add a piece of wood to the side with the char to make a rectangle and then try drilling. It might make it work a little better.
 

TimS124

Member
Joined
Apr 11, 2012
Messages
735
Location
Asheville, NC
Try using some hot melt glue and add a piece of wood to the side with the char to make a rectangle and then try drilling. It might make it work a little better.

I had no problems working it with the approach I used. I'm curious how the hot melt glue would work when strengthening against the drill blowing out (I'm guessing you meant glue on a strip instead of the multi-bit drilling approach I described earlier). Hot melt glue seems like it would have enough give to be riskier than the step-drilling (though it would allow somebody that has to drill at their lathe to try).

Have you tried the hot melt glue approach? I'd love to hear how it worked out (and not sure where my hot glue gun is hiding since we moved).
 
Top Bottom