Watch this space ...

Signed-In Members Don't See This Ad
See more from Kaspar

Kaspar

Member
Joined
Aug 1, 2006
Messages
1,363
Location
Ahead of the curve. Waaay ahead.
Thanks for all the very encouraging comments!

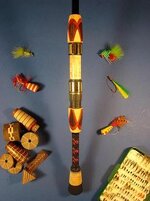
I thought it was a pretty good idea, and I am most pleased with how well the equipment I spent so much money on worked. I was able to achieve a degree of accuracy with this pen that lived up to the billing of the Byrnes Saw and Sander. You won't find any glue lines on this baby. I can heartily recommend this equipment to anyone. (No, I don't get any money for saying that either. I wish I did. :biggrin: Seriously, folks, that's good, hyper-precise equipment, and I can't say enough about it. Wait till you see what I'm going to do using the compound angle table on the sander. Keep "Watching This Space.")

Also, Ed "The Resinator" Brown's Zebra blanks (@ www.exoticblanks.com) are just wicked cool.

PLEASE...don't tell me you're selling it for $49.95 or something ridiculous like that.

Of course not. It's not up in Gisi or Grayson Tighe range, but I'm going to make one for myself at some point, and I wouldn't part with it for less than a nice, three-figure sum.

It is extremely outstanding workmanship. I think the only thing that throws it off for me is the green sections, inbetween the centerband, down by the final..should have stayed blue in my opinion. You are quite the inspiration for others!

Thank you for the kind comment and especially the critique. I definitely considered staying with turquoise all the way through. When I make mine, I might do that just to see how it looks.

My reasoning for adding the green was this: The Zebra blank is bold, and so is the Turquoise. That is a loud, eye-grabbing blue. Adding the Varasite softens it a bit, but it's also a trustone web so it still fits right in. The same thing, only different.

Sometime, I'm going to do something that uses the Turquoise and the Emerald Web tru-stones too. I may use the Varasite for veneer. You can slice trustone very, very thin. I've cut pieces to .020" with no problem. I wish I could say that about the Italian Onyx. It shattered when I tried to get it thin. That's why I had to use the Gabon Ebony, and had to put a CA finish on a mostly acrylic pen.
 
Last edited:
Signed-In Members Don't See This Ad

Hillbilly

Member
Joined
Oct 6, 2008
Messages
181
Location
Tennessee City, TN
Did you use a computer layout to see what the design would look like before you started? Amazing art work. I guess thats the best I've seen.

You what I think about when I see that? EBAY BABY $$$$:biggrin:
 

VisExp

Member
Joined
Oct 1, 2007
Messages
2,738
Location
Palm Coast, FL, USA.
It is extremely outstanding workmanship. I think the only thing that throws it off for me is the green sections, inbetween the centerband, down by the final..should have stayed blue in my opinion. You are quite the inspiration for others!

I agree with Jeff about the green sections. Regardless, you have made a beautiful pen and I'm sure it will inspire many people. Well done.
 

Kaspar

Member
Joined
Aug 1, 2006
Messages
1,363
Location
Ahead of the curve. Waaay ahead.
I agree with Jeff about the green sections. Regardless, you have made a beautiful pen and I'm sure it will inspire many people. Well done.

Thanks very much.

I can tell you that the customer very much liked the green, and that's probably the most decisive factor to me.

I can certainly see it the other way. In fact, I'm thinking a turquoise center band, with that tiny bit of green at both ends of each pen barrel might have worked better. But the great part is I can always make another and try new things with it. One thing I'd like to try is to make the same design, but with woods or plastics that are different shades of the same color. I think that would be very subtle.
 

Kaspar

Member
Joined
Aug 1, 2006
Messages
1,363
Location
Ahead of the curve. Waaay ahead.
I've had a few PMs about scalloping. Maybe this will help anyone who wants to try this.

Here's that piccie of the unturned, scalloped blank.
image.aspx


Here's the illustrated Mark Gisi tutorial on scalloping.

Put into words, this is how I would explain scalloping:

When you make a straight line cut (at any angle) on a rectangular piece of wood, that line will become a curve when the rectangle is rounded into a cylinder. The Zebra Blank shows this clearly. Those straight black streaks become curved as though you were laying flat strip of black paper on a white ball. If I'm "knot" mistaken, this same principle is used to make the Celtic Knot pens and other effects, doing nothing more than crossing, straight line cuts on a rectangular blank, then rounding it to a cylinder on the lathe.

You can stack scallops the length of the blank if you want. You can nest them and offset the "nesting", as I did. You can change the angles of the cuts, to make the scallops thicker or thinner (or perhaps "deeper or shallower" is a better way to put it.) There's a great deal you can do with them. I am even trying to figure out a way to overlap them around the cylinder. The problem, of course, is that the last scallop you do will always be completely visible, that is, the relevant terminus of the last one will not "tuck under" the first one, because each scallop requires a clean complete cut on the blank. But I will find a way. :biggrin:

Anyway, hopes this helps.
 
Last edited:

ahoiberg

Member
Joined
Apr 10, 2007
Messages
1,763
Location
Ames, IA, USA.
man that is one pretty pen. great job. i love the simple shape of it combined with that stunning design. great idea, eye and execution. i can't wait to see what comes next.
 

marcruby

Member
Joined
Feb 22, 2008
Messages
1,175
Location
Warren, Michigan, USA.
Gorgeous pen - a real work of art. And thanks for taking the time to show so much of the methods and tools involved. That openness is greatly appreciated.

Marc
 
Last edited:

mb757

Member
Joined
Jul 30, 2007
Messages
120
Location
Wisconsin.
I was thinking about your quest for a diffferent scallop. I you used two identical sized blanks with identical materials and then cut them, at your angle, transfered them from one blank to the other. Turn then cut and transfer the materials back to the original blank it may give you the effect you are looking for. It should look like the picture below only with the black material showing. I'm not sure that's what you are looking for, just thinking out loud.
 

Attachments

  • marks poles 579 edit.jpg
    marks poles 579 edit.jpg
    34.1 KB · Views: 293

jectos

Member
Joined
Dec 2, 2010
Messages
1
Location
Medina, OH
That is a fantasic Pen!!! I am new to this and very inspired by pieces like this. What type of adhesive did you use? I can't see a glue line anywhere.
 

Padre

Member
Joined
Dec 2, 2009
Messages
1,841
That is truly an incredible work of art. If you aren't a member of the Pemakers Guild yet, this one will definitely get you in.
 

Freethinker

Member
Joined
Jun 26, 2007
Messages
275
Location
MO.
You do realize this is a year old??? Regardless, it is still amazing!!!

LOL.

Yeah....it's an old thread, but i'm glad someone revived it......I liked revisiting this pen.

It is such a stunner, I never get tired of looking at it. I've been wanting to do a Gisi style pen, and this has made me want to get on with it. Off to the shop!!
 

seamus7227

Member
Joined
Mar 18, 2009
Messages
6,220
Location
Wichita Falls, TX
Looks pretty creative so far! I like it! especially the zebra resin thrown in there. Great work! Cant wait to see the finished product
 

jasontg99

Member
Joined
Feb 21, 2009
Messages
1,597
Location
Portsmouth, Virginia
You do realize this is a year old??? Regardless, it is still amazing!!!

LOL.

Yeah....it's an old thread, but i'm glad someone revived it......I liked revisiting this pen.

It is such a stunner, I never get tired of looking at it. I've been wanting to do a Gisi style pen, and this has made me want to get on with it. Off to the shop!!

Completely agree. This pen is amazing.
 

Kaspar

Member
Joined
Aug 1, 2006
Messages
1,363
Location
Ahead of the curve. Waaay ahead.
It's bad form to encourage thread necromancy so this will be my only reply:

Thanks again, to all. That is one I'll have to do a few more of someday.

That is a fantasic Pen!!! I am new to this and very inspired by pieces like this. What type of adhesive did you use? I can't see a glue line anywhere.

I used Grizzly's maxi-cure extra thick. In segmented work, I figure it's a good idea to use the heaviest CA possible. The bond will be paper thin, but it still has to hold things together during the stress of turning.

Great work! Cant wait to see the finished product
The picture of the completed pen is at the top of page three in this thread.

Thanks again.
 
Top Bottom