Veneer experiment

Signed-In Members Don't See This Ad
See more from bobleibo

bobleibo

Member
Joined
Mar 15, 2007
Messages
2,130
Location
Utah
I had a bunch of veneer scraps and was curious about turning it into a pen but not just plain and boring like straight Spectraply, so this is what I ended up with ....a lot of work for what was only a curiosity, not sure if I'll try to refine it, so..
pic 1 - veneer pieces
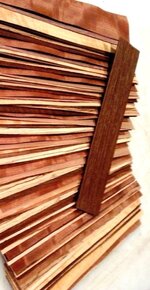
pic 2 - I made a form out of hard maple, glued them up and clamped them up, all 74 pieces.
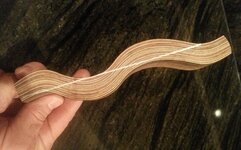
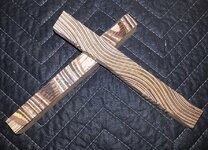
pic 3 - this is what the raw block looked like out of the form
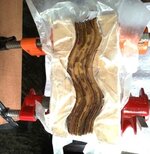
pic 4 - this is the block cut into 2 pen blanks
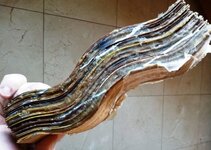
pic 5 - this is the first blank that blew out when the glue expanded instead of discharging while drilling. No, I was not mad at all but I have no idea where that hole in the wall came from :rolleyes:
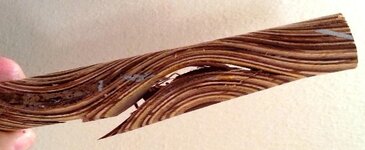
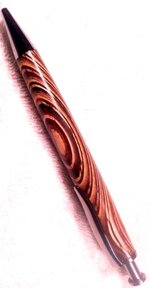
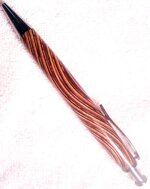
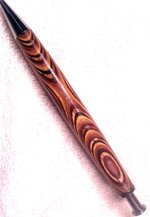
pic 6 thru 8 - this is the pen.
Wasn't sure what I would end up with but there was only one way to find out~
Thanks for looking
Bob
 

Attachments

  • veneer pieces.jpg
    veneer pieces.jpg
    78.1 KB · Views: 310
  • clamped.jpg
    clamped.jpg
    43.5 KB · Views: 357
  • raw blank.jpg
    raw blank.jpg
    49.9 KB · Views: 287
  • cut blanks.jpg
    cut blanks.jpg
    391 KB · Views: 284
  • blow out.jpg
    blow out.jpg
    31.9 KB · Views: 264
  • pen 3.jpg
    pen 3.jpg
    46.5 KB · Views: 289
  • pen 4.jpg
    pen 4.jpg
    48.1 KB · Views: 254
  • pen 8.jpg
    pen 8.jpg
    53.5 KB · Views: 310
Last edited:
Signed-In Members Don't See This Ad

Bean_Counter

Member
Joined
Feb 27, 2013
Messages
960
Location
Lubbock, TX
I think the experiment worked out well. Very nice pen, how big was the block? I'm assuming there was a lot of waste?

I usually get mad and throw something and then get mad again cause I have to go shag whatever I threw lol.....
 

bobleibo

Member
Joined
Mar 15, 2007
Messages
2,130
Location
Utah
I think the experiment worked out well. Very nice pen, how big was the block? I'm assuming there was a lot of waste?

I usually get mad and throw something and then get mad again cause I have to go shag whatever I threw lol.....

The scraps are 1-3/4" wide thinking I could get 2 blanks out of it. Here's a pic of the first block I glued up and sanded. I forgot to compensate for the curves which prevented getting a section out of the middle which you can see where I marked. On the other raw block you can see where the lines are that leaves enough to get two 3/4" blanks out of it. Everything outside of the lines is waste.
 

Attachments

  • 20151213_201322.jpg
    20151213_201322.jpg
    48 KB · Views: 198

Curly

Member
Joined
Nov 20, 2010
Messages
4,850
Location
Saskatoon SK., Canada.
Nice work. Wave blanks! Are you taking the off cut "crests" and glueing them into the "troughs" on the opposite side? It would reduce the waste and make for a bigger blank.
 

bobleibo

Member
Joined
Mar 15, 2007
Messages
2,130
Location
Utah
Here are a few tips for anyone who wants to give it a go......
- I used Tightbond wood glue. Whatever you use, make sure it has a long working time, you'll need it. I might try Gorilla epoxy IF I do it again.
- have your gluing process set up, you won't have time to fumble around
- this is the second maple form I made. The first one had curves that were too severe to press the glued veneer into it even using big pipe clamps.
- the thicker the stack of veneer, the less of a curve you can press
- clamp the living **** out of it! Veneer splinters very easily and your raw blanks will show it if there are any gaps. Think catches.
- when you take it out of the form, there will be a very slight spring back, enough that you will not be able to add more veneer to the block and re-clamp with the same form so make sure you use enough to end up with a section out of the middle (sideways) that is big enough for your blank.
- the "crests" and troughs" will not fit into the other side, thus the waste.
- I cut mine on the band saw and sanded flat after. This helps get squared blanks.
- I rounded them before I drilled them.
- When you drill GO SLOW! There is a lot of glue in this which can gunk up. If it cannot find it's way out like normal sawdust, it will find another way out! (refer to blow-out in first post)
- did I mention DRILL SLOWLY? and back your drill out often.
- use drill bits that have very clean flutes to help get the gunk out.

If anyone has ideas or suggestions that might make this a better process, I'd love to hear them.
Cheers
Bob
 

BRobbins629

Passed Away Dec 28, 2021
In Memoriam
Joined
Mar 8, 2006
Messages
4,037
Location
Richmond, VA, USA.
Very neat idea. May be easier if you soaked the veneer in water and pressed in the form without glue. Let it dry and it should take the shape of the form. After drying it should be easier to glue up and you could probably use steeper curves.
 

KenV

Member
Joined
Oct 28, 2005
Messages
4,720
Location
Juneau, Alaska.
Bob, a most excellent example of strip lamination techniques scaled down to pen scale!!!!

Using wood glues may require several days of curing because of all the water added in proportion to the amount of Wood. Partially cured wood glue is gummy.

I saw some work by a California Turner several years ago where he was using marine epoxy for the adhesive and varying the thickness of the glue to good effect.

Well done indeed.
 

bobleibo

Member
Joined
Mar 15, 2007
Messages
2,130
Location
Utah
Very neat idea. May be easier if you soaked the veneer in water and pressed in the form without glue. Let it dry and it should take the shape of the form. After drying it should be easier to glue up and you could probably use steeper curves.
That's a great idea. My hope was the moisture in the glue would help some with flex. Doing in steps might get better results.

Bob, a most excellent example of strip lamination techniques scaled down to pen scale!!!!

Using wood glues may require several days of curing because of all the water added in proportion to the amount of Wood. Partially cured wood glue is gummy.

I saw some work by a California Turner several years ago where he was using marine epoxy for the adhesive and varying the thickness of the glue to good effect.

Well done indeed.
You sure got the part about partially cure glue being gummy...which is what caused the blowout. I also think the heat of the drill may have added to that. Marine glue is a good thought. It cures hard.

Thank you for the kiddos and suggestions. It gives me encouragement to experiment again.
Cheers
Bob
 
Top Bottom