Unknown Spalted Burl on Jr Statesman

Signed-In Members Don't See This Ad
See more from Nate Davey

Nate Davey

Member
Joined
Jan 17, 2010
Messages
120
Location
Fayetteville, NC
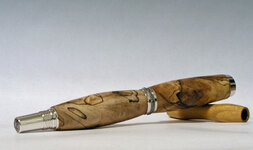
This is my second Statesman and I really like this kit. This is another burl from my "free bag o'burls" from a buddy of mine. 3 coats med ca, 6 coats thin ca 12k MM and white diamond buffed.

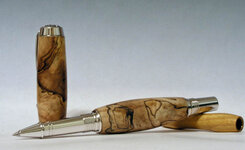
Pic was taken with my ceiling lights f8, shutter speed 4 seconds.

Comments and critique appreciated.

P.S. Still don't have a good prop yet.
 

Attachments

  • Unk Spalted Burl 01.jpg
    Unk Spalted Burl 01.jpg
    64.6 KB · Views: 273
  • Unk Spalted Burl 03.jpg
    Unk Spalted Burl 03.jpg
    51.6 KB · Views: 228
Signed-In Members Don't See This Ad

toddlajoie

Member
Joined
Feb 6, 2010
Messages
1,728
Location
Feeding Hills MA
Pen looks fantastic, I'm far from an expert on woods, but my knee-jerk guess would be spalted maple...

Photo looks very good. Fine tuning suggestions would be to maybe shoot from a little higher angle (raise the camera and shoot down a the pen a bit more...) Second shot looks like it may have a bit of camera movement. With the long shutter speed, are you using a cable release or self timer to eliminate camera shake? Another suggestion would be to get some slightly opaque material (frosted glass, wax paper, tissue paper or such, something SLIGHTLY not clear, not something too opaque) and put it between the pen and the light source. This will soften the shadow you see below the pen and spread the light a bit more around the barrel.

Again, MINOR suggestions, not major criticisms, the shots are really very good.
 

Nate Davey

Member
Joined
Jan 17, 2010
Messages
120
Location
Fayetteville, NC
Thanks for the photo tips. Typically, there is some natural light coming in from the window to the right of the pic put took this at night. I like the "not clear" filter idea and will find something to use. As for the motion in the second pic, I need to stop being cheap and get a new battery for my remote. Thanks again for the advice.

Nate
 

Robert Gill

Member
Joined
Feb 4, 2011
Messages
9
Location
Louisiana
Your pen and pics both look good. I am working on my first CA finish pen now. I sanded with 150 grit, then thin CA following by med with 150 grit to fill some pits. I then sanded with 150 through 12000MM. Then a couple of coats of thin. Looks good except for some scratches, Got enough wood to turn finish off and start over. Question is, do you guys sand between coats or not. Also how about a final polish. Thanks
 

ctubbs

Member
Joined
Sep 12, 2010
Messages
3,588
Location
Murray, Kentucky
Your pen and pics both look good. I am working on my first CA finish pen now. I sanded with 150 grit, then thin CA following by med with 150 grit to fill some pits. I then sanded with 150 through 12000MM. Then a couple of coats of thin. Looks good except for some scratches, Got enough wood to turn finish off and start over. Question is, do you guys sand between coats or not. Also how about a final polish. Thanks

Robert, starting to sand at 150 is just asking for trouble unless you are turning with the paper. 150 will put huge scratches in the wood that you then have to get out with 220, then 340 right on. If your tools leave tool marks that deep then you need to alter your process. Use sharp tools and take light cuts. Very rarely start sanding under 400P. Starting at 150 you are just generating much more work for yourself. These ideas are respectfully submitted and in no way a criticism of your work or yourself. They are intended as a help. I started there myself and very kind turners slapped me silly and set me straight. I believe once you try the finer grits, you will see the difference. I agree that on flat work 150 is a great starting place, but you are starting on a tool polished surface on the pen blank.
Charles
 

Nate Davey

Member
Joined
Jan 17, 2010
Messages
120
Location
Fayetteville, NC
I think its spaulted pecan. I just did one that look almost exactly like yours....in fact I thought it was mine.:eek:

Coincidence??? Have we seen the two of them together? Clark Kent / Superman???

I had to start this one at 150 grits as it was pretty punky and I had to stabilized it first. I will sand up to 3200 MM if the woods features keep appearing as I go finer. I don't sand between CA coats either.
 

toddlajoie

Member
Joined
Feb 6, 2010
Messages
1,728
Location
Feeding Hills MA
My own opinions here, but if you're using CA for filling, I would still suggest you finish sand the wood well below 150g. I typically turn to size with a skew, then starting at 400g, sand to about .02 or .03 below the parts measurements. From there I do a quick sanding with 400/600/800/1200 with the lathe off, sanding with the grain. Wipe it down with acetone IF there is dust in the pores. Give it a bit of BLO IF I want the change in color that brings with it (and if I do this, it then gets an overnight to sit and cure...) After that I start with the CA, a few coats of thin if the wood is soft and or needs some filling, otherwise I do it all with medium. Typically I don't sand between coats of CA, unless I get sloppy and the ridges get out of control...
 
Top Bottom