Turning end grain

Signed-In Members Don't See This Ad
See more from plantman

plantman

Member
Joined
Jan 2, 2012
Messages
3,437
Location
Green Bay, Wi
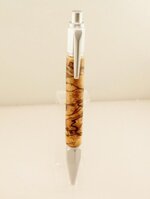
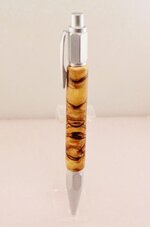
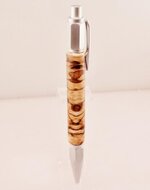
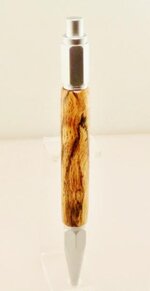
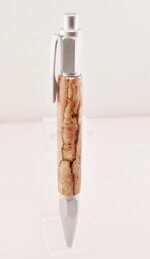
Usualy when I buy blanks from someone, I ask for the wildest, narlyest, knotyest, punkyest grain they have. I like something a little different. This pen is from some Mineral Stained White Oak that Steeve sent me several days ago. The blanks are cut across the grain, giving you end grain the length of your blank. Not very stable to work with !! But, if done carefully, makes a very interesting grain pattern. This is the method I used to turn this blank, and would use for any end grain or realy funky burl. Cut the blank about 1/2" longer than your tube. Cover the entire blank in thin CA, and let it soak in for a little while before spraying accelerator on it. Wrap blank in tape. I use duct tape because it's nylon reinforced. Drill your hole starting with a smaller drill and work your way up. After drilling coat the inside of your hole with thin CA. Redrill your hole being careful to keep the drill centered in the blank. Glue in your tube. Remove the tape. Turn your blank until it is round. Apply a coat of CA to the blank and let it soak into the endgrain. Apply accelerator and wipe dry.. Cut about a 64th'' off and check your blank. Apply more CA if you can see pores in the end grain. Turn to size, but do not turn the ends any smaller than the body with a tool. Hand sand with lathe nunning with 400 grit paper. Put another coat of CA on your blank and shape the ends with the sandpaper. Be gentle, there's nothing there but end grain. Finish your blank with CA. Hand sand to 1200 or more, removing any spots that reflect light. Take a parting tool and squqre your ends down to the bushings to remove any glue. I will give my blank 2 coats of polish with the lathe running. Put your prize together. The second pen is the same Mineral Stained White Oak, only cut with the grain. Still nice, but not as nice as the end cut Oak. For those of you who do not know my work, I use a Mini Micro Metal Lathe to turn most of my blanks. This makes it very easy to control tight tolorances and avoid any digs. Jim S
 

Attachments

  • DSCF0026 (484x640).jpg
    DSCF0026 (484x640).jpg
    10.9 KB · Views: 328
  • DSCF0027 (423x640).jpg
    DSCF0027 (423x640).jpg
    11.2 KB · Views: 290
  • DSCF0029 (507x640).jpg
    DSCF0029 (507x640).jpg
    11.9 KB · Views: 277
  • DSCF0032 (331x640).jpg
    DSCF0032 (331x640).jpg
    9.8 KB · Views: 232
  • DSCF0031 (371x640).jpg
    DSCF0031 (371x640).jpg
    9.5 KB · Views: 244
Signed-In Members Don't See This Ad

SDB777

Member
Joined
Feb 6, 2010
Messages
6,620
Location
Cabot, Arkansas USA
Wow!!!

Got some nasty Crosscut Spalted Pecan here that is almost too punky to pick up with my hands. Was thinking about getting some of that Wood Hardener stuff from HD and let it soak in there for awhile....you ever tried that? I'm not set-up for vaccuum, and there is no way I can afford to get a 'system'(ready-to-use type thing).
I've tried using thinCA on them, but it doesn't get into the blank far enough before crystalizing....


That oak doesn't look too bad, just the right amount of spalting to make it POP!


Scott (those CA fumes are awesome too) B
 

plantman

Member
Joined
Jan 2, 2012
Messages
3,437
Location
Green Bay, Wi
Wow!!!

Got some nasty Crosscut Spalted Pecan here that is almost too punky to pick up with my hands. Was thinking about getting some of that Wood Hardener stuff from HD and let it soak in there for awhile....you ever tried that? I'm not set-up for vaccuum, and there is no way I can afford to get a 'system'(ready-to-use type thing).
I've tried using thinCA on them, but it doesn't get into the blank far enough before crystalizing....


That oak doesn't look too bad, just the right amount of spalting to make it POP!


Scott (those CA fumes are awesome too) B

:bananen_smilies022: SCOTT; I have never tried the wood hardner from HD. I will be going there today, and will check out what they have to offer. All I use is thin CA as I reduce the size of the blank. The last cut I take is close to the finished size I am aiming for and removes the thin CA. Next I sand the blank with 400 paper. Than I slow the lathe down to finish speed and apply a coat of gap filling CA with a paper towel. Sand down my ends to size and remove all dust. With the lathe in slow speed apply as many coats of gap filling CA with a smooth heavy paper napkin that you want. I never do less than 4, sometimes 10 or more. I hand sand with the lathe stopped, starting with 400 and remove any shiney spots that will show up with overhead lighting, then go over it again with 1200. Wipe clean, than I use two coats of One-Step Polish with the lathe running at high speed. I think I remember an article in the library about sinking wood in a can of Min-Wax to stabelize it. I have no vaccuum setup and have always used the above method with little problems. I do think the advantage I have, is using a metal lathe with a tool holder and cutting from the side, instead of by hand and cutting straight on. With the cutting bit you have a very small cutting point, and no in or out, up or down movement while turning, plus presice depth control. As for he fumes, I have a large box fan sitting on the floor blowing ais towards the lathe. I also mount the nozzle of my vaccuum directly to my tool holder to draw away fumes and shaveings. It's the narrow attachment you use for getting into sofas and chairs, has flat sides and clamps easily to the tool post. Some of this White Oak is split and punky, but for me the badder the better !! Pease to all !! Jim S
 
Last edited:
Top Bottom