
You are using an out of date browser. It may not display this or other websites correctly.
You should upgrade or use an alternative browser.
You should upgrade or use an alternative browser.
Tulipwood barons with embellishments
- Thread starter jtate
- Start date
Signed-In Members Don't See This Ad
See more from jtate


Dang you Roy! You owe me a flat panel monitor. I tried smashing the bug.
Ummm JT? Very impressive work!
You know, I WAS going to say something along the lines of "atta girl, you really do some amazing things with your pens" but when I read your post above I got so tickled I forgot what I was going to say!


Signed-In Members Don't See This Ad
gerryr
Member
Nice work, Julia.
LEAP
Member
Very nice, I really like the one with the bead at the center band.
Sylvanite
Member
Very nice wood accents. I really like it when people replace the kit trim with matching wood.
Nicely done embeleshments Julia. Does the cb come apart to allow the replacing of the black ring for the wood, or do you have some trick to do that?
BTW, I think your square bowl is very cool too.
BTW, I think your square bowl is very cool too.
wdcav1952
Activities Manager Emeritus
Where is the applause smilie????
papaturner
Member
Very good work,Julia.
Perry
Perry
LouisQC
Member
I like them a lot!!!
How did you do the tip?
Also what finish did you use?
How did you do the tip?
Also what finish did you use?
jtate
Member
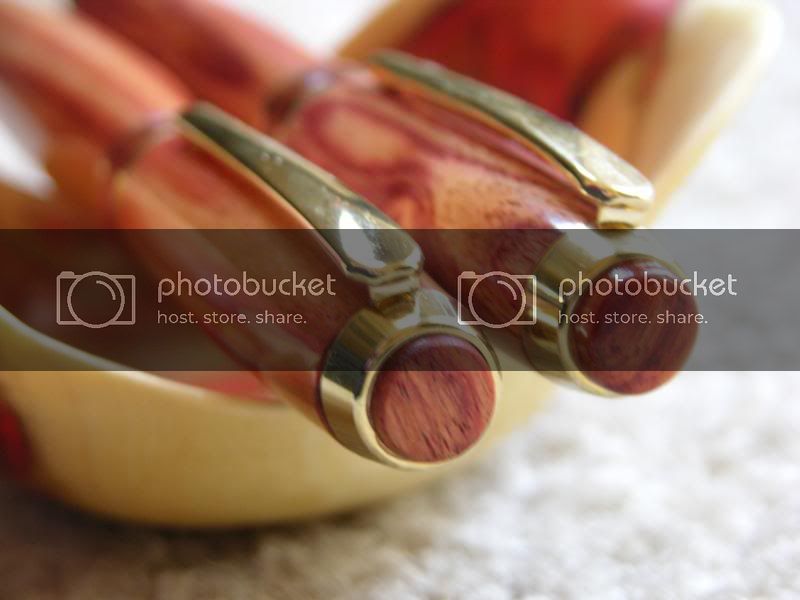
I did the ring and the finial from the left over part of the blank after cutting off the parts for the barrel and cap.
I use a face plate more than a chuck. Just my preferece.
Screwed on a waste block, glued the little block in the center, turned that little block round.
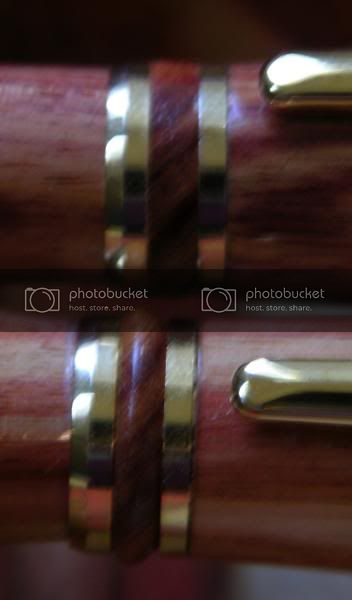
I did the ring first them the finial. I measured the ID of the black ring that comes with the baron kit and hollowed the piece to match it. Then I measure the OD of the black ring that came with the kit and cut the outside to match. I finished this pen with CA so I dripped on a little and let it cure them MM'ed. Since it's just a little detail piece I didn't worry about a perfect finish on it.
The hard part is cutting the ring off. I started witha parting tool, then switched to a little hacksaw that I held against the spinning wood as the lathe turned slowing. Once it came off - well to tell the truth, it flew off into the shavings pile so I had to do it all over again.
With the second one, I sanded the unfinished side after cutting it off, put a little lacquer on it and hung it on a pin to dry.
The finial was pretty easy to make - harder to install. From the remaining wood glued to the face-plate and waste block, I turned a little mushroom and finished it with CA. I hacksawed it off at the point at which the mushroom stem would enter the ground (if it were a real mushroom).
I made a couple more rings and mushrooms from this block then used the remaining waste block to fix the end piece on which the finial is a little black piece. I cut a hole in the cetner of the waste block and jammed the part into the hole. I love jam chucks! They're tricky though. You have to get them tight. Once the part was in there, I started cutting with a detail gouge (fingernail grind) till I had cut through the black part and into the brass underlying the gold plating. You could use a jacobs chuck and drill bit to cut through the black part so it would all come off. I just used the detail gouge. Once I got the black piece off I just stuck the mushroom in it and dropped some glue inside the part (not CA, it makes a film on the gold plated nib part - DAMHIKT). After the glue sets up you just install the part as you normally would when assembling the pen.
And that's it!
Oh, I tried for a CA finish and failed dismally. Somebody should have told me how oily tulipwood is! Why did I not already know this! I'll be doing an acetone wipe the next time I use Tulipwood.
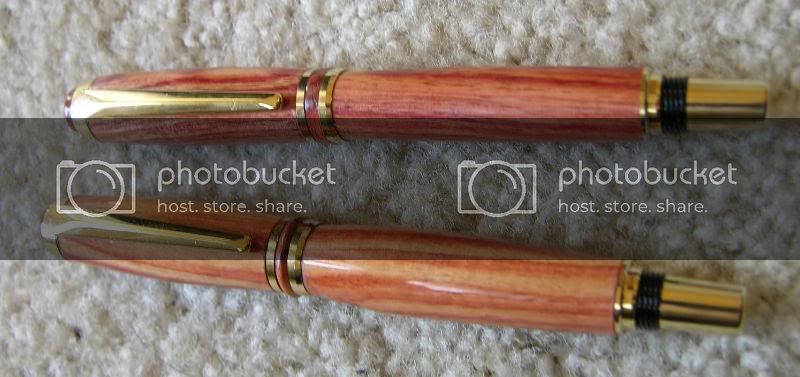
One of these if the failed CA finish and the other is a dipped lacquer finsih.
Julia
I use a face plate more than a chuck. Just my preferece.
Screwed on a waste block, glued the little block in the center, turned that little block round.
I did the ring first them the finial. I measured the ID of the black ring that comes with the baron kit and hollowed the piece to match it. Then I measure the OD of the black ring that came with the kit and cut the outside to match. I finished this pen with CA so I dripped on a little and let it cure them MM'ed. Since it's just a little detail piece I didn't worry about a perfect finish on it.
The hard part is cutting the ring off. I started witha parting tool, then switched to a little hacksaw that I held against the spinning wood as the lathe turned slowing. Once it came off - well to tell the truth, it flew off into the shavings pile so I had to do it all over again.
With the second one, I sanded the unfinished side after cutting it off, put a little lacquer on it and hung it on a pin to dry.
The finial was pretty easy to make - harder to install. From the remaining wood glued to the face-plate and waste block, I turned a little mushroom and finished it with CA. I hacksawed it off at the point at which the mushroom stem would enter the ground (if it were a real mushroom).
I made a couple more rings and mushrooms from this block then used the remaining waste block to fix the end piece on which the finial is a little black piece. I cut a hole in the cetner of the waste block and jammed the part into the hole. I love jam chucks! They're tricky though. You have to get them tight. Once the part was in there, I started cutting with a detail gouge (fingernail grind) till I had cut through the black part and into the brass underlying the gold plating. You could use a jacobs chuck and drill bit to cut through the black part so it would all come off. I just used the detail gouge. Once I got the black piece off I just stuck the mushroom in it and dropped some glue inside the part (not CA, it makes a film on the gold plated nib part - DAMHIKT). After the glue sets up you just install the part as you normally would when assembling the pen.
And that's it!
Oh, I tried for a CA finish and failed dismally. Somebody should have told me how oily tulipwood is! Why did I not already know this! I'll be doing an acetone wipe the next time I use Tulipwood.
One of these if the failed CA finish and the other is a dipped lacquer finsih.
Julia
Tanner
Member
Oh now that's pretty cool! Sweet looking embellishments!
OKLAHOMAN
Member
It bugs me that I didn't think of that!

CaptG
Member
Very nice work. I always wipe the blanks with acetone before I apply a CA finish. It seems to help a lot.
I always wipe the blanks with acetone before I apply a CA finish. It seems to help a lot.jhs494
Member
Awesome looking pair Julia! I think they both look great. The extra details turned them into something very special.
Thanks for sharing them with us!
Thanks for sharing them with us!
kirkfranks
Member
Nice job Julia,
I can't decide which center-band I like best. How were you able to get beads on both sides using a faceplate? I am really impressed to get such small beads.
On the finial installation when I did mine I just used a HF punch to push (hit) the black finial out from the inside.
I can't decide which center-band I like best. How were you able to get beads on both sides using a faceplate? I am really impressed to get such small beads.
On the finial installation when I did mine I just used a HF punch to push (hit) the black finial out from the inside.
Dalecamino
Local Chapter Leader
Very nice Julia !! Thanks for showing us ! [8D]
toolcrazy
Member
That is a cool idea. And you have some very nice pens.
Gary Max
Member
You did good------now if I could only find some extra time
Neodon1
Member
Dynamic, impressive Art,
Thanks for sharing your very nice pens.
Neodon1[8D]
Thanks for sharing your very nice pens.
Neodon1[8D]
R2
Member
Lovely pens Julia!![^] I like the embelishments.[8D] I think the pens would be ppreferred by the ladies.
[^] I like the embelishments.[8D] I think the pens would be ppreferred by the ladies.jtate
Member
Kirk,
That's a GREAT idea - the transfer punch to punch out the little black piece! Since they are actually made for punching out pieces, not all the various other uses we find for them.
That's WAY better than the jam chuck and detail gouge. I'm Soooo going to do that next time.
Julia
That's a GREAT idea - the transfer punch to punch out the little black piece! Since they are actually made for punching out pieces, not all the various other uses we find for them.
That's WAY better than the jam chuck and detail gouge. I'm Soooo going to do that next time.
Julia
alamocdc
Member
I like your embellishments, Julia! the caps at the final are an especially nice touch.[^]
Are we allowed to say that to a female turner?[:0][}][]
Originally posted by jhs494
Awesome looking pair Julia!
Are we allowed to say that to a female turner?[:0][}
][]jtate
Member
Billy,
Hey, at my age - I'm just pleased to have 'em noticed!
Julia
Hey, at my age - I'm just pleased to have 'em noticed!
Julia
alamocdc
Member
ROTFLMAO!!
VisExp
Member
Beautiful work! The embellishments really make those pens stand out in a crowd. Well done.
DocStram
Member
Originally posted by OKLAHOMAN
It bugs me that I didn't think of that!

Dang you Roy! You owe me a flat panel monitor. I tried smashing the bug.
Ummm JT? Very impressive work!
Texatdurango
Member
Originally posted by jtate
Billy,
Hey, at my age - I'm just pleased to have 'em noticed!
Julia
You know, I WAS going to say something along the lines of "atta girl, you really do some amazing things with your pens" but when I read your post above I got so tickled I forgot what I was going to say!
its_virgil
Member
Nice touch to the pens, Julia. I really like the wood CB ring and the end cap finial. Doing away with that little black ring all together (no replacement)makes the baron look like a different pen. Nice work.
Do a good turn daily!
Don
Do a good turn daily!
Don
Randy_
Member
Nicely done, Julia!! Very elegant.
To carry your mods a step further, you might want to look at a closed end version or if you want to retain the posting capability, figure out a way to add a nice piece of wood to the posting end of the barrel to replace that gaudy hunk of metal above the threads.
To carry your mods a step further, you might want to look at a closed end version or if you want to retain the posting capability, figure out a way to add a nice piece of wood to the posting end of the barrel to replace that gaudy hunk of metal above the threads.
Rifleman1776
Member
Very fine idea. I may try something like that.

workinforwood
Member
It's way better than I could do, so I'm not going to argue with that point. The idea's are inspirational indeed. Now..I have to tell you that in my opinion the top pen in photo 2 looks bent. I really don't think it is bent, but it looks like it is, and I think I figured out why. The lower barrel, the grain travels slightly angled. The cap has as much or more angle but the angle goes in the opposite direction. So it feels like the pen is bent where the cap and pen meet. I just wanted to point this possibility out to you. Maybe it's just me, or maybe nobody else wanted to mention it. Thank you for letting me see your skills and talents!
Hiram33
Member
Awesome work
gwilki
Member
Beautifully, and uniquely done, Julia.
jtate
Member
Jeff,
Wow! It really does look bent! I think it's an artifact of the photography process more so than an issue with the grain in the wood. using my eyes instead of the lens, the pen doesn't look bent. The grain lines up nicely. Now the other one - I can't get the grain to line up right - and I used the PH vise, drilled in the cneter, carefully matched the parts so I'd be aware of which part went which way and still, I can't get the grain lined up right.
Sigh...
Always more challenges for the future!