
azamiryou
Member
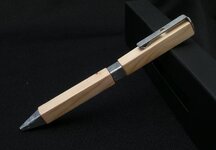
For my PITH pen, I latched onto the "2x4" and "common, construction grade building material" aspects of the rules.
First of all, 2x4's are not round, so I needed to make a square pen. It turns out there's a reason pens aren't usually square: they are not very comfortable to write with. But I'm an artist, not a craftsman, so I don't think form has to follow function.:tongue:
Secondly, I've never seen construction grade gold or titanium plating, so I needed galvanized steel pen parts. After checking with suppliers (not really) I discovered there are no commercially available galvanized steel pen kits, so I had to make my own. I started with a piece of plate made for nailing together a splice, I guess. It already had holes in it, which I used as decoration on the clip. The stamped writing on the nib section also adds interest.
Thirdly, how often do builders put a deep, luxurious finish on a two by four? I've never seen it. I wanted to protect the soft pine, so I applied a CA finish, but when sanding I stopped before the high-gloss shine started to come out. The result should be durable, but still looks a lot like unfinished 2x4.
My first PITH was an awesome experience, I had a lot of fun. I also found it liberating to be working on a pen a) for another penmaker and b) that I knew I wouldn't be paid for. It really gets creative juices flowing when you don't have to worry whether the results are actually commensurate with the time put in. I think it's a neat pen, but there's no way it would sell for what I'd have to charge if I were going to sell it!
")