Thin Blue Line

Signed-In Members Don't See This Ad
See more from Kunk35

Kunk35

Member
Joined
Aug 10, 2015
Messages
51
Location
Denison, TX
The "Thin Blue Line" pens have been getting a lot of interest lately. I'm really glad to see that. Not because of my traffic, but because the police seem to be needing all the interest and support they can get right now.

Here is my Thin Blue Line pen...

ry%3D480
 
Signed-In Members Don't See This Ad

ladycop322

Member
Joined
Dec 21, 2013
Messages
961
Location
South Florida
I like the concept but there are a lot of scratches in the black part. Try to re sand at 400 and 600 them MM to 12,000....it will look soooo much better :)

Michelle
 

Kunk35

Member
Joined
Aug 10, 2015
Messages
51
Location
Denison, TX
You must have better eyes than me.... you can make out microscratches up to 12000 grit...

This is what I used. Wet of course.
ry%3D480
 

Kunk35

Member
Joined
Aug 10, 2015
Messages
51
Location
Denison, TX
I told you they were hot right now. Just sold the second one in two days. Now I gotta order more supplies.....
 

ladycop322

Member
Joined
Dec 21, 2013
Messages
961
Location
South Florida
Yes, that is what I use too :) But I can see the scratches in the photo you posted...just trying to give you some advice...sorry didn't mean to offend
 

Kunk35

Member
Joined
Aug 10, 2015
Messages
51
Location
Denison, TX
It's all good. Are you talking about the lines just about even with the tip of the rifle? I think the next one I do, I'll go up to 1200 with sandpaper, then switch to the micro sanding. Maybe I'm skipping too many grits starting with the micro pads.
 
Last edited:

Skie_M

Member
Joined
Aug 7, 2015
Messages
2,737
Location
Lawton, Ok
Probably incidental reflections or other light sources nearby .... possibly some dust or fingerprint smudging on the pen before photo was taken?

I'm seeing extra light reflected from random spots on the pen too. My first reaction was to think- Oh ... a few scratches ... he should have polished that up a bit better.


My finishing technique is generally to wet-sand with micromesh up to 12,000 grit, like you do ... and then apply PlastX for a final polish, and then top it off with Turtle Wax Hard Surface wax. I hear that a wax on top helps with keeping fingerprints off the pen, repels water from the surface, and helps to deepen the shine and gloss of the finish.

If you don't have any of those top-coat compounds, ask some car enthusiasts if they'll let you borrow a little bit to try to see if you like it.


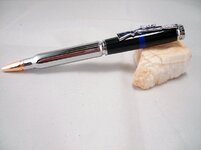
I blew it up for better detail .... and added some arrows to point out what I can see.

JCWILdB.png


The arrows each point to some reflected/refracted light that appear to be scratches. Some are in line with the pen, some are at an angle or are just small points ....

The area that is circled is showing definite signs of radial lines. Polishing with PlastX can reduce marks like this substantially, but sanding laterally in between grits is the best and most effective means of getting rid of them.
 
Last edited:

Tom T

Member
Joined
May 12, 2012
Messages
1,883
Location
Sanford Florida
The pen looks great. Thanks for sharing. Wet sand with micro mess. Then Beal buff system, tripalee and white diamond. I do not use wax on plastic pens. Have never had a problem. If you want to use wax. I from time to time have used Renasonce Wax. $35 for small time.
 

Kunk35

Member
Joined
Aug 10, 2015
Messages
51
Location
Denison, TX
I think a lot of what is seen in the photo is multiple light sources. I take these pictures under a chandelier light that has 10 bulbs. Plus, I open the curtains next to the table I take these on, so there is natural light as well. I'm not a professional photographer and never well be, so this is what I have. I agree that I can see some radial marks. I'll make sure that doesn't exist on future pens. Also, keep in mind that the blank I used isn't just plain black. It has some pearl effect mixed in as well, so some of that can be attributed to below the surface. I'm sure there are some finger prints on there as well. This was one of the first "Thin Blue Line" pens I made, and at that time I wasn't even selling on Etsy. I know the policeman I gave this pen to didn't notice a thing and was totally amazed by it.

In holding this particular pen, unless my eyes are getting worse than I thought, (getting older sucks by the way), only people like us that make pens would ever notice these issues. Or, someone that takes a close up photo with a multi-megapixel camera and blows it up. I do appreciate the critique though. I'll start taking pictures of the blanks while they are still on the lathe and zoom in to see what I can't see. That will let me finish off anything that shows up. I might try the wax idea too.

Thanks for the thoughts guys and gals! I'll put them to use.
 
Last edited:

Skie_M

Member
Joined
Aug 7, 2015
Messages
2,737
Location
Lawton, Ok
Meguiar's PlastX and 105/205 can be found in most quality auto parts stores ... look for surface restoration products.

PlastX is made specifically for headlights and other clear plastic parts (lens caps, blinkers, reflectors).

Meguiar's 105 and 205 are specially formulated for finishing work on topcoat paints and metal surfaces ... it is more aggressive and not recommended for plastic surfaces, but if you're careful using it you can get some really nice results that regular PlastX can't do because it's abrasives are too soft.

I get my PlastX and Turtle Wax from Advance Auto Parts.

It should also be carried in CarQuest Auto Parts, Napa Auto Parts, and O'Reiley's Auto Parts.


Meguires 105 and 205 are awesome for finishing a pen. Mirror finish no scratches!

Where can I find meguires? All I have been using is the one step polish from woodturningz

One-Step is actually the same as PlastX .... it might even be made by the same company.

Keep using it till you run out .. then get some PlastX, as it's MUCH cheaper.
 
Last edited:

Kunk35

Member
Joined
Aug 10, 2015
Messages
51
Location
Denison, TX
Okay, I just finished another Thin Blue line pen and I have come to a conclusion. Just like owning a black truck, you can NEVER get all the micro scratches out of gloss black. Not possible.

I sandpapered to 1200, used all the grits of micro sponge sand pads, and finished it off with the wax people were discussing above. I still see the same radial micro scratches that are in the picture on the pen in this thread. So I'm calling this myth busted. You can't get gloss black perfect.

However, I'm willing to admit defeat if someone will show me that I'm wrong. Someone show me a perfect gloss black pen with no blemishes. Please..... then tell me what magic you used to get it that way.

Kory
 

Skie_M

Member
Joined
Aug 7, 2015
Messages
2,737
Location
Lawton, Ok
Meh ... all I have is Ebony.


My exact procedure for finishing an acrylic pen:

Turn to within a few mm of final dimensions, start with 120 grit abranet (or 220 regular), all wet sanding. Work up to 1000 grit after reaching final dimensions before switching to micromesh. Make sure to TURN THE LATHE OFF after each grit and sand along the blanks (in line with the mandrel) to remove any radial lines. After each grit, clean the blank of all slurry and water with clean paper towel. Do the same, with micromesh, all the way up to 12,000 grit.

Clean and dry the barrels before continuing. Examine for any visible scratches .... if you see any that are unacceptable, go back and sand them out and repeat till you are satisfied with your finish.

Apply PlastX with lathe running at low speed... wait about 10 - 20 seconds before you begin polishing it off at high speed. Pinch the blank with the applicator to apply pressure and build some heat. Apply again, if desired. Finish by wiping the entire blank down with a clean pad.

Apply Turtle Wax hard coat wax with lathe running at high speed (right after the PlastX so the blank is quite warm). Buff at high speed with moderate pressure (pinch the blank with the applicator). Lightly run a clean pad across the blank for the final cleaning pass before turning the lathe off and assembling your pen.
 

wwneko

Member
Joined
Jul 21, 2014
Messages
215
Location
APO, AP
This is good because the black highlights the flaws that are probably in all of the other pens made. Once you perfect the black then you'll know all of you other pens are perfect too.
 

t001xa22

Member
Joined
Jun 17, 2011
Messages
441
Location
Arlington, TX
Greg is spot-on with his method. My Thin Blue Line pens were the first time I worked with jet black acrylics. I was about to quit the whole project because of the radial scratch lines until I took notice of the advice to wet-sand parallel to rotation and inline with lathe off. Like so many here, I use Maguire Plastix for final prep. I am now donating my TBL pens to my city's dept. through the Chief's office to pass out to the officers as they see fit. It is a great feeling. Just when I think I have mastered something in penmaking, I come here and learn something new. I guess this is my way of saying thank you to all the masters that are so free with sharing their knowledge.
 

Attachments

  • TBLBullet3.4.jpg
    TBLBullet3.4.jpg
    60.1 KB · Views: 110

Skie_M

Member
Joined
Aug 7, 2015
Messages
2,737
Location
Lawton, Ok
It's not magic ... it's consistency with your method with a will to NOT TAKE SHORTCUTS.


Oh ... and if you sand down a bit too far for your liking, you can apply a few layers of CA to build it back up again. The thin layer of clear acrylic should be uniform and thus invisible.
 
Top Bottom