yort81
Member
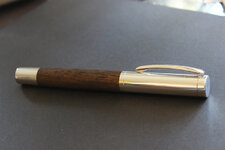
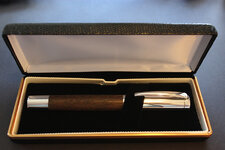
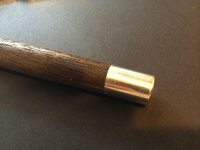
I recently purchased some Teak Decking that is being replaced on the USS North Carolina Battle Ship. I combined that with some 7075 Aluminum and came up with, what i think is a very handsome pen.

 Very nice.
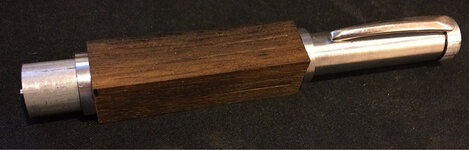
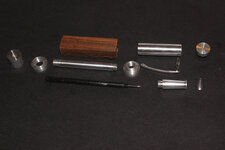
Hi Justin.... the first ring, at the end of the barrel is to cap the wood. So when you take off the end cap to place a new refill... the wood is not exposed and to protect the edge of the wood from damage. It is threaded and then a drop of red thread locker is applied to make it semi permanent.
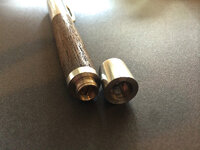
What is not shown... is that there is a handmade brass screw on the butt end of the barrel to place tension on the refill.... no springs to lose!
Justin.... LOL.... I should have read your post a bit further, before i replied...
No..it's not a kit pen.. it's a custom/kitless
I made the components from 7075 aluminum
and Im trying to maximize the use of the metal... Im going to make some pens from bronze aluminum, brass, copper... and a long spine of 7075 aluminum will cut down on the use of the precious metals which cost considerably, a bit more.
as for being like a 'kit pen'... it was not my intentions... it is just easier for me to make the individual components, than to make it all one or two pieces... and I can use the components, mostly, for other designs that i may have. So.. there isnt any constant redesigning just for a new pen.
So if you are selling pens, Like I am... you have to account for the variables in the refills. So if you are selling pens, Like I am... you have to account for the variables in the refills.[/quote] Nice job! So is the screw adjusted externally through the lower finial, or is this an internal adjustment screw inside the finial? Id like to see a pic of what youve done if you dont mind.Very handsome indeed! Although I appreciate the level of skill and craftsmanship that goes into making a kitless pen, I don't care for the look of most. This one I like a lot. Great job.
Wow, I really like it. I'd buy the parts from you to make a pen but then I guess that makes it a kit pen for me and still kitless for you?? :wink:
Justin, that is a really stunning pen, great job all around.
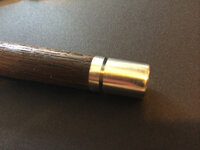
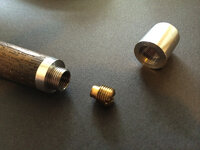
Sure Justin, The first photo shows the back end of the barrel, in the second... the end cap is unscrewed a bit, the third shows the screw inside the barrel and the end cap... and the 4th shows the endcap.. the screw.... and the barrel. It's actually a very simple design... and not even my own original idea... Im just not that imaginative.
Cheers
Thanks Troy, i was thinking it was in the finial, but i guess is doesnt matter where it is. Looks like this design would lend well to making shorter pens, as you could have done without the lower finial and it still worked.
Justin, that is a really stunning pen, great job all around.
Since you are retired Navy... did you notice that I mentioned the wood is Teak Decking from the USS North Carolina Battleship BB~55.. The most decorated ship in From WW2 .... The USS North Carolina Participated in every engagement in the Pacific Theater... Iwo Jima, the Marshall Islands, Guadalcanal, New Georgia Group, Gilbert Islands Operation, Okinawa And many many more.