"Steampunk" style Sierra Vista

Signed-In Members Don't See This Ad
See more from bgio13

bgio13

Member
Joined
Nov 11, 2007
Messages
260
Location
Oak Bluffs, MA, USA.
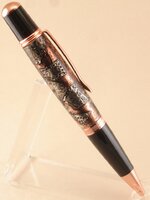
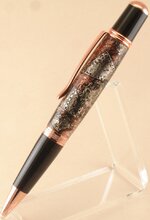
Decided to take a few elements I had done separately before and combine them. Wrapped a tube with copper tape, added some aluminum tape accents, and to top it off added some solder splats to give it that "industrialized" (not sure if that's the right word) look. Rubbed it with some black paint to distress it, and cast in Alumilite. Wanted a little beefier pen so I used a copper Sierra Vista kit. Not sure if it's a little "busy", what do you think, thanks,

Bill
 

Attachments

  • DSC08928 (2).jpg
    DSC08928 (2).jpg
    140.3 KB · Views: 316
  • DSC08931 (2).jpg
    DSC08931 (2).jpg
    134.1 KB · Views: 287
Signed-In Members Don't See This Ad

mark james

IAP Collection, Curator
Joined
Sep 6, 2012
Messages
12,752
Location
Medina, Ohio
Looks great! I also cast a foil blank in Alumilite today. Came out very similar.

What sanding/ polishing technique did you use, and did you like it?

I dry sanded 180-600; then wet sanded with micromesh pads up to 12000. Each with forwards/backwards and horizontal sanding.

I still had very fine scratches? Not bad, but I'm a perfectionist. I then buffed and while it looked better, not a perfect finish.

Hoping to learn!
 

bgio13

Member
Joined
Nov 11, 2007
Messages
260
Location
Oak Bluffs, MA, USA.
Looks great! I also cast a foil blank in Alumilite today. Came out very similar.

What sanding/ polishing technique did you use, and did you like it?

I dry sanded 180-600; then wet sanded with micromesh pads up to 12000. Each with forwards/backwards and horizontal sanding.

I still had very fine scratches? Not bad, but I'm a perfectionist. I then buffed and while it looked better, not a perfect finish.

Hoping to learn!

Mark, my sanding and polishing technique is pretty basic. I turn the lathe down to 1250 rpm and start wetsanding with 400 then 600, stopping the lathe to sand horizontally by hand. I then use micromesh pads wet to 12000 then buff with Plastix. Sometimes I will use Novus 2 or 3 if I see those same fine scratches. I think you might be putting scratches in your blank using the 180 paper. I have found that after using the skew, I am able to start with 400, occasionally 320 but never below that, hope this helps,

Bill
 

mark james

IAP Collection, Curator
Joined
Sep 6, 2012
Messages
12,752
Location
Medina, Ohio
Makes sense! I'll try a higher starting sanding grit next time. Thanks for the suggestion, I think it will help.

Mark


Looks great! I also cast a foil blank in Alumilite today. Came out very similar.

What sanding/ polishing technique did you use, and did you like it?

I dry sanded 180-600; then wet sanded with micromesh pads up to 12000. Each with forwards/backwards and horizontal sanding.

I still had very fine scratches? Not bad, but I'm a perfectionist. I then buffed and while it looked better, not a perfect finish.

Hoping to learn!

Mark, my sanding and polishing technique is pretty basic. I turn the lathe down to 1250 rpm and start wetsanding with 400 then 600, stopping the lathe to sand horizontally by hand. I then use micromesh pads wet to 12000 then buff with Plastix. Sometimes I will use Novus 2 or 3 if I see those same fine scratches. I think you might be putting scratches in your blank using the 180 paper. I have found that after using the skew, I am able to start with 400, occasionally 320 but never below that, hope this helps,

Bill
 

OZturner

Member
Joined
Aug 5, 2013
Messages
6,662
Location
Sydney. NSW. Australia
Great Pen, Bill.
The Blank looks Terrific on the Copper Sierra Vista .
Excellent Fit and Finish.
Not too busy for me, gives me something to look at and study.
Congratulations,
Brian.
 

Marko50

Member
Joined
Oct 22, 2013
Messages
938
Location
Orem, UT
Scratches?

Looks great! I also cast a foil blank in Alumilite today. Came out very similar.

What sanding/ polishing technique did you use, and did you like it?

I dry sanded 180-600; then wet sanded with micromesh pads up to 12000. Each with forwards/backwards and horizontal sanding.

I still had very fine scratches? Not bad, but I'm a perfectionist. I then buffed and while it looked better, not a perfect finish.

Hoping to learn!


Hey fellas!

Just my .02¢….those scratches might be showing up on your "Alumilite Clear" or clear PR casts due to the fact that you're using dry sanding techniques with such low grits.:confused::confused:

Try this to see if you get better results; After my final pass, with a carbide tool, or skew, I simply wet sand, start to finish, with Micro-Mesh™ grits 1500-12,000. Thats it. No low grit sanding. No polish. Just a good wet sand with MM. I alway put my pens under a 10X loupe to inspect it for scratches, but I have yet to find any scratches using this method. It's always worked for me.

Just sayin'….:)
 

Jim Smith

Member
Joined
Jul 27, 2008
Messages
1,962
Location
Lakeland, FL
Great looking steampunk. I really like the loo of mixing the copper with the silver. These pens sort of reminds me of the movie Mad Max.

Jim Smith
 

bgio13

Member
Joined
Nov 11, 2007
Messages
260
Location
Oak Bluffs, MA, USA.
Thanks for all the kind words. These blanks are fun to make and have become somewhat addictive as well. I always feel that I am adding too much to the tube whether it be tape or solder, and you know the old saying about "less is more". But in the end I guess they turn out just fine, thanks again,

Bill
 

mrrichieboy

Member
Joined
Nov 6, 2009
Messages
84
Location
Nampa, Idaho
Marko50 has it just about right as to finishing alumilite. I never dry sand it, always wet sand. It is a soft plastic and PlastX has some micro abrasives in it that you cause scratches, even after 12,000 grit MM. As much as I don't like Hut polish, it does work on alumilite. You might also try Woodcraft's Turners polishes, the step #4 does not have any abrasives in it either and leaves alumilite truly glossy with no scratches. I love working with alumilite, but this is an issue with it. Hope this helps.---Rich
 
Top Bottom