You are using an out of date browser. It may not display this or other websites correctly.
You should upgrade or use an alternative browser.
You should upgrade or use an alternative browser.
Steampunk Saber
- Thread starter Jgrden
- Start date
Signed-In Members Don't See This Ad
See more from Jgrden
I love it.."force". But I am thinking the same, a bolt a action mechanism. An issue that I am sure you are acquainted with is melting previous welds when applying new ones. Makes on think ahead and solder several at one time. At present I am using two grades of solder and step down when close to another link.
Keep in touch. Thank you for your help.
I have been using a watch chain for heat sink and to hold pieces together but I like the idea of a wet cloth. Once again, you come through with experience.
I want to see what you do. Steve G has great advice, I would read his messages.
As I said...no direct experience. But I am thinking the damp fabric should work because the steaming off of the moisture will absorb the unwanted heat. So a dropper bottle of water will be handy to keep the fabric saturated in case all the H2O steams away before the work is done. (Just thinking through the process )
)
(I know...'thinking again' >>> could be dangerous!!
 )
)
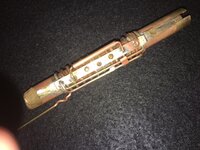
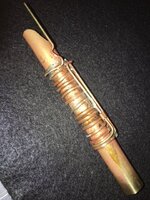
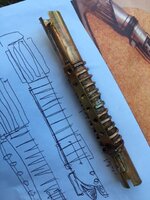
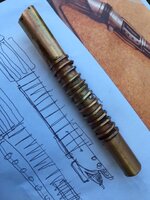
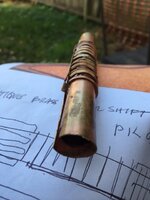
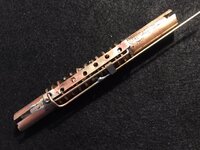
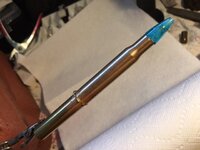
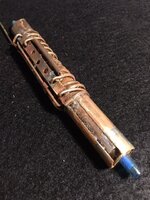
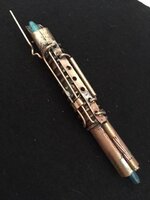
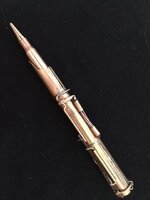
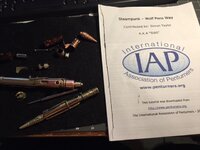
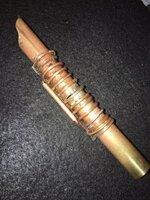 SkiM has taught me all I know. This last post is critical and I may want to completely change my process. My whole working area has to change. This is GOOD. These pictures or of rough construction. No polishing, a little shaping, some additions but still very rough.
I have the pen portion figured out.
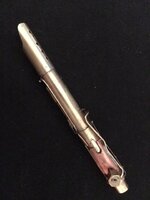
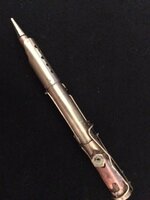
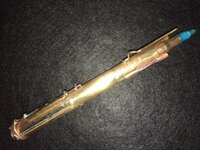
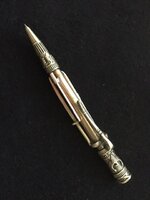
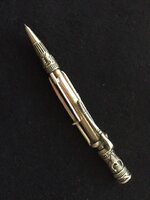
Oh man, this is great. I have one thing left to do and that is to employ the tension aping at the top. The refill is Cross and can be changed by pulling the bottom our of the contraption. The .30-06 slides in and out with ease. After employing the tension spring then it is on to clean up.
Yes, Skie, this is fun and thank you for your tutoring. There is still room for improvement with soldering and it will get better. This pen has about 70 hours of labor in it. It is a gift to my computer code writing, Lucas Arts lover, Star Wars fan - son. The next one goes on the market. At ten dollars and hour that is a seven hundred dollar price tag. A m I off base? Suggestions?
Heh heh, that is what I was looking for. Let's see, we should knock off about forty hours. this could be done with thirty hours, that makes it a three hundred dollar pen. Am I still off base?
 Nothing to re[port on the Saber 1. Worked all day on a finial that would hold the tension spring. Two ideas blew apart nor were they strong enough. Phooey So why bother you with tripe? I dunno, I'll think better tomorrow when not so tired. Gotta get this done so that I can start brazing.
Well now that is something to think about. My blow a-parts were partly due to overheating but more to poor design and structure. Thank you for this information. This would protect the stylus on top from melting.
:good::good::good:
Signed-In Members Don't See This Ad
Skie_M
Member
I'ld cannibalize the bolt action mechanism off of a bolt action pen to actuate it for your "switch" ... possibly put a few other fake buttons on it as well. Make someone not familiar with the pen have to "use the force" to figure it out ... 
Jgrden
Member
I'ld cannibalize the bolt action mechanism off of a bolt action pen to actuate it for your "switch" ... possibly put a few other fake buttons on it as well. Make someone not familiar with the pen have to "use the force" to figure it out ...
I love it.."force". But I am thinking the same, a bolt a action mechanism. An issue that I am sure you are acquainted with is melting previous welds when applying new ones. Makes on think ahead and solder several at one time. At present I am using two grades of solder and step down when close to another link.
Keep in touch. Thank you for your help.
Jgrden
Member
Reminds me of a bit of moonshine still. You could call it Western Kentucky Steam Punk.
Sent from my iPhone using Penturners.org mobile app
Sent from my iPhone using Penturners.org mobile app
SteveG
Member
I am no expert in this, by any means, but often times a heat sink of some sort is used when soldering. The function is to keep critical heat away from a protected component. This could be a hemostat, thin nosed vise grips, damp cloth wrapped around the protected component, etc. That might help in the progressive soldering steps.
Keep having fun! Remember that you are not just creating a monster...it is supposed to actually write, once you say it is done. :wink:
Keep having fun! Remember that you are not just creating a monster...it is supposed to actually write, once you say it is done. :wink:
oldtoolsniper
Member
You have inspired me to give one a go.
I'm old enough to remember the big fat three color pens, I believe they were BIC or something like that.
Sent from my iPad using Penturners.org mobile app
I'm old enough to remember the big fat three color pens, I believe they were BIC or something like that.
Sent from my iPad using Penturners.org mobile app
OZturner
Member
Thanks, for Showing your Latest Incarnation, John.
It looks Intriguing, Difficult, and Perhaps a little Dangerous.
I Recall an Old Saying, "That Only Fools and Children Should Comment on Unfinished Work"
I Trust that I am not a Fool, and I am Certainly not a Child, so I shall reserve my Comments, and let you solve Your Conundrum.
It's Great Project John.
Congratulations, Enjoy the Journey.
Brian.
Last edited:
dogcatcher
Member
Too late for this project, but jewelers/silversmiths use solder that melts at different degrees. You have to decide before the first solder your steps of putting it all together, then use the highest melting point first, then progress to the lowest as you add to your design.
This explains it a it better and more detail than I have. https://www.gemsociety.org/article/solder/
This explains it a it better and more detail than I have. https://www.gemsociety.org/article/solder/
Jgrden
Member
I am no expert in this, by any means, but often times a heat sink of some sort is used when soldering. The function is to keep critical heat away from a protected component. This could be a hemostat, thin nosed vise grips, damp cloth wrapped around the protected component, etc. That might help in the progressive soldering steps.
Keep having fun! Remember that you are not just creating a monster...it is supposed to actually write, once you say it is done. :wink:
I have been using a watch chain for heat sink and to hold pieces together but I like the idea of a wet cloth. Once again, you come through with experience.
Jgrden
Member
You have inspired me to give one a go.
I'm old enough to remember the big fat three color pens, I believe they were BIC or something like that.
Sent from my iPad using Penturners.org mobile app
I want to see what you do. Steve G has great advice, I would read his messages.
SteveG
Member
I am no expert in this, by any means, but often times a heat sink of some sort is used when soldering. The function is to keep critical heat away from a protected component. This could be a hemostat, thin nosed vise grips, damp cloth wrapped around the protected component, etc. That might help in the progressive soldering steps.
Keep having fun! Remember that you are not just creating a monster...it is supposed to actually write, once you say it is done. :wink:
I have been using a watch chain for heat sink and to hold pieces together but I like the idea of a wet cloth. Once again, you come through with experience.
As I said...no direct experience. But I am thinking the damp fabric should work because the steaming off of the moisture will absorb the unwanted heat. So a dropper bottle of water will be handy to keep the fabric saturated in case all the H2O steams away before the work is done. (Just thinking through the process
(I know...'thinking again' >>> could be dangerous!!
Skie_M
Member
Don't use too much water, it may even prevent you from melting the solder itself if it's too close to your work area .... plus, cooling a solder joint too fast can result in a "cold solder" joint or a crystallized join, which is quite fragile and easy to break off. The use of an aluminum heat sink to absorb the excess heat is the better idea, but so is keeping parts in place with galvanized steel wire or even aluminum wire... the solder wont stick very well to these metals, and is a fairly easy cleanup with a steel wire wheel or a grinding wheel with a rotary tool.
I would put parts in place and wrap them down with aluminum wire before and between soldering the major components in place ... work your way down from the largest pieces to the smallest, any time you can.
Keep flux only in the areas you intend to solder ... a small watercolor paintbrush works well as a detail applicator for the flux. Uncleaned copper/brass won't have nearly as much solder adhered to it. Once everything is all in place, a steel wire brush in a rotary tool will remove excess flux and shine up the copper and brass ... finish up with a buffing wheel or cone and red/white rogue.
Alternatively, you can leave it looking more of a mess, and even add more to give it the aged, used and beaten up look, which is very popular for steampunk. Either way, lead based solder is poisonous, and is considered a cause of cancer, so you really should seal your creations as much as possible in some kind of safe encasement, such as a clear epoxy or polyresin... silmar or alumilite work too. This would definitely also preserve your weathered appearance, if that's the look you choose. (Even if you use the modern silver based or "plumbing safe" solder, it still contains a large amount of tin, and bronze contains appreciable amounts of lead, if you use any. Better to be safe, than sorry.)
Steam can be a lot more dangerous than many people realize ... it can burn you before you feel it. If you use the wet or damp towel trick, you'll also want to make sure you keep it damp, because if it dries out too much it will catch fire. Fire + wood shop = very sad news. All round, the aluminum heat sink or wire method is a good deal safer to work with.
Keeping a damp sponge nearby helps you with keeping the tip of your soldering iron clean. You will want to periodically wipe the iron tip on the sponge to remove any blackened buildup, as the carbonized/oxidized material insulates the tip from making contact or transferring heat to your work. If it doesn't come off, try a steel wire brush ... if it's still being stubborn, allow the iron to cool and use a file to remove the buildup.
Once the tip is clean again, plug the iron back in and properly tin the tip with flux and solder. As the tip heats up, either paint the tip area you wish to use with flux or dip it into your flux container, and then melt solder directly on the tip as it reaches operating temperature to coat the copper tip with solder. This layer of solder provides several functions ...
1. it assists with heat transfer, by creating a liquid bridge between the soldering tip and the work area
2. it protects the copper clad tip from oxidation, which is greatly increased by heat ... the tin keeps the lead from oxidizing as well.
3. it aids in the flowing of solder into a joint, by removing areas of the soldering tip that solder won't adhere to and gain heat from.
4. it protects the tip from corrosion when the soldering iron is not in use. (Make sure to glob some extra solder onto the tip for a thick layer before you unplug it and let it cool off, and then put it away properly after it's cool.)
(These are all tips that are known and commonly practiced in the electronics repair trade, but it also works well for plumbing style soldering irons and other related tools ... stained glass irons included.)
Last edited:
Jgrden
Member


 SkiM has taught me all I know. This last post is critical and I may want to completely change my process. My whole working area has to change. This is GOOD. These pictures or of rough construction. No polishing, a little shaping, some additions but still very rough.
 I have the pen portion figured out.
Jgrden
Member
Jgrden
Member
Skie, you are right. I was using way too much flux and way too much solder. Now a snip of about 1/4 placed on top of the joint/flux does the job. If it is right the solder flashes and disappears without any bubbles. If there is contamination or improper heat sink those little bubbles appear and the joint will not hold.
thanks for tutoring.
John
thanks for tutoring.
John
Jgrden
Member
Jgrden
Member
Skie_M
Member
Now you're just having fun ... 
Jgrden
Member


Now you're just having fun ...
Oh man, this is great. I have one thing left to do and that is to employ the tension aping at the top. The refill is Cross and can be changed by pulling the bottom our of the contraption. The .30-06 slides in and out with ease. After employing the tension spring then it is on to clean up.
Yes, Skie, this is fun and thank you for your tutoring. There is still room for improvement with soldering and it will get better. This pen has about 70 hours of labor in it. It is a gift to my computer code writing, Lucas Arts lover, Star Wars fan - son. The next one goes on the market. At ten dollars and hour that is a seven hundred dollar price tag. A
 m I off base? Suggestions?
Last edited:
Skie_M
Member
Yipes!
I'm certain that the process can be very much streamlined now that you have all the research and development out of the way ...
I'm certain that the process can be very much streamlined now that you have all the research and development out of the way ...
Jgrden
Member
Yipes!
I'm certain that the process can be very much streamlined now that you have all the research and development out of the way ...
Heh heh, that is what I was looking for. Let's see, we should knock off about forty hours. this could be done with thirty hours, that makes it a three hundred dollar pen. Am I still off base?
Skie_M
Member
Hmmm .... I'm pretty sure someone other than George Lucas himself would buy it at that price ... but I'm thinking that with a bit of pre-planning and staging, one could produce 10 of these pens over 10 hours of actual work.
If I were doing it, I'ld set it up to be done 2 or 3 hours at a time over 4 or 5 days, finishing a stage or a set of specific parts for each pen all at once, rather than going through them all one by one, but that's my personal take on it ...
I'ld still probably end up charging a good 80 - 100 dollars for each pen, and I'ld be using bits from a bolt action pen kit that would run me around 15 dollars each.... so that sounds fair to me.
Of course, if you do em one at a time and make them each individual and unique, you could theoretically charge whatever you want for them ....
Skie_M
Member
Day 1:
Prep 5 pieces of wire for each of 10 pens ... turn/sand and polish, bend with a wooden form ... perhaps 1 hour of prep time total.
Prep 3/4 brass barrels per pen (3 outer, if using a long barrel blank for the center of the form ... let's say a 10" barrel cut in half) so ... cut/shape the front barrel and make cutouts to the rear barrel, mark for wire attachments on all 3 barrels, and install the bolt action mechanisms ... perhaps 1 hour prep time total. (very easy with pre-made marking gauges/forms)
Day 2:
Prep long barrel (thinner diameter barrel, probably 4 - 5 inches, from another 10" piece) with "padding" (screw threads to mate with larger barrel and hold inner barrel concentric to the body of the pen) ... add nib and refil, measure for fit and pen tip exposure ... perhaps 2 hours prep time total.
Begin assembly of outer barrel frame using solder to attach front/rear barrels to main barrel ... perhaps 1 hour for all 10
Day 3:
Begin assembly/modification to outer barrels, attaching wires (pipes) to assigned locations .... perhaps 2 hours total.
Day 4:
Begin distressing or polishing (I think a mix of new and old/used looks would sell well) each outer barrel, and installing inner barrels ... perhaps 2 hours total.
That would be my basic plan ... probably either sell out almost instantly or have sporadic sales through the year ... if I planned on selling these in any great quantity, I'ld contact LucasArts to see if I could get permission and have it licensed as an official product. If that were the case, I'ld then probably make plans to number each one individually and provide a certificate of authenticity, and make 10 - 20 per month till my contract ran out.
Si90
Member
Looking good my friend, I like it a lot.
I wish I could do 10 of my pens in 10 hours, I certainly wouldn't be doing my day job if I could. For me it's more about building something that I like and is unique and a one off. I have had several repeat customers for that very reason. I never make more than 1 of each pen so the creative process accounts for much of my time.
Keep up the good work.
Jgrden
Member
Rounder
Member
Jgrden
Member
Another option is what is called a heat sink paste such as this - Cool Blue.
Well now that is something to think about. My blow a-parts were partly due to overheating but more to poor design and structure. Thank you for this information. This would protect the stylus on top from melting.
Rounder
Member
Another option is what is called a heat sink paste such as this - Cool Blue.
Well now that is something to think about. My blow a-parts were partly due to overheating but more to poor design and structure. Thank you for this information. This would protect the stylus on top from melting.
:good::good::good:

