Skie: Your information is valuable to me. I sent a private message to ask more questions.
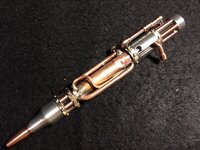
I tried cutting a V grove on the inside of 8mm tube and am not getting a nice 90 degree. Perhaps this will come with more practice. I have not tried it on the copper wire. All the solder that was working well for me is gone. Today will be trips to Ace, Lowes and the other store to find low melting temp. solder. Any help from you on how to identify this solder will be appreciated.
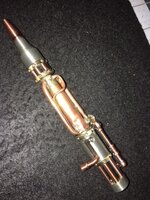
I made a big blunder on the top end with the level bubble - that is where the pen nib is suppose to be housed. Now an extension needs to be soldered to the bottom. Soldering without melting the plastic level tube was a trick.
63/37 tin/lead rosin core electrical solder is my recommendation. You can find it available at any hobby electrical outlet, such as Radio Shack. It melts at the lowest available temperatures for solder.
Rather than soldering and possibly damaging the plastic level tube, I would recommend some type of epoxy like JB weld. After it cures, you can machine it, sand it, paint it, ect...
Jgrden in PM said:
Skie:
Thank you for your valuable information.
When you say "step Up" in wire gauge do you mean increase from a 8 ga. wire to a thicker 6 gauge?
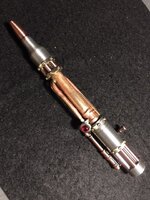
Your comment on DO NOT DRILL HOLES UNTIL..." was perfect !! I guess you saw all the holes in the aluminum piece.
Say, I found a piece of solder that is half the size of normal plumbing wire and it melts fast - perfect. It was not labeled and I need some. What do you recommend.?
Also, I need to read a little more carefully on how to make the 90 degree bend.
John
The advice about not drilling holes yet was more towards ensuring that your finished "pipe" will fit the holes you drill to match it, rather than attempting to drill holes first and attempting to match the holes, which is rather difficult.
Already mentioned above that you found some electrical solder... it's fairly cheap stuff. You won't be needing the "silver solder" and the currently safer "plumbing safe" stuff that they want to charge an arm and a leg for, as your pen should stay safely out of the mouth of the recipient... On the other hand, you may want to print up a "lead content disclaimer" notice, if you plan to sell your pen in California....
Pad the vice with scraps of leather or thick cloth material, so you don't leave scratches on the "pipe". Grab the other end (fingers should be sufficient, but padded pliers would work too), and gently bend it over in the desired direction. As the bend forms, you can adjust the height that the vice is gripping it at in order to adjust the angle and degree of the bend, so as to have a gradual and even bend.
Alternatively, you may wish to create an aide or jig to assist you in the bending process ... a few dowel rods in a block of wood spaced fairly close together and of an appropriate diameter would allow you to bend the thick gauge wire evenly in whatever angle, degree, and direction you wish. Various thickness dowels and distance between them will help you with different degrees of bends. Lift the finished wire straight up and off the dowels.
At this point, rather than drilling holes in the blank, I would use some flush cutters to clip the "pipes" into the exact measurements I want, and then sand them flat. I would then surface mount them to the brass barrel with solder, cleaning away excess solder with a steel wire brush wheel (in a dremel type tool). After all the pieces are in place, antiquing or polishing (whichever I desire) would take place, followed by casting and turning to completion.
Good luck with the bubble level thing, it looks interesting .... did you know that you can find glass level vials online?