Beautiful pen Ron, I bought some of those blanks ages ago and still to muster the courage to make them, you may have encouraged me with your great work!
Wow. That is the ultimate compliment to me! Thank you Sir! I look forward to seeing yours posted soon! You are much better at pics, and penmaking in general so it should be a showstopper!
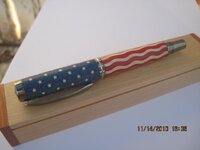
Mine came with a little instruction sheet on how to glue it all up. I did it similar to the instructions, but not exactly. I used a small rubber band to hold the stripes together while i glued them, using thin CA with a couple of good soaking, dripping coats inside and out.
Then i cleared the center with the drill press.
For the stars, I used the watered down wood glue technique to get them in, but once that all dried, I used a generous coat of thin CA inside and out, followed by clearing the center again on the DP.
I wrapped tape around the outside of both blanks for glueing the tubes in. I like gorilla glue, but was concerned it might push the pieces apart, or out when it expanded... hence the tape.
After that, it was pretty standard stuff, just nerve racking.