
You are using an out of date browser. It may not display this or other websites correctly.
You should upgrade or use an alternative browser.
You should upgrade or use an alternative browser.
Spiral
- Thread starter Shep
- Start date
Signed-In Members Don't See This Ad
See more from Shep


Glycerine:
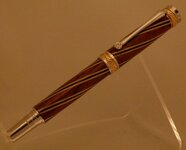
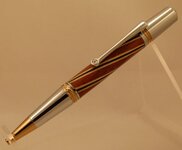
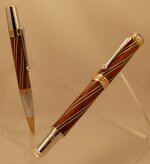
I processed the bubinga blanks just like normal and turned them until they were maybe 1/64 oversize. I used a Beall Pen Wizard to cut the spirals with a 1/8" flat bottom bit. Groove depth was a few thousandeths below the oversize blank. You have to allow some margin as setting depth on the Pen Wizard is not really an exact science. The maple/ebony inlay strips were glued into the spiral grooves. They were only about 1/32 thick so they had enough flex to be forced into the spiral and then held with lots of rubber bands and clamps until the glue dried.
I tried six grooves but thought it was too busy and four was too plain. I ended up making my own index plate for the Pen Wizard to give 72 degree spacing and cut five spirals.
There isn't a lot of figure or obvious grain in the bubinga (most of it is away from the camera), but after cutting the inlays in the bottom of the pen, I matched the top blank grain to the bottom and marked the edge of the first spiral. By using that starting point, I was able to end up with both the grain and the spirals matching between the two halves.
Once the inlays were set, I put it back on the lathe and took it all down to the final diameter. Finish was a whole bunch of coats of Tru Oil gun stock finish.
Ah, thanks! I know of the pen wizard, but don't have one. Maybe I could rig up a jig of some kind...


Another way to do it as a "poor man's" way is to do some math and cut a zigzag pattern on the blank. The math is to figure out the finished dimensions from rough design. If your math is correct everything will be a spiral the design works well and i have done this before. The spirals will have an almost threaded looks. The down side to this is that your cuts have to be precise. The spiral will depend on the number of cuts and the angle you chose


Signed-In Members Don't See This Ad
asyler
Local Chapter Leader
those are great.
glycerine
Member
Do you mind sharing how you made the spirals?!?!
minus459
Member
They are awesome.
ToddMR
Member
Awesome! You did an excellent job!
mrcook4570
Member
Outstanding! All of the woods complement each other very nicely.
Great job. They're beautiful.
broitblat
Member
Nicely done!
-Barry
-Barry
Shep
Member
Do you mind sharing how you made the spirals?!?!
Glycerine:
I processed the bubinga blanks just like normal and turned them until they were maybe 1/64 oversize. I used a Beall Pen Wizard to cut the spirals with a 1/8" flat bottom bit. Groove depth was a few thousandeths below the oversize blank. You have to allow some margin as setting depth on the Pen Wizard is not really an exact science. The maple/ebony inlay strips were glued into the spiral grooves. They were only about 1/32 thick so they had enough flex to be forced into the spiral and then held with lots of rubber bands and clamps until the glue dried.
I tried six grooves but thought it was too busy and four was too plain. I ended up making my own index plate for the Pen Wizard to give 72 degree spacing and cut five spirals.
There isn't a lot of figure or obvious grain in the bubinga (most of it is away from the camera), but after cutting the inlays in the bottom of the pen, I matched the top blank grain to the bottom and marked the edge of the first spiral. By using that starting point, I was able to end up with both the grain and the spirals matching between the two halves.
Once the inlays were set, I put it back on the lathe and took it all down to the final diameter. Finish was a whole bunch of coats of Tru Oil gun stock finish.
glycerine
Member
Glycerine:
I processed the bubinga blanks just like normal and turned them until they were maybe 1/64 oversize. I used a Beall Pen Wizard to cut the spirals with a 1/8" flat bottom bit. Groove depth was a few thousandeths below the oversize blank. You have to allow some margin as setting depth on the Pen Wizard is not really an exact science. The maple/ebony inlay strips were glued into the spiral grooves. They were only about 1/32 thick so they had enough flex to be forced into the spiral and then held with lots of rubber bands and clamps until the glue dried.
I tried six grooves but thought it was too busy and four was too plain. I ended up making my own index plate for the Pen Wizard to give 72 degree spacing and cut five spirals.
There isn't a lot of figure or obvious grain in the bubinga (most of it is away from the camera), but after cutting the inlays in the bottom of the pen, I matched the top blank grain to the bottom and marked the edge of the first spiral. By using that starting point, I was able to end up with both the grain and the spirals matching between the two halves.
Once the inlays were set, I put it back on the lathe and took it all down to the final diameter. Finish was a whole bunch of coats of Tru Oil gun stock finish.
Ah, thanks! I know of the pen wizard, but don't have one. Maybe I could rig up a jig of some kind...
S.A.Mappin
Member
Very nice, and very original!!
boxerman
Member
Wow awesome job.
workinforwood
Member
Great looking pen.
Rfturner
Member
Do you mind sharing how you made the spirals?!?!
Another way to do it as a "poor man's" way is to do some math and cut a zigzag pattern on the blank. The math is to figure out the finished dimensions from rough design. If your math is correct everything will be a spiral the design works well and i have done this before. The spirals will have an almost threaded looks. The down side to this is that your cuts have to be precise. The spiral will depend on the number of cuts and the angle you chose
PR_Princess
Member
Beautiful!
G1Pens
Member
Awesome.
Ruby pen turning
Member
Those are some awesome pens. Your work looks great, I just wish you had some better pics so we could get the full effect.
simomatra
Member
Great pens outstanding spirals
EarlD
Member
both look really great.
earl
earl