Some pens for C&C

Signed-In Members Don't See This Ad
See more from Dan Hintz

Dan Hintz

Member
Joined
Feb 16, 2011
Messages
477
Location
Columbia, MD
I just posted this on The Creek (my old haunting ground), but this may be a more appropriate forum :wink:

I rarely take the opportunity to post some of my stuff, but since I have a few photos of my work close at hand, here they are for your C&C. Feel free to offer suggestions on how to make things better, either the pens themselves or the photography.

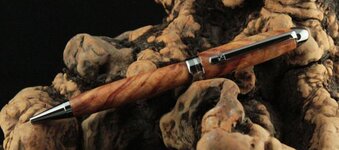
This one was given to a dear friend. It's a Euro in black Ti... not positive on the blank, but I believe it came out of the Maple box. The background is one of many chunks of Manzanita Burl I have lying around.
(See Photo #1)

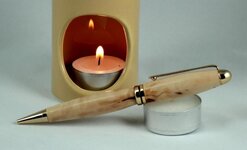
This one was also given to a good friend. Another Euro in gold... it's Maple, but the blank turned out so white I initially thought it was a dark piece of Holly.
(See Photo #2)

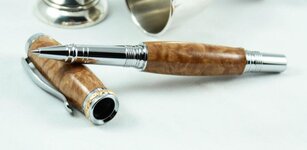
I still have this one (and may just keep it for my own use). It's a Triton rollerball with a Yellow Box burl blank. The background is a couple of silver shot cups (I spent quite a while polishing the tarnish off of them before use).
(See Photo #3)

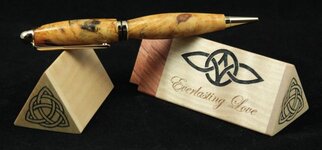
This one recently sold. Yet another Euro in gold (they're so easy to make!), with a Maple blank. I stabilized the snot out of this one with thin CA throughout the turning, so I think the yellow color comes from internal burning... I like the outcome, so I may try that method again rather than throwing it in the vacuum stabilization pot. The case is Maple with a Rosewood centerband. The client's wife is a fan of Celtic stuff, so I engraved a Celtic knot in either end and a triskel on all three faces (both in black)... the script "Everlasting Love" is done in gold underneath each triskel.
(See Photo #4)

I hope you guys like :)

I realize the black background tends to lose the edges of the pen... it was a quick photoshoot, so I used what was set up at the time. It looks like I did a poor job at sizing the ends, but I promise it's just the black background reflecting off of the gold kit.
 

Attachments

  • 615268_546553492021322_933482327_o.jpg
    615268_546553492021322_933482327_o.jpg
    43.9 KB · Views: 331
  • 739873_550736024936402_524551419_o.jpg
    739873_550736024936402_524551419_o.jpg
    26.2 KB · Views: 335
  • 793869_555791191097552_317561433_o.jpg
    793869_555791191097552_317561433_o.jpg
    25 KB · Views: 310
  • 830528_563004223709582_2000052403_o.jpg
    830528_563004223709582_2000052403_o.jpg
    33.7 KB · Views: 334
Last edited:
Signed-In Members Don't See This Ad

Dan Hintz

Member
Joined
Feb 16, 2011
Messages
477
Location
Columbia, MD
Sorry, I accidentally linked in the pics from The Creek. I'll try to add them to my album and relink... gimme a few...

Okay, they're attached, but I need to figure out how this site does inline images for a more coherent read...
 
Last edited:

Fishinbo

Member
Joined
Aug 13, 2012
Messages
2,125
Location
Richmond, Virginia
Fantastic collection you have! Like most the 4th pen with the beautiful case, great photos too!

____________________
-www.sawblade.com
 

NotURMailman

Member
Joined
Oct 15, 2012
Messages
479
Location
Orange Park, Florida
Great craftsmanship and wood choices!

Totally off topic - Something I strongly dislike about the Triton pen. Not your work or the wood, just the kit itself.
 

Dan Hintz

Member
Joined
Feb 16, 2011
Messages
477
Location
Columbia, MD
Thanks, guys, I appreciate the compliments. The client I mentioned for the last pen works with my wife... when she got home today, she told me he was running around the entire office showing people what I had just made for him. She said he was absolutely giddy :) There's no better compliment when a client is happy with what you've created for them.

The great thing (in my mind, anyway) is these are just the simple kits... I haven't even done anything complicated yet, so I'm looking forward to pushing the boundary.
 

jttheclockman

Member
Joined
Feb 22, 2005
Messages
19,132
Location
NJ, USA.
Dan

Nice to see you posting some of this great work here as well and sharing with a bigger audience of pen turners. Job well done all around. It is always good when the clients are enjoying your work and who knows what can become of it too. Thanks for showing.
 

NewLondon88

Local Chapter Leader
Joined
May 15, 2008
Messages
5,077
Location
Claremont NH
I realize the black background tends to lose the edges of the pen... it was a quick photoshoot, so I used what was set up at the time. It looks like I did a poor job at sizing the ends, but I promise it's just the black background reflecting off of the gold kit.

That happens a lot. I've had to go look at my own pens sometimes
because the photo looks like they're turned down too far. But then
I take out the pen and look at it and realize they're turned down too far.
 

SDB777

Member
Joined
Feb 6, 2010
Messages
6,620
Location
Cabot, Arkansas USA
They all look to be pretty nicely done, the turning. The photo's are a little out of focus(or maybe I need to go visit the doctor again?)....could be the camera is trying to focus on the 'items' in the frame and getting confused? A small DOF(say something like f/45) will help get your focus lined-out.


Congrats on the sales, and keep them photo's coming!


Scott (might got sawdust in my eye) B
 

Dan Hintz

Member
Joined
Feb 16, 2011
Messages
477
Location
Columbia, MD
Scott,

Because I was at work when I posted those, the images were pulled from my camera, cropped, uploaded to Facebook (and therefore resized), downloaded from Facebook, uploaded here (and evidently resized again), and probably decompressed/re-compressed several times along the way. I think the originals look much better, but there's always room for improvement.... but I'm happy to blame it on the sawdust :tongue:
 

Dan Hintz

Member
Joined
Feb 16, 2011
Messages
477
Location
Columbia, MD
I have been asked for some more details on what I shoot with and settings, so here's a rough breakdown. For those using point-and-shoots, the more settings mentioned below you can modify, the better off you are... typically this is just EV for a lot of P-and-S cameras. For those with DSLRs who have not stretched their legs yet, this should help get you a bit closer to nice shots.

As mentioned earlier, the camera itself is a Canon T2i, purchased August(?) 2010. It is lightly used and the sensor has never been cleaned, but I have yet to notice any dust bunnies in my images. Shooting is done in a photo tent purchased from eBay for around $40. Several colored fabric backgrounds were included in red, blue, black, and white.

The tent came with a couple of small halogen lights and a tripod (well, it's a camera stand, not so much an actual tripod, but it's workable), though I have never used the included lights in favor of Daylight Fluorescents. I used a 100W on either side of the tent and a 60W along the top, though I could certainly go brighter on all and it would only help the picture. This typically allows the camera to select 100ISO for almost every shot. The bulbs are used in these clippable reflector canisters from Lowes and aimed to be within 1" of the tent's top / side surfaces:
attachment.php

I use the "Manual Exposure" mode on the camera, which allows me to set several critical parameters while still allowing the camera to automatically select other parameters as it sees fit (I will be slowly changing over to almost full manual control as the camera does not always get it right). I selected "Faithful" for the Picture Style as it really does give a faithful representation of the colors in front of me. The bulbs I use are listed at 6500k (true daylight is around 5500k)... the camera only allows 1000k jumps, and I have found 6000k to be significantly more faithful in color than at 7000k.

Depending upon the specific object, I have found settings of 0EV to -1EV (it jumps by 1/3rds) to give me the best contrast and brightness with the above mentioned lights. One of the features I do not currently have enabled (but will be enabling from here on out) is AEB bracketing... until now, I had been taking an image at 0EV, then three more pics at progressively lower EV values (dropping by 1/3rd each time). I will try different settings, but I will likely go with a +/-1EV bracket setting centered at 0EV, and then let some HDR processing software find me some serious definition and contrast using those shots. If I wanted to stick with non-processed shots, I could have also gone with a bracketed shot +/- 1/3rd EV centered at -1/3rd EV and nailed a good shot in almost every burst, but I think I'll get more detail in the shadows from an HDR shot.

My glass is the stock 18-55mm kit lens that came with the body... it received very high reviews for a kit lens, and so far I don't have any complaints, either. At some point I will likely start playing with depth of field so the pen is in focus and the background objects are a bit blurred (moreso than they are now), but for now I'm okay with what's coming out.

The camera usually sits on the "tripod" provided with the tent. I have a high-end tripod, but since most of my work takes place on the floor (I'm constantly assembling / disassembling the setup due to space concerns), the <1'-high piece that comes with the tent is useful. I also have a remote so pressing the shutter doesn't jiggle the camera, but so far I have not used it... not only is there image stabilization in the lens (good up to four ISO levels), the camera's choice of 100ISO for most shots means it will also select a very fast shutter speed (thereby reducing blur even further).

There are a few other parameters I will eventually drag under manual control, but for the most part these few settings alone make a difference of night and day in quality of the final image. I do very little post-processing of my images (other than cropping), sometimes none at all.

Enjoy!
 
Top Bottom