Some new pens photo test,

Signed-In Members Don't See This Ad
See more from Chief Hill

Chief Hill

Member
Joined
Aug 26, 2009
Messages
635
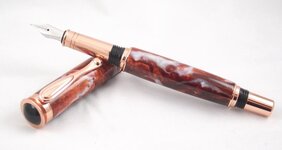
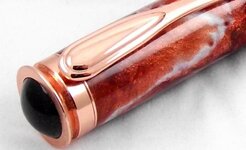
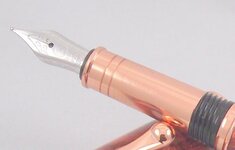
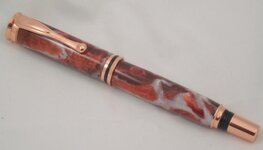
Well with the new camera I got a while back I bought a new photo Tent complete with proper lighting tripods etc.

So here is a few test pics. Now I still have to learn background, adjusting lighting, macro. Distance from object when shooting etc. Each time I took a picture with a diffrent background it changed the color of the pic a bit. Some of the pics turned out darker then I thought. I am a little confused with the lights jammed into the sides of the tent and the inside backdrop white and all seems to be bright why do some of the pictures seem dark? Not attached here as I only put up the decent ones.

Fyi the pens here are all being made for my business partner AKA Larry T here who wants me to finish 50 bullets and 180 more slims before the end of the month.
eek.gif
eek.gif


attached are Copper FP Jr Retro with copper style Pr Blank, 50 cal BMG and .308 Rounds with WWW Animal print blanks. Very fragile to turn short by the way., They like to explode when making them on 7mm tubes....

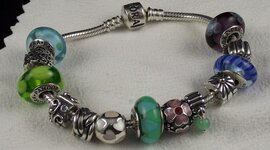
One of the pics is of my wifes mothers day gift her pandora bracelet. I took a pic of that tonight and it turned out the best out of all of them??? who knows but photography isnt easy as point and shoot.

Comments and Photo HELP PLEASE....
 

Attachments

  • Copper1.jpg
    Copper1.jpg
    20.9 KB · Views: 246
  • pandora.jpg
    pandora.jpg
    53.1 KB · Views: 185
  • Bullets1.jpg
    Bullets1.jpg
    51.1 KB · Views: 262
Last edited:
Signed-In Members Don't See This Ad

toddlajoie

Member
Joined
Feb 6, 2010
Messages
1,728
Location
Feeding Hills MA
What is the new camera that you're using? That would help to see what might be going on. If the color of the photos is changing when your composition does, that is usually because the white balance is set to "auto" Your best bet is to set the white balance to a setting that matches the lights you are using, daylight, tungsten, florescent, incandescent, etc, or a Kelvin temperature if you know it and your camera will let you set it.

Auto exposure settings will also cause the dark photos you mention when shooting shiny things on bright backgrounds. The Auto settings assume that the overall image will average out to grey, so when you have an abnormal amount of white to the processor (which assumes you're taking photos of your wife, dog, car, or all of the above...) Again in this situation, you want to adjust your exposure either by setting it manually if your camera will allow it, or finding and adjustment that will trick the processor into overexposing the photos.

None of the photos you posted were beyond repair, if you have Photoshop, GIMP or another image editing program, you could probably do a good deal to bring up the exposure and bump up the contrast and sharpness.
 

Chief Hill

Member
Joined
Aug 26, 2009
Messages
635
What is the new camera that you're using? That would help to see what might be going on. If the color of the photos is changing when your composition does, that is usually because the white balance is set to "auto" Your best bet is to set the white balance to a setting that matches the lights you are using, daylight, tungsten, florescent, incandescent, etc, or a Kelvin temperature if you know it and your camera will let you set it.

Auto exposure settings will also cause the dark photos you mention when shooting shiny things on bright backgrounds. The Auto settings assume that the overall image will average out to grey, so when you have an abnormal amount of white to the processor (which assumes you're taking photos of your wife, dog, car, or all of the above...) Again in this situation, you want to adjust your exposure either by setting it manually if your camera will allow it, or finding and adjustment that will trick the processor into overexposing the photos.

None of the photos you posted were beyond repair, if you have Photoshop, GIMP or another image editing program, you could probably do a good deal to bring up the exposure and bump up the contrast and sharpness.


Good point thanks. I am using a Fugifilm Finepix S1800 12mp with 18x zoom. It has many diffrent settings for white balence. 3 for Florescent settings alone. I am using fl daylight 16W bulbs now. 60w currly syle bulb.
 
Last edited:
Joined
Aug 7, 2009
Messages
700
Location
Jamestown, NC
So you've opened Pandora's Box. I got my wife one about a year ago and that is all she wants now. Honestly it makes it pretty easy on my end. Look at a bead, buy a bead, give a bead. Simple!
 

toddlajoie

Member
Joined
Feb 6, 2010
Messages
1,728
Location
Feeding Hills MA
Well, that seems like it should do just a great job for you once you get things dialed in. I generally think that for what we do with pens and such, auto settings are never going to be right. What I would do is set up your lights in one way, and leave them there till you get everything else in line. This is where it being digital makes life easy, since you can take a photo, see it right away, change something and take another one and see how it changes. Set up a shot (I like to toss a bunch of stuff in there, Legos, small product boxes, a couple pens/bottle stopers, screwdrivers, etc. Just a bunch of stuff with different bright colors, makes it easier to evaluate things overall. Considering you're using compact florescent bulbs and your camera has 3 FL settings, take a shot using each of them and look to see if one looks better than the others, and if that one or any are acceptable. If not, then start playing with the custom color balance settings. Assuming that you can set a Kelvin (K) temperature, CF lights run the range from around 3000K to 6000K depending on who makes them, and the fabric of your tent can shift that some too, so I would start around the 4000K range and fiddle up (if the images are too cold or blue) or down (if the images are to warm or yellow/orange) until you find the right temperature (If you can't set a K temperature, let me know and I can explain how to do a reliable color balance by taking a photo...)

After you get the color dialed in right, then work on the exposure, use the same kitchen sink of colorful stuff so you have a range of colors and such to evaluate, and go with full manual exposure, Keep your camera's ISO (ASA for you old folks) no higher than 400, and if you are not using a tripod, be sure your shutter speed stays above 1/125 second ( you can go slower if you have a steady hand, this is just a ballpark, I regularly hand hold down to 1/20 of a second, but I do this all day long...) Get your exposure right, then go back and take a closer look at the color one more time and tweak it if necessary.

Once you have that all set, then go back and start playing with moving your lights around to get the look you want. Your color balance should stay fine, but your exposure may drift up or down depending on where you place your lights. I find for pens and shiny round things, you often need to put the lights more behind the item (not directly behind, but nearer to the back to the tent than the front. But you will find that where you put the light will determine where your highlight reflections are.

We could talk all day on where to put your lights, but there are so many variables. A good place to start might be a shot of the whole tent setup with your lights in place.
 

Chief Hill

Member
Joined
Aug 26, 2009
Messages
635
Ok New pics

How about these now? I followed everyones advice and had some time to play around a bit. Now l am getting the hang of it. I will spend much more time testing.

So how are these now?

FYI I used the highest exposure setting to get this pic. The lower setting still gave a grey scale..
However I will take a pic of the light set up and I do use a very good tripod It can hold a 8lb camera. So its very sturdy.
 

Attachments

  • New pic.jpg
    New pic.jpg
    23.8 KB · Views: 108
  • cap1.jpg
    cap1.jpg
    39.5 KB · Views: 97
  • Nib1.jpg
    Nib1.jpg
    25.3 KB · Views: 102

toddlajoie

Member
Joined
Feb 6, 2010
Messages
1,728
Location
Feeding Hills MA
That looks MUCH better. The nib closeup is spot on from a technical point of view. Nice separation with the shiny silver and white background. That's a key factor in getting the exposure correct. It looks like the full body shot might be a bit bright in that your separation in the same area is less. You can see that in the closeup the background is a bit darker, so likely the image is darker also (speculation: This may have been caused by zooming your lens in for the closeup, many lenses aperture or f-stop changes as you zoom in or out, so if you didn't change your aperture and zoomed in, your lens may have darkened the image. Many newer cameras adjust for this, but not all...)

Another thing to play with is small reflectors or subtractors. I use small pieces of white and black matte board, but white and black paper will work also. Make little stands that hold the paper up like a sign, and you can position them just outside of your image area to reflect or subtract light from small areas of your pens. The most obvious is in the closeup of the cap. If you put a small piece of white reflector just out of the frame by the black tip, you can brighten up the black circle a bit to better define it's shape (this is an extreme nit-pic point, I'm just pushing you ever forward and bringing up new things to work on, don't take it as a criticism!!!)

For a second attempt, I think you've made a huge stride forward!!! The pen is pretty sweet too..
 
Top Bottom