NotURMailman
Member
Not sure they are anything to show off, but these are my first 4 pens (and only 4 to date).
I will try to include as much info as I can think of with each one...
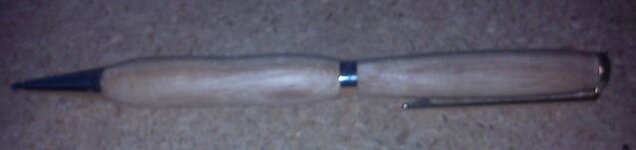
#1 is a gold slimline, made from scrap pine, sanded to 400 grit, and finished with Hut Crystal Coat
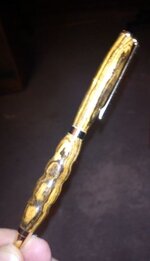
#2 is another gold slimline, made from Bocote, sanded to 400 grit, finished with thin CA (10 coats or so), polished with MicroMesh
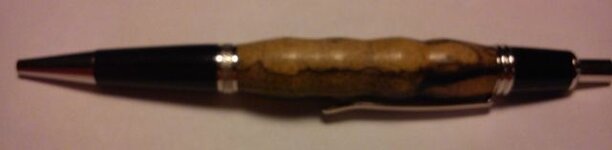
#3 is a gold WallStreet II click pen, made from Ebony, sanded to 400 grit, then polished with MicroMesh, then finished with Hut Crystal Coat - made for my wife
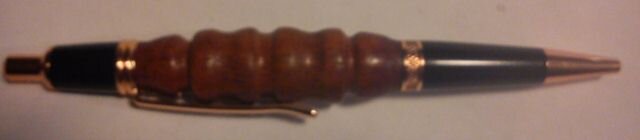
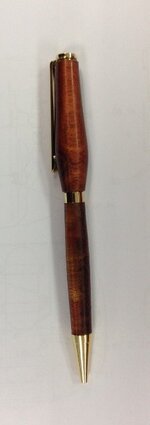
#4 is a copper WallStreet II click pen, made from African Padauk, sanded to 400 grit, polished with MicroMesh, and finished with Hut Crystal Coat - made for me")
I'm sure the CA finish will last 100 times longer than the wax based, but I like that the HCC leaves the pen feeling like wood
My pen turned out to be quite the adventure. First the Lacewood blank I had picked out exploded on me both times I tried to drill it. Then I glued the tube into a piece of pine. I decided I wasn't going to waste a $17 pen kit with pine. So, I tried to cut down the side of the blank so I could break it from around the tube. Oops... I cut a slice off the side of the tube with my scroll saw. So today I went back to WoodCraft and tried to get a pack of spare tubes. They didn't any. We thought we found some the same diameter but longer, so I bought those. The salesman measured the tube from another kit and said it was 1 7/16 long. I get home and cut one of the tubes to 1 7/16. I looked at it and said "that's way too short". So, I dug the busted up pine blank out of the trash and used it to get the right length. I cut a second tube and replaced the now destroyed scroll saw blade (I knew that was going to happen, so no worries). I cut the blank to length, drilled it and glued in the tube. After the glue dried I went to clean it up with my pen mill and it wouldn't fit in the tube. The new tube diameter was just barely too small! So I used the 25/64 guide (the WSII should have been 27/64). Of course the WSII bushings wouldn't fit in th tube either. So, what did I do? I pressed them in with my vise... LOL! At this point I'm not even sure if the pen will go together or function when I am done, but I figure I may as well keep going. So I turn and finish the blank. I (obviously) had some issues getting the bushings out of the tube, but it ending working out. The kit parts pressed in nice and tight and the click mechanism works the way it should. So far I'm in for about $1,000 (lathe, tools, chuck, consumables, etc...) and have four pens...
But, I do find turning to be super relaxing and very enjoyable!
That was the point after all...
I will try to include as much info as I can think of with each one...
#1 is a gold slimline, made from scrap pine, sanded to 400 grit, and finished with Hut Crystal Coat
#2 is another gold slimline, made from Bocote, sanded to 400 grit, finished with thin CA (10 coats or so), polished with MicroMesh
#3 is a gold WallStreet II click pen, made from Ebony, sanded to 400 grit, then polished with MicroMesh, then finished with Hut Crystal Coat - made for my wife
#4 is a copper WallStreet II click pen, made from African Padauk, sanded to 400 grit, polished with MicroMesh, and finished with Hut Crystal Coat - made for me
I'm sure the CA finish will last 100 times longer than the wax based, but I like that the HCC leaves the pen feeling like wood
My pen turned out to be quite the adventure. First the Lacewood blank I had picked out exploded on me both times I tried to drill it. Then I glued the tube into a piece of pine. I decided I wasn't going to waste a $17 pen kit with pine. So, I tried to cut down the side of the blank so I could break it from around the tube. Oops... I cut a slice off the side of the tube with my scroll saw. So today I went back to WoodCraft and tried to get a pack of spare tubes. They didn't any. We thought we found some the same diameter but longer, so I bought those. The salesman measured the tube from another kit and said it was 1 7/16 long. I get home and cut one of the tubes to 1 7/16. I looked at it and said "that's way too short". So, I dug the busted up pine blank out of the trash and used it to get the right length. I cut a second tube and replaced the now destroyed scroll saw blade (I knew that was going to happen, so no worries). I cut the blank to length, drilled it and glued in the tube. After the glue dried I went to clean it up with my pen mill and it wouldn't fit in the tube. The new tube diameter was just barely too small! So I used the 25/64 guide (the WSII should have been 27/64). Of course the WSII bushings wouldn't fit in th tube either. So, what did I do? I pressed them in with my vise... LOL! At this point I'm not even sure if the pen will go together or function when I am done, but I figure I may as well keep going. So I turn and finish the blank. I (obviously) had some issues getting the bushings out of the tube, but it ending working out. The kit parts pressed in nice and tight and the click mechanism works the way it should. So far I'm in for about $1,000 (lathe, tools, chuck, consumables, etc...) and have four pens...
But, I do find turning to be super relaxing and very enjoyable!
That was the point after all...