
You are using an out of date browser. It may not display this or other websites correctly.
You should upgrade or use an alternative browser.
You should upgrade or use an alternative browser.
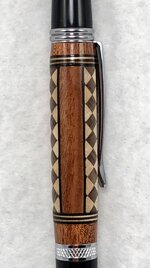
Slotted Trimrings
- Thread starter mark james
- Start date
Signed-In Members Don't See This Ad
See more from mark james


I used just Mylands sanding sealer on this, then sanded and burnished. OK, you're Old AND Entertaining.


Hi Mal: I'll assist in any manner I can.
This may not be the exact picture of the rod, but if you substitute the darker brown, which I suspect is the infamous... broom stick rod; closet rod, misc Home depot rod... It will be a very plain, cheap 6' section that I bought to practice my skew skills (that didn't go well!).
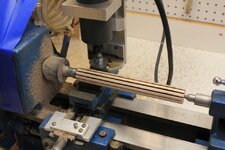
But the elements are the same: I used a metal lathe chassis, side mounted hand-router; slitting blades; 360 degree indexing plate; west system marine epoxy; accurately milled inlays.
This would have been any easy inlay. Only 12 thick slices, vs 36 thinner slices for a 3-ply 12 inlay. (Same number of inlays, just a single inlay vs a 3-ply).
Please ask any questions.

Mark, I am a huge fan of the work you do, especially the trim rings. Is there a way to do that without a metal late? I can see by inspecting your setup how it's done, but I wasn't sure if there were any other methods. Maybe I should just add a metal lathe to the wish list!
Hi Ronnie: Yes, there are other methods. Some folks (that have far more precise skills/equipment than I) cut angled staves to construct these. Others have simply used a hand router mounted on their wood lathe and used the lathe supplied indexing feature (if present), or had added precision indexing plates. Others have simply used the table saws.
All of the above methods, including my set-up will have various equipment needs and learning curves.
Then there is the method of how to do the inlay.
I'll freely explain how I do my blanks/segmented designs as I have NO ISSUE if anyone wants to "give it a go." But, I'll let others explain their methods if they wish - some folks feel a bit "protective" of techniques at times; which I understand and respect - I just don't feel that way about my work.
A PM will follow.
Thanks. I believe I found what you are referring to. It's got me thinking on what I can do.

OK, Got your query Mal.
YES, I have had some slotted blanks that failed due to what you described.
For the 3-inlay blanks, I can cut a slot about .25" wide, to a depth to insure the final OD of the pen is intact for the design. That will leave enough material for the inside triangle (Picture to follow) for it to be good. However, I cannot cut a .25" slot on a 4-inlay blank. The inside depth is too great and the pieces fall apart (not a good description, but the result is bad).
So... going to a lesser width of the inlay, .240, .230, .220, etc.. We have more options to go for a 4, 5, 6 slotted inlay. When I go to the trim rings, I can cut my slots for a solid or 3-ply inlay very thin; probably .0625+. So things can get interesting.
") .
.
Signed-In Members Don't See This Ad
wolf creek knives
Member
Very nice accomplishment!
The finish is curing on mine!! That one is PURDY!!! And i'm OLD, just not as OLD as you OLD FARTS!!!!
mark james
IAP Collection, Curator
The finish is curing on mine!! That one is PURDY!!! And i'm OLD, just not as OLD as you OLD FARTS!!!!
I used just Mylands sanding sealer on this, then sanded and burnished. OK, you're Old AND Entertaining.
Dalecamino
Local Chapter Leader
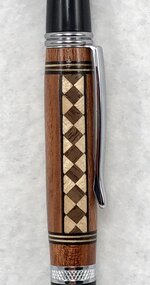
Good looking pen Mark!
mbroberg
IAP Activities Manager, Emeritus
Great looking pen!
MRDucks2
Member
mark james
IAP Collection, Curator
Lovely pen, Mark !!
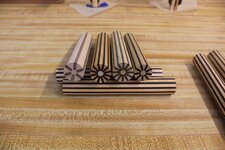
I assume you made a whole (or half) blank-length of the "pattern" and then slice off what you need. Would love to see a cross section of that rod, please, if you can.
Hi Mal: I'll assist in any manner I can.
This may not be the exact picture of the rod, but if you substitute the darker brown, which I suspect is the infamous... broom stick rod; closet rod, misc Home depot rod... It will be a very plain, cheap 6' section that I bought to practice my skew skills (that didn't go well!).
But the elements are the same: I used a metal lathe chassis, side mounted hand-router; slitting blades; 360 degree indexing plate; west system marine epoxy; accurately milled inlays.
This would have been any easy inlay. Only 12 thick slices, vs 36 thinner slices for a 3-ply 12 inlay. (Same number of inlays, just a single inlay vs a 3-ply).
Please ask any questions.
Attachments


Last edited:
Chief TomaToe
Member
But the elements are the same: I used a metal lathe chassis, side mounted hand-router; slitting blades; 360 degree indexing plate; west system marine epoxy; accurately milled inlays.
This would have been any easy inlay. Only 12 thick slices, vs 36 thinner slices for a 3-ply 12 inlay. (Same number of inlays, just a single inlay vs a 3-ply).
Please ask any questions.
Mark, I am a huge fan of the work you do, especially the trim rings. Is there a way to do that without a metal late? I can see by inspecting your setup how it's done, but I wasn't sure if there were any other methods. Maybe I should just add a metal lathe to the wish list!
mark james
IAP Collection, Curator
But the elements are the same: I used a metal lathe chassis, side mounted hand-router; slitting blades; 360 degree indexing plate; west system marine epoxy; accurately milled inlays.
This would have been any easy inlay. Only 12 thick slices, vs 36 thinner slices for a 3-ply 12 inlay. (Same number of inlays, just a single inlay vs a 3-ply).
Please ask any questions.
Mark, I am a huge fan of the work you do, especially the trim rings. Is there a way to do that without a metal late? I can see by inspecting your setup how it's done, but I wasn't sure if there were any other methods. Maybe I should just add a metal lathe to the wish list!
Hi Ronnie: Yes, there are other methods. Some folks (that have far more precise skills/equipment than I) cut angled staves to construct these. Others have simply used a hand router mounted on their wood lathe and used the lathe supplied indexing feature (if present), or had added precision indexing plates. Others have simply used the table saws.
All of the above methods, including my set-up will have various equipment needs and learning curves.
Then there is the method of how to do the inlay.
I'll freely explain how I do my blanks/segmented designs as I have NO ISSUE if anyone wants to "give it a go." But, I'll let others explain their methods if they wish - some folks feel a bit "protective" of techniques at times; which I understand and respect - I just don't feel that way about my work.
A PM will follow.
dogcatcher
Member
JT the Clockman has an easy tutorial on how to make these in the segment section.
Chief TomaToe
Member
JT the Clockman has an easy tutorial on how to make these in the segment section.
Thanks. I believe I found what you are referring to. It's got me thinking on what I can do.
Woodchipper
Member
Need to try segmenting. Just counted and I have 19 Slimline kits! Need to make different patterns, designs, etc., in addition to the usual plain vanilla. Will look at JT's tutorial. Thanks two bunches.
Mark,
Thanks for your reply and the detailed pictures. . General idea I get.
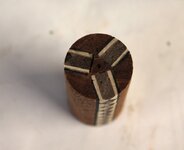
A thing I don't get is ... when you do the longitudinal slitting, the adjacent slits seem to meet near the axis of the main dowel which is being slit. . And if the slits meet, the wedge-cross-section piece in between the slits would fall out ! .... or does the wedge-cross-section piece still hang in there in an extremely fragile and precarious way ?
Thanks for your reply and the detailed pictures. . General idea I get.
A thing I don't get is ... when you do the longitudinal slitting, the adjacent slits seem to meet near the axis of the main dowel which is being slit. . And if the slits meet, the wedge-cross-section piece in between the slits would fall out ! .... or does the wedge-cross-section piece still hang in there in an extremely fragile and precarious way ?
Last edited:
mark james
IAP Collection, Curator
Mark,
Thanks for your reply and the detailed pictures. . General idea I get.
A thing I don't get is ... when you do the longitudinal slitting, the adjacent slits seem to meet near the axis of the main dowel which is being slit. . And if the slits meet, the wedge-cross-section piece in between the slits would fall out ! .... or does the wedge-cross-section piece still hang in there in an extremely fragile and precarious way ?
OK, Got your query Mal.
YES, I have had some slotted blanks that failed due to what you described.
For the 3-inlay blanks, I can cut a slot about .25" wide, to a depth to insure the final OD of the pen is intact for the design. That will leave enough material for the inside triangle (Picture to follow) for it to be good. However, I cannot cut a .25" slot on a 4-inlay blank. The inside depth is too great and the pieces fall apart (not a good description, but the result is bad).
So... going to a lesser width of the inlay, .240, .230, .220, etc.. We have more options to go for a 4, 5, 6 slotted inlay. When I go to the trim rings, I can cut my slots for a solid or 3-ply inlay very thin; probably .0625+. So things can get interesting.
Attachments
Last edited: