
You are using an out of date browser. It may not display this or other websites correctly.
You should upgrade or use an alternative browser.
You should upgrade or use an alternative browser.
Segmenting craziness in NM
- Thread starter Krash
- Start date
Signed-In Members Don't See This Ad
See more from Krash


Yea, I'm kinda with you Mark. Although I have done some contrasting woods, I usually tie the top and bottom sections together by at least using some of the same wood in both areas. This was supposed to be a concept/practice piece so I tried something a little different. I am sure it will appeal to some though that like variety in their pens.
OK Mike. I did take pictures of the 4 steps.
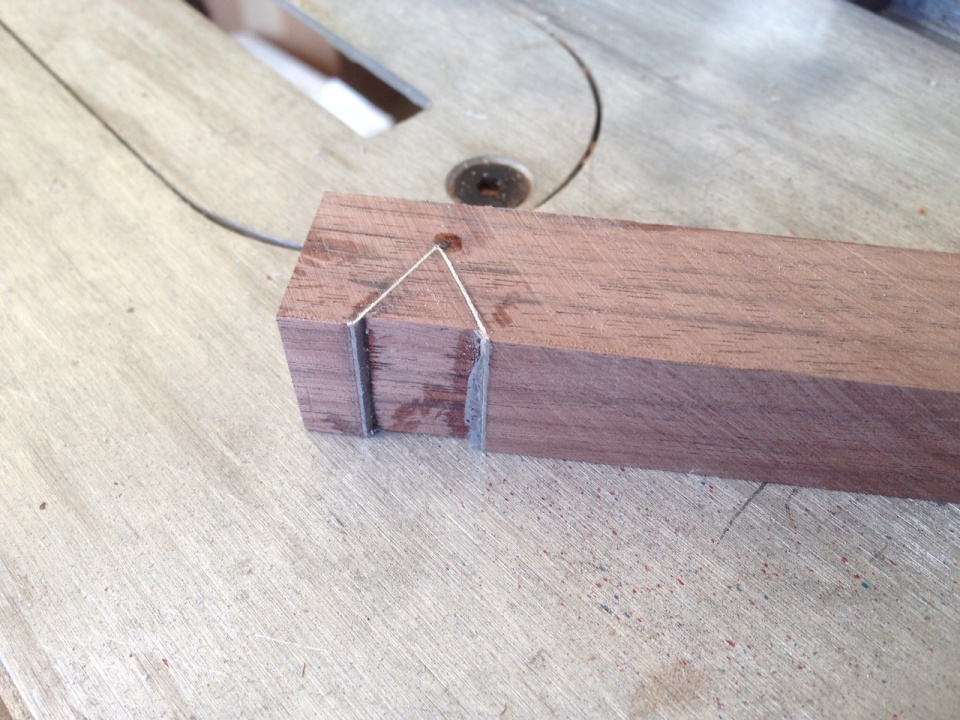
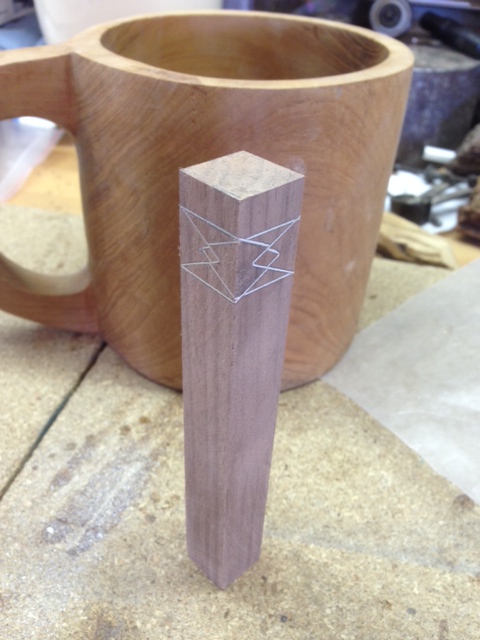
1. Draw a line lengthwise offset from center where you want the points to overlap. I drew mine at about 2/3 just eyeballing where the edge of my pen would be, still wanting the point to show.
I set up my bandsaw for 40 degrees (I think) and installed a stop-block so all of my subsequent cuts would be identical. You will have to get creative on how to do the V cut sideways since one stop-block will not work for both side of the V. If I come up with a good way to do this one the next piece, I'll post it, or if someone else already has a good method you can share it with us all!
Lay your separating material into the V cut and glue it back up.
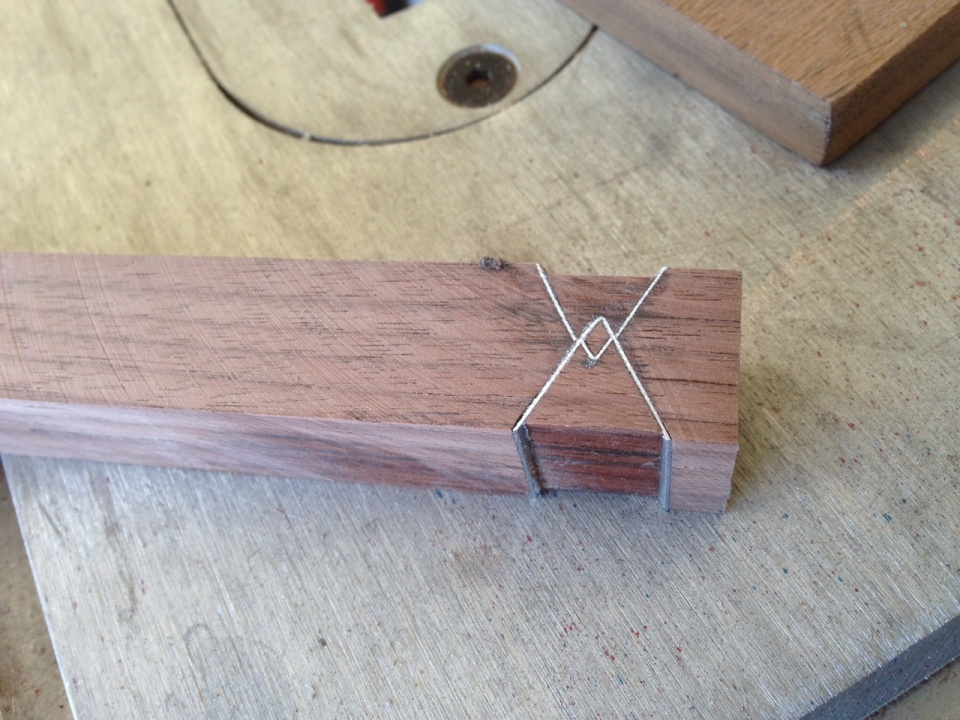
2. Square up any overhang from the previous step. Turn the blank 180 degrees and make the same off-center mark and cut. The cuts will overlap.
Lay your separating material into the V cut and glue it back up.
Make sure to glue well since you are creating some small pieces.
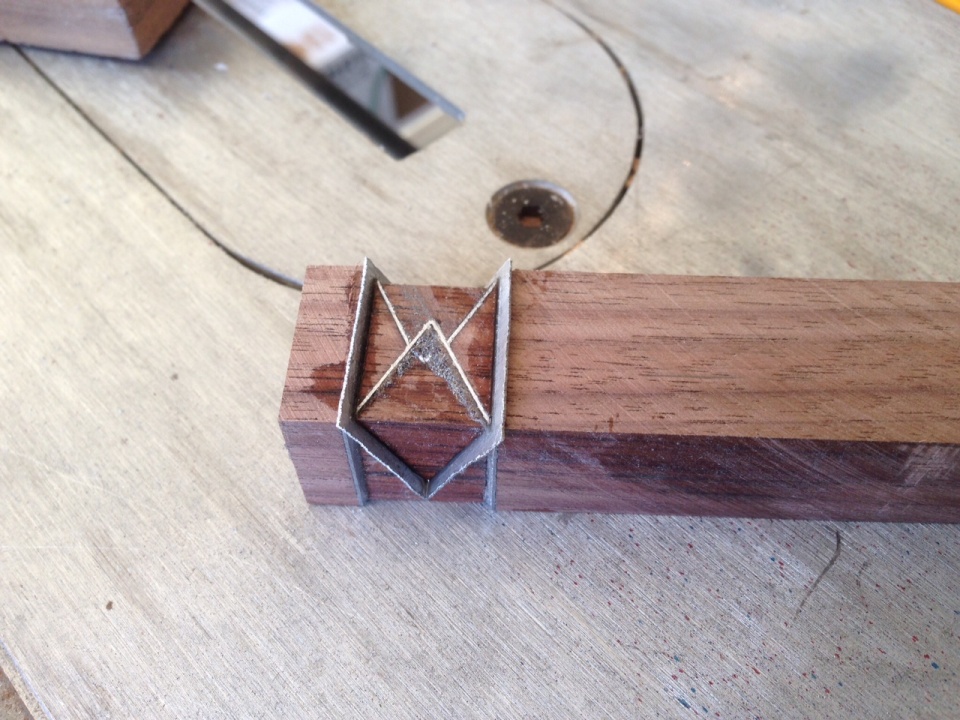
3. Square up any overhang from the previous step. If you think you need to, flush the areas with some thin CA to strengthen.
Choose one of the remaining sides and set up the same off-center mark and cut. I know, I know ... this is starting to get dicey!
Lay your separating material into the V cut and glue it back up. And pray.
4. Square up any overhang from the previous step. Again, if you think you need to, flush the areas with some thin CA to strengthen. I did. I was starting to get fearful ...
Turn the blank 180 degrees and make the same off-center mark and cut. The cuts will overlap.
Lay your separating material into the V cut and glue it back up. Gulp ... !
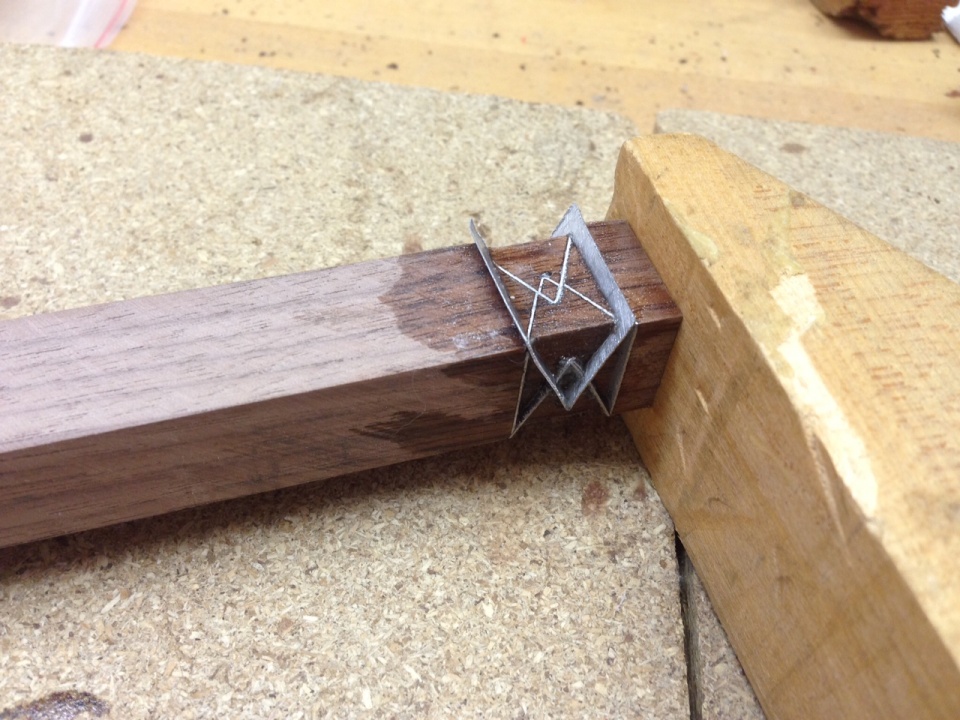
5. Again, flood the area with thin CA and let it sit for a while. Square everything up. I took it all the way down mainly to see what kind of madness I had created. This created a lot of heat which I am sure was not good for the CA. Next time I'll just leave it and take off the material with the lathe.
This practice blank turned out well enough that I decided to go ahead and finish it into a slimline which is chancy because of the diameter. Luckily I got my Nova G3 chuck with the pin jaw set to hold it all together while drilling. I can't recommend this chuck enough. It makes drilling a breeze.
It all held together while turning and finished well although the lathe work was challenging because of all the aluminum material consentrated in that one area.
Good luck with this method. It is definitely challenging. I'll post some other pictures once I get my process down if anybody wants them.
Have a great day!


Signed-In Members Don't See This Ad
John Den
Member
Very thought provoking!!
Regards
John
Regards
John
BayouPenturner
Member
very nice
Very nice Kelly. Well done.
johncrane
Member
I agree with Jan! great job.
mikespenturningz
Member
Very nice Kelly I like the tight design.. Maybe a tutorial on that one would be cool...
mark james
IAP Collection, Curator
VERY NICE! I like the delicate, segmenting.
For me, I may have a preference for the same wood in both blanks... They both are beautiful, but similar enough in color, with different grain patterns that the pairing seems a little off?
Its a beautiful job, so this is a minor consideration (and coming from someone who is just thinking of trying segmenting). Maybe I'll segment an egg between two pieces of toast today :tongue:
Krash
Member
VERY NICE! I like the delicate, segmenting.
For me, I may have a preference for the same wood in both blanks... They both are beautiful, but similar enough in color, with different grain patterns that the pairing seems a little off?
Its a beautiful job, so this is a minor consideration (and coming from someone who is just thinking of trying segmenting). Maybe I'll segment an egg between two pieces of toast today :tongue:
Yea, I'm kinda with you Mark. Although I have done some contrasting woods, I usually tie the top and bottom sections together by at least using some of the same wood in both areas. This was supposed to be a concept/practice piece so I tried something a little different. I am sure it will appeal to some though that like variety in their pens.
Krash
Member
Very nice Kelly I like the tight design.. Maybe a tutorial on that one would be cool...
OK Mike. I did take pictures of the 4 steps.
1. Draw a line lengthwise offset from center where you want the points to overlap. I drew mine at about 2/3 just eyeballing where the edge of my pen would be, still wanting the point to show.
I set up my bandsaw for 40 degrees (I think) and installed a stop-block so all of my subsequent cuts would be identical. You will have to get creative on how to do the V cut sideways since one stop-block will not work for both side of the V. If I come up with a good way to do this one the next piece, I'll post it, or if someone else already has a good method you can share it with us all!
Lay your separating material into the V cut and glue it back up.
2. Square up any overhang from the previous step. Turn the blank 180 degrees and make the same off-center mark and cut. The cuts will overlap.
Lay your separating material into the V cut and glue it back up.
Make sure to glue well since you are creating some small pieces.
3. Square up any overhang from the previous step. If you think you need to, flush the areas with some thin CA to strengthen.
Choose one of the remaining sides and set up the same off-center mark and cut. I know, I know ... this is starting to get dicey!
Lay your separating material into the V cut and glue it back up. And pray.
4. Square up any overhang from the previous step. Again, if you think you need to, flush the areas with some thin CA to strengthen. I did. I was starting to get fearful ...
Turn the blank 180 degrees and make the same off-center mark and cut. The cuts will overlap.
Lay your separating material into the V cut and glue it back up. Gulp ... !
5. Again, flood the area with thin CA and let it sit for a while. Square everything up. I took it all the way down mainly to see what kind of madness I had created. This created a lot of heat which I am sure was not good for the CA. Next time I'll just leave it and take off the material with the lathe.
This practice blank turned out well enough that I decided to go ahead and finish it into a slimline which is chancy because of the diameter. Luckily I got my Nova G3 chuck with the pin jaw set to hold it all together while drilling. I can't recommend this chuck enough. It makes drilling a breeze.
It all held together while turning and finished well although the lathe work was challenging because of all the aluminum material consentrated in that one area.
Good luck with this method. It is definitely challenging. I'll post some other pictures once I get my process down if anybody wants them.
Have a great day!
Attachments


OZturner
Member
Great Pen Kelly, and Thanks for the Splendid Tutorial.
Most intriguing Segmenting.
Excellent Fit and Finish.
Shows a Slimline in a completely different Class.
Terrific work,
Brian.
Most intriguing Segmenting.
Excellent Fit and Finish.
Shows a Slimline in a completely different Class.
Terrific work,
Brian.
Trees2Pens
Member
Very cool segmenting, I tried to figure it out before I looked at the step by step...Honestly I couldn't figure it past step 2. Thank you for sharing.
Krash
Member
You all give it a try and post your results!
I'd love to see what you come up with.
I'd love to see what you come up with.