Ruby Red Slipper

Signed-In Members Don't See This Ad
See more from Ed McDonnell

Ed McDonnell

Member
Joined
Oct 20, 2008
Messages
2,294
Location
Melbourne, FL
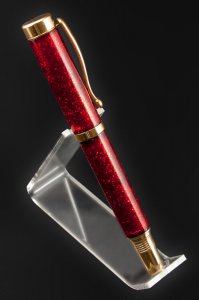
I've been working on casting a blank that has the look of a metallic paint job. It's proven to be a bit more difficult than I had anticipated, but I finally got a set of blanks that was worth attaching hardware.

I was going for a candy apple red metallic look that was similar to what I had seen at an auto show earlier this year. I showed it to my wife who said it reminded her of the ruby red slippers from the Wizard of Oz, which somehow translated into it becoming her new carry pen. Probably for the best.

There is lots of fiery sparkling as the pen moves that is not captured by the photo. A bit too much for me. Not quite gaudy, but getting close. I bet my young nieces would love it. I'm going to try making the clear coat a little more opaque on the next attempt.


Ed
 
Signed-In Members Don't See This Ad

Ed McDonnell

Member
Joined
Oct 20, 2008
Messages
2,294
Location
Melbourne, FL
is that glitter in the resin?

Hi Mike - It is a type of glitter. It's the same stuff they use to make the metal flake hulls on bass boats and such (~375 micron size). It's "vacuum metallized (0.5% aluminum) pigmented polyethylene terephthalate". (That should clear things up :biggrin:).

Ed
 

CrimsonKeel

Member
Joined
Mar 1, 2013
Messages
495
Location
Royal oak, MI
Really nice.
did you happen to try painting the tubes with a auto paint and then casting with clear resin? always been curious if that would work out. maybe try a smaller flake to limit the sparkle.
 

Ed McDonnell

Member
Joined
Oct 20, 2008
Messages
2,294
Location
Melbourne, FL
Thanks for all the compliments and "likes".


Really nice.
did you happen to try painting the tubes with a auto paint and then casting with clear resin? always been curious if that would work out. maybe try a smaller flake to limit the sparkle.

I didn't try using a metal flake / metallic paint for a couple of reasons:

1) I would have to test to make sure the paint would stand up to the resin
2) I would have limited choices on colors and no choice on flake size / shape in a premixed paint.
3) I wanted more of a dimensional look to the flake than I could get with paint.

Although I think I might like a smaller flake size myself, the flash from the current size I'm using has been really popular. But most of my experience with using this has been on much larger work and it looks much different on tiny little pens.

There are a dizzying array of flake sizes and shapes available. I'm about to order some more and I've got to really think about what sizes / shapes I want to get. Unfortunately I can't find anybody offering sample size portions so buying a lot of different sizes / shapes can get pretty pricey pretty quickly.

Ed
 

Brooks803

Member
Joined
Sep 13, 2009
Messages
5,632
Location
Aiken, South Carolina
Looks great Ed! I've been playing with the same stuff to. Are you attaching it to the tube and then casting or pouring it directly into the resin? I think I have that same red. Mine might be a size larger though.
 

Ed McDonnell

Member
Joined
Oct 20, 2008
Messages
2,294
Location
Melbourne, FL
Thanks Donnie.

Looks great Ed! I've been playing with the same stuff to. Are you attaching it to the tube and then casting or pouring it directly into the resin? I think I have that same red. Mine might be a size larger though.

Hi Jonathan - I wasn't satisfied with the look of it attached directly to the tubes.

I mix the flakes in the resin and then rotocast a thin layer (~0.02" - ~0.03") on the tubes. I then cast another layer of plain resin on top of that to provide a "clear" area for shaping the pen that will keep the flakes "buried". I like to keep the flakes below the ultimate turned surface. If the flakes are at the surface while turning, they lose their color and show as a brilliant silver streak and (in my opinion) ruin the look.

Seems like there is a lot that can be done with this, but it has been a little bit of a challenge to work with. I've got sparkly fairy dust everywhere in the shop now.

Ed
 

Brooks803

Member
Joined
Sep 13, 2009
Messages
5,632
Location
Aiken, South Carolina
Thanks Donnie.

Looks great Ed! I've been playing with the same stuff to. Are you attaching it to the tube and then casting or pouring it directly into the resin? I think I have that same red. Mine might be a size larger though.

Hi Jonathan - I wasn't satisfied with the look of it attached directly to the tubes.

I mix the flakes in the resin and then rotocast a thin layer (~0.02" - ~0.03") on the tubes. I then cast another layer of plain resin on top of that to provide a "clear" area for shaping the pen that will keep the flakes "buried". I like to keep the flakes below the ultimate turned surface. If the flakes are at the surface while turning, they lose their color and show as a brilliant silver streak and (in my opinion) ruin the look.

Seems like there is a lot that can be done with this, but it has been a little bit of a challenge to work with. I've got sparkly fairy dust everywhere in the shop now.

Ed

I agree that directly to the tube doesn't look as nice. Wow, you put a lot more effort into yours than I did. I might have gotten lucky not to give those silver slits on my most recent trial: http://i1136.photobucket.com/albums/n496/Brooks803/DSC03471623x700_zps4f826911.jpg but I didn't use quite as much as you did (by the looks of coverage).

It is tricky to work with for sure! Powder coating was way worse for me though. I still have that powder all over the shop (although it was used OUTSIDE!).
 
Top Bottom