
You are using an out of date browser. It may not display this or other websites correctly.
You should upgrade or use an alternative browser.
You should upgrade or use an alternative browser.
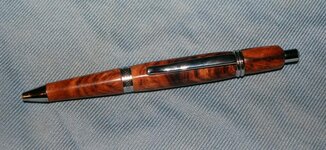
Rosewood sierra click
- Thread starter gwilki
- Start date
Signed-In Members Don't See This Ad
See more from gwilki


I believe that is whats turning me off on this mod. The wood is beautiful, but the multiple chrome bands are too much.
It is a great mod though!:biggrin:
Signed-In Members Don't See This Ad
witz1976
Member
As long as the customer likes it then it is great for you! I am not diggin this as much...really can't tell you the reason.
gwilki
Member
No worries, Dan. I like the pen style. I'm just not sold on Shellawax as a finish. It looks nice at the outset, but doesn't stay that way for very long.
PaulDoug
Member
I've been waiting to see this done. I am one of the few that is not a fan of that style pen because there is too much plastic. And the more elaborate models have too much metal. Now that I see yours I like it. One other mod I would like is to eliminate the bottom band. Nice work.
gwilki
Member
Paul
I've done one without the band. The process is pretty much the same. I just turned off the band with a skew and lengthened the barrel to make up for its loss. I know, I know - no pics, didn't happen. I'll have to do another one and take pics.
I've done one without the band. The process is pretty much the same. I just turned off the band with a skew and lengthened the barrel to make up for its loss. I know, I know - no pics, didn't happen. I'll have to do another one and take pics.
boxerman
Member
Very nice pen.
maxman400
Member
I like It, How did you get the bottom apart, I have been wanting to take one apart but never seem to have the time but after seeing yours I think I will make the time.
wizard
Member
I like it!! Very creative and unique. Great job. Regards, Doc
gwilki
Member
Warning: long description
Maxman
Here's how I did it.
In terms of taking the kit apart, it depends a bit on which version of the kit you have. The first time that I did this, the nib end of the kit simply knocked apart with punches. This time, it seems that Berea had changed the kit. It's easy to tell. You simply try to knock it apart and if it doesn't work, you have the newer one.
If you have the older version, starting with the nib end, simply insert a punch through the centre band and knock off the chrome nib. If it goes, then insert a punch through that opening and knock off the centre band.
If you have one of the new kits, the nib will not knock out. You need to cut the black piece off. I used a dremel with a cutting wheel.
When you have the black piece off, you can twist the two pieces apart. Then it's just a matter of turning a new wood piece to replace the black piece and pressing the pieces back together. There is a shoulder on both the nib and the centre band. I did nothing with the one on the nib, but I turned the one on the centre band down a bit so that the wood would not be so thin. I just held onto the centre band with a collet chuck and used a skew to turn the shoulder down a bit. You don't need to do this. I only did it so that I didn't need to turn the wood down so thin that it was in danger of cracking when I pressed the pieces together.
For the clicker end, the first thing to do is to remove the button and most of the click mechanism. If you don't do this, you'll damage it when you knock it apart. DAMHIKT
To remove the button and the inner click mechanism, you just push the refill up into the cap and while holding it, unscrew the chrome button. The refill will prevent the mechanism from turning while you unscrew the button. The inner click mechanism will fall out of the end of the cap. There is still an outer part in the cap, but you don't touch it when you disassemble the rest.
With the button gone, hold on to the chrome end with a pair of pliers and twist it off. Since I don't use it, I don't mind scratching it. If you intend to use it, wrap it in tape first. (You can't knock it out with a punch because any punch big enough to not go through the hole on the end will damage the click mechanism parts still in there.) With this off, the black piece will fall off.
Now, you just turn pieces to replace the two black pieces. I held the square blank in a scroll chuck, drilled it on the lathe and turned it to final diameter. There is no magic to this. The barrel is just done in the usual way.
I used epoxy to hold everything together. I would imagine that CA would work, too.
I did a couple of these previously where I turned off the two chrome rings above the clip. The look is a bit cleaner, I think. To do this, you can use a punch inserted into the cap from the centre end. Be sure to use a punch that just fits into the cap. Too small and you will ruin the part of the click mechanism that stays in there. When you knock this apart, you'll have a piece with the two rings and the clip will be separate. I held the piece with the rings in a collet chuck and turned off the rings with a skew. Then I just pressed the two pieces and the clip together again.
I hope this helps. If you have any questions, I'll do what I can to answer them
maxman400
Member
Thanks So Much for the Info, I will give it a try real soon.
witz1976
Member
I've been waiting to see this done. I am one of the few that is not a fan of that style pen because there is too much plastic. And the more elaborate models have too much metal. Now that I see yours I like it. One other mod I would like is to eliminate the bottom band. Nice work.
I believe that is whats turning me off on this mod. The wood is beautiful, but the multiple chrome bands are too much.
It is a great mod though!:biggrin:
gwilki
Member
Phil: It does have three pieces of rosewood. The barrel is the stock kit part; drill a blank, glue in tube and turn it to size. Below the band replaces the black part in the kit and above the clip replaces the black part in the kit. The pen still unscrews at the centre band to replace the refill.