
You are using an out of date browser. It may not display this or other websites correctly.
You should upgrade or use an alternative browser.
You should upgrade or use an alternative browser.
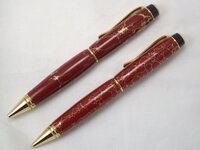
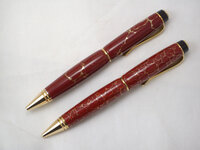
Red with Gold Matrix compared to Red with Gold Web TruStone
- Thread starter hilltopper46
- Start date
Signed-In Members Don't See This Ad
See more from hilltopper46


Thanks for the nice comments.
The centerband treatment isn't original with me, but here's how I do it:
I know what you mean - I think half the reason I made both was I couldn't remember what the customer wanted, and then I had to look at the suppliers site to make sure which was which when I went back and looked at his order, after I made the pens.
FWIW, the web is the smaller pattern and the matrix is the larger pattern.
Signed-In Members Don't See This Ad
thewishman
Member
Both look good - nice work.")
Love your modifications!
Love your modifications!
steeler fan1
Member
They both look great, my personal preference has always been the matrix.
Carl
Carl
BKelley
Member
Nice work, they look like a pen should.
Ben
Ben
EarlD
Member
Both are great. Interesting centerband treatment. Care to elaborate on it?
EarlD
EarlD
jbthbt
Member
I'm not edumacated enough to know which is which, but on that body, I definitely prefer the one on the left. Both look great though.
hilltopper46
Member
Both are great. Interesting centerband treatment. Care to elaborate on it?
EarlD
Thanks for the nice comments.
The centerband treatment isn't original with me, but here's how I do it:
- Cut a custom lower tube the length of the standard lower tube plus the black ring that goes just above the nib of the standard cigar pen. PSI has the 10mm OD tubes. 2.220 inches is a good length.
- Use the standard lower tube for the upper barrel.
- Throw the black ring, and the top tube and the trim ring for the black center band into your ever-increasing pile of spare parts.
- Use the standard nib end bushing and the standard clip end bushing, and two lower barrel middle bushings back-to-back.
- Turn and shape to your desired profile.
- Pull the two bushings out of the center and replace with two smaller diameter bushings (either two nib-end bushings, two clip-end bushings or one of each).
- Cut and round the center end of each barrel to your desired shape.
- Finish the barrels.
- Take the black centerband and cut the flange off it. I use my metal lathe. Some folks use a Dremel with cut-off blade. There may be other ways to do the same thing.
- Completely assemble the lower barrel including the transmission. The threads in the nib are deep enough to make up for the black trim ring you aren't using. Plan on using adhesive on the fittings.
- Press the black bushing you have created by trimming the black centerband into the lower end of the upper barrel. Without this bushing, the barrel will have too much movement around the lower end of the transmission. This bushing will not need adhesive.
- Check for fit onto the lower assembled barrel.
- If the fit is not OK, use a round file to make the bushing in the bottom end of the upper barrel larger.
- Once the fit is OK, assemble the remainder of the upper barrel.
- Admire your handiwork.
Last edited:
hilltopper46
Member
I'm not edumacated enough to know which is which, but on that body, I definitely prefer the one on the left. Both look great though.
I know what you mean - I think half the reason I made both was I couldn't remember what the customer wanted, and then I had to look at the suppliers site to make sure which was which when I went back and looked at his order, after I made the pens.
FWIW, the web is the smaller pattern and the matrix is the larger pattern.