Red Dwarf Banksia (Georgenised) in Roman Harvest

Signed-In Members Don't See This Ad
See more from tgsean

tgsean

Member
Joined
Jan 6, 2014
Messages
510
Location
Australia
Hi Friends,

Its been a while since I've put up anything, because my nephew from Canada is visiting, he is the one for whom I have been selling the pens to raise funds for his Bible school fees this year. I am happy to say that when I complete the orders I have I would have made that money and will be able to give it to him before he leaves Kalgoorlie!!

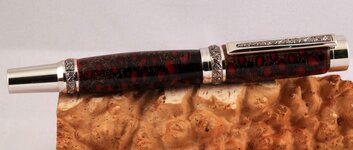
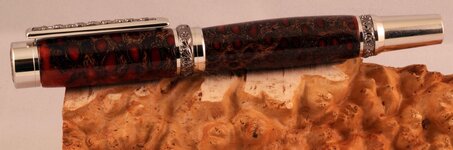
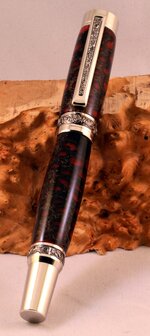
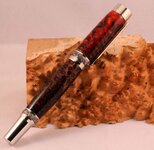
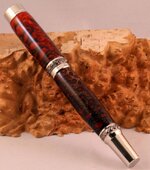
Now the pen is a Roman Harvest pen but the first time I am turning the Dwarf Bansksia Pod and I love it!! It is just awesome. I presented this to my colleagues at work and they were superthrilled. It works well with Carbide tools or flap disc. I did notice that you have to be very careful while sanding, and its not so easy to get the sanding marks off, and I am not sure I was able to completely. Please let me know what you think. C & C very welcome.

Cheers,
Sean
 

Attachments

  • Red Dwarf Banksia.jpg
    Red Dwarf Banksia.jpg
    126.7 KB · Views: 107
  • Red Dwarf Banksia1.jpg
    Red Dwarf Banksia1.jpg
    112.7 KB · Views: 119
  • Red Dwarf Banksia2.jpg
    Red Dwarf Banksia2.jpg
    138.8 KB · Views: 109
  • Red Dwarf Banksia3.jpg
    Red Dwarf Banksia3.jpg
    251.7 KB · Views: 168
  • Red Dwarf Banksia4.jpg
    Red Dwarf Banksia4.jpg
    228.2 KB · Views: 123
Signed-In Members Don't See This Ad

OZturner

Member
Joined
Aug 5, 2013
Messages
6,662
Location
Sydney. NSW. Australia
Beautiful Pen, Sean
I cannot see any problems or scratches on the Dwarf Banksia Blanks.
Due to the nature of the area around the seed pocket, it is difficult to have the material smooth. It is like an end grain, so as you turn or sand, you may have to continually fill the exposed "Ends" with CA and build up a coat that you can polish without scratches.
Having done that you may still see marks on the Banksia Pod, through your scratch free CA Surface Finish.
I hope I have made sense, now back to the pen.
Love the use of the Roman Harvest.
Your fit and Finish looks Terrific.
Congratulations on achieving your Goal of raising sufficient money to send your Nephew to Bible College.
You are truly Following the Master Carpenter.
Brian.
 
Last edited:

robutacion

Member
Joined
Aug 6, 2009
Messages
6,514
Location
Australia - SA Adelaide Hills
Hi Sean, glad to have you back...!

Thank you for using and showing us another one of the Dwarf Banksia pods I make, I didn't know this was your first one however, you done a very good job with it...!

You mention the difficulty you experienced in sanding all the scratch marks and that, they may still be visible. Firstly, the pics are not close enough to see that sort of details and you may need to re-arrange some of your finishing steps with these blanks.

Quite honestly, none of the same blanks I have used to make a few pens as gifts, require any different steps than those I normally perform with any other blanks, appart from making sure the exposed pod material is soaked with thin CA as you go (the pods on these are cast raw...!) so, there will be the hardness difference of the PR resin and the raw pod.

The last dry sanding before the blank is prepared for the CA finish, is done with 240, 300 and 400 grits then, and after all the dust was remove, blown out, a good coat of thin CA is applied to the whole surface, with the lathe turned off, this coat works like a deep soaking sealer, it can be spread with the finger (protected or unprotected) to make sure the whole area is covered evenly, don't worry about smoothness at this point.

Make sure that sealing coat is set hard, I use double of the accelerator I normally use in between coats and them, with the lathe turning, I use the heat gun for 1 minute to make that coat cure fast and from the deep reach.

The dry 240 grit smooths it out but is done with the lathe OFF and sanding the blanks with the grain/side to side, when is smooth the lathe is then turned on and a quick rub with 300 and 400 grits will get it ready for the last CA coats that will be in reality the top coats (6 in most of mine, at least, using medium CA). After that the wet sanding is applied, a good rub with polish compound and Bob is your uncle...!:wink::biggrin:

From where I stand, the finish looks a little dull, and that may explain any of the scratches you may noticed...!

This is off-course, my methods and my opinion...!

You have a "few" more of those blanks to work with so, you will find the best way to make them look the way you prefer...!

Cheers
George
 

tgsean

Member
Joined
Jan 6, 2014
Messages
510
Location
Australia
I will try the suggestions George, afterall you are the creator of the blank! You should know what will work. Thanks for the comments friends!
 
Top Bottom