Rattler

Signed-In Members Don't See This Ad
See more from omb76

omb76

Member
Joined
Jan 1, 2009
Messages
711
Location
Cartersville, GA
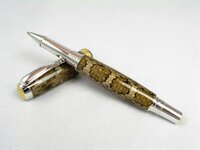
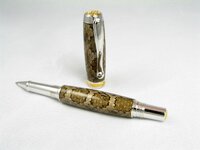
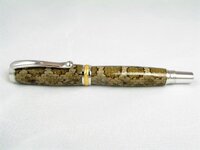
Got these blanks in the mail today from Seamus, can't believe how great they turned out. This is the 5th snakeskin pen I've turned and the first time turning some of Seamus' blanks, and these are FAR superior than any others that I've done. :biggrin: Pen kit is a Rhodium / 22k Jr. Statesman. The only trouble I had was when I was putting the kit together trying to get the scales to line up between the body and the cap. I must have taken it apart 4 times (which I hate doing). Everything would stay perfectly lined up and when I went to cap it they would be off everytime. Finally I started off over compensating by the amount that it was always off and it lined up perfectly. :confused: Oh well, the end result is worth it. I'm pretty proud of this one if you can't tell. :biggrin: Thanks for looking!!
 

Attachments

  • IMG_1711.jpg
    IMG_1711.jpg
    64 KB · Views: 233
  • IMG_1712.jpg
    IMG_1712.jpg
    49.5 KB · Views: 170
  • IMG_1717.jpg
    IMG_1717.jpg
    54.1 KB · Views: 252
Signed-In Members Don't See This Ad

omb76

Member
Joined
Jan 1, 2009
Messages
711
Location
Cartersville, GA
Thanks everyone for the compliments! They are truely appreciated! I've been working a lot on improving my pictures, glad to see it's paying off too!

Seamus, I hope to be able to turn the cigar pen this weekend. I'm waiting on my order from Exotics to get here which has the kit I need. I'll post pictures of that one too assuming that the good lord is willing and the devil doesn't mind if I turn it. :rolleyes:
 

lwalden

Member
Joined
Nov 3, 2005
Messages
1,238
Location
Trophy Club, Texas, USA.
Great looking pen, David! Quick question for you- do you assemble the cap or the body first? I do a number of blanks where alignment is critical, and have learned that you just can't do the cap first and then try to align the lower barrel- the threading of the nib end ends up offseting by about 1/8, maybe a little less,when pressfitting the nib end threaded insert. I've learned to assemble the lower barrel/body, go ahead and thread the cap center coupler on to the lower body and make sure it's snug, then align the upper barrel with the lower and start slipping it over the black plastic fittings by hand before transfering to the arbor press for final seating of the hardware.
 

jskeen

Member
Joined
Oct 11, 2007
Messages
1,754
Location
Crosby, Texas, USA.
Great looking pen, David! Quick question for you- do you assemble the cap or the body first? I do a number of blanks where alignment is critical, and have learned that you just can't do the cap first and then try to align the lower barrel- the threading of the nib end ends up offseting by about 1/8, maybe a little less,when pressfitting the nib end threaded insert. I've learned to assemble the lower barrel/body, go ahead and thread the cap center coupler on to the lower body and make sure it's snug, then align the upper barrel with the lower and start slipping it over the black plastic fittings by hand before transfering to the arbor press for final seating of the hardware.

Those are the same first two steps I do when assembling a capped pen. For a postable pen, I then attempt to align the threads on the tail end so that the cap grain will be aligned at least one of 3 ways for the cap to be posted. Last thing I do is to then hand press the clip/cap assy and put a small piece of drinking straw over the clip, then twist it so that the clip is aligned with the top of the nib when posted in the grain matching position, then add a small drop of locktite between the clip band and the cap assy, and press to finish.
 

omb76

Member
Joined
Jan 1, 2009
Messages
711
Location
Cartersville, GA
Great looking pen, David! Quick question for you- do you assemble the cap or the body first? I do a number of blanks where alignment is critical, and have learned that you just can't do the cap first and then try to align the lower barrel- the threading of the nib end ends up offseting by about 1/8, maybe a little less,when pressfitting the nib end threaded insert. I've learned to assemble the lower barrel/body, go ahead and thread the cap center coupler on to the lower body and make sure it's snug, then align the upper barrel with the lower and start slipping it over the black plastic fittings by hand before transfering to the arbor press for final seating of the hardware.

Thanks for the advice Lyle. I've been assembling the cap first, then trying to line up the lower barrel.
 
Top Bottom