
You are using an out of date browser. It may not display this or other websites correctly.
You should upgrade or use an alternative browser.
You should upgrade or use an alternative browser.
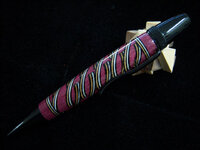
"Purple Waves" Atlas
- Thread starter akbar24601
- Start date
Signed-In Members Don't See This Ad
See more from akbar24601


I saw some of your work and I think it is all pretty cool. I tried to use aluminum and then copper like you did and it ended up ok but I had a hard time combining the different materials with wood. What do you use for adhesive? I tried it with medium ca and they kept comming loose.
On the lathe, take your time. Keep your tool sharp and take nice light passes. Again, PATIENCE! You are not going to set any speed records taking this blank down. Watch how much you are taking off the whole pass, as the blade likes to find softer material and then will catch on the metal, leaving you looking for a piece on the floor to hopefully glue back on.
Hope this helps, if you have more questions let me know. I'll be happy to answer them.")

Thanks Steve. That is exactly whats happening. It was heating up fast and seperating. I will take more time now and I will also try the packing tape idea.
One more question, how do you get the shapes on one side of theblank? I noticed you have designs with the metal on one side.
Not to be a total pain in the hiney, but(no pun intended), I'm gonna let you monkey around with that one for a while. If you still can't get it let me know. Happy turning.
I could appreciate that. I will screw around with it for a while. I will post what I come up with.
Thanks Again
Brian

I never was arround when Eagle was here, but for a very 'eaglish' blank that is quite the similar response. I'll bet you just gave all those that knew him and read this a change in emotion (either smiling due to the similarity or maybe missing him a little).


That's what I'm talkin' bout!!! LOL!!!
http://content.penturners.org/articles/2007/celticknot.pdf
This is a tutorial from the IAP library. Look in there and you may find more.
Back to your second pen. Consider your angle, play with it. Pay attention to the end result of a cut. The way that it looks in your pre-turned blank may be radically different than after you turn. Make mental notes of these changes and consider how they can be toyed with.
Let me know if you've done the knot before and how that turns out for you. :wink:
Thanks Steve. I have never done knot but willing to try. I will check out the tutorial and turn something. I will post with what I come up with.

Brian, I've had some good experiences with 5 min epoxy. It sets up relatively quick, but still has a reasonable working time and it dries clear. I get mine from Walmart.
While you there you can also pick up one of those two packs of while cutting boards. Use one on your workbench while you are doing your glue ups, and cut the other one up into backing pieces to help clamp and align the parts you are gluing up.
Signed-In Members Don't See This Ad
soccer2010
Member
That is awesome. Where did you get the blank or did you make that?
rdunn12
Member
Wow,that is cool looking,I like it.
akbar24601
Member
Yeah, I made the blank.
bitshird
Member
Steve, you're getting pretty slick, this is a beautiful pen.
CaptG
Member
Don't you ever take a break? Nice job, again.
toolcrazy
Member
Beautiful pen. I like that blank.
talbot
Member
Looks like you put a lot of work into that one but the effort was worth it. Nice pen.
regards,Bill
regards,Bill
soccer2010
Member
Do you sell those blanks?
rlofton
Member
Very nice pen blank! You've got that design down.
USAFVET98
Member
Yeah, I made the blank.
I saw some of your work and I think it is all pretty cool. I tried to use aluminum and then copper like you did and it ended up ok but I had a hard time combining the different materials with wood. What do you use for adhesive? I tried it with medium ca and they kept comming loose.
akbar24601
Member
Typically I use the Heavy CA when gluing pieces together. Be sure to scuff your metal pieces first for better adhesion. Also, as you sand or drill the blanks they absorb alot of heat, especially with the metal in there. I've noticed a tendency for seperation when they get too hot, so take your time. If nothing else, in dealing with these metals I am getting a great lesson in patience which I know that I definitely need. Lately I've been wrapping the blank in clear packing tape before drilling. Seems to help.I saw some of your work and I think it is all pretty cool. I tried to use aluminum and then copper like you did and it ended up ok but I had a hard time combining the different materials with wood. What do you use for adhesive? I tried it with medium ca and they kept comming loose.
On the lathe, take your time. Keep your tool sharp and take nice light passes. Again, PATIENCE! You are not going to set any speed records taking this blank down. Watch how much you are taking off the whole pass, as the blade likes to find softer material and then will catch on the metal, leaving you looking for a piece on the floor to hopefully glue back on.
Hope this helps, if you have more questions let me know. I'll be happy to answer them.
Ligget
Member
WOW, that is a cool blank!
USAFVET98
Member
Typically I use the Heavy CA when gluing pieces together. Be sure to scuff your metal pieces first for better adhesion. Also, as you sand or drill the blanks they absorb alot of heat, especially with the metal in there. I've noticed a tendency for seperation when they get too hot, so take your time. If nothing else, in dealing with these metals I am getting a great lesson in patience which I know that I definitely need. Lately I've been wrapping the blank in clear packing tape before drilling. Seems to help.
On the lathe, take your time. Keep your tool sharp and take nice light passes. Again, PATIENCE! You are not going to set any speed records taking this blank down. Watch how much you are taking off the whole pass, as the blade likes to find softer material and then will catch on the metal, leaving you looking for a piece on the floor to hopefully glue back on.
Hope this helps, if you have more questions let me know. I'll be happy to answer them.
Thanks Steve. That is exactly whats happening. It was heating up fast and seperating. I will take more time now and I will also try the packing tape idea.
One more question, how do you get the shapes on one side of theblank? I noticed you have designs with the metal on one side.
akbar24601
Member
One more question, how do you get the shapes on one side of theblank? I noticed you have designs with the metal on one side.
Not to be a total pain in the hiney, but(no pun intended), I'm gonna let you monkey around with that one for a while. If you still can't get it let me know. Happy turning.
USAFVET98
Member
Not to be a total pain in the hiney, but(no pun intended), I'm gonna let you monkey around with that one for a while. If you still can't get it let me know. Happy turning.
I could appreciate that. I will screw around with it for a while. I will post what I come up with.
Thanks Again
Brian
akbar24601
Member
Can't wait to see what you come up with Brian.
Nick
Member
Steve,
Very nice blank and thanks for all your tips!!
Keep the pens coming, we all love your work!!
Very nice blank and thanks for all your tips!!
Keep the pens coming, we all love your work!!
akbar24601
Member
Thanks Nick, that means alot.
alphageek
Former Moderator
Not to be a total pain in the hiney, but(no pun intended), I'm gonna let you monkey around with that one for a while. If you still can't get it let me know. Happy turning.
I never was arround when Eagle was here, but for a very 'eaglish' blank that is quite the similar response.
I'll bet you just gave all those that knew him and read this a change in emotion (either smiling due to the similarity or maybe missing him a little).Daniel
Member
No kidding, that was straight out a blast from the past. And not in a bad way but it sure had me thinking. "There is just somehting about these inlay guys".
I never was arround when Eagle was here, but for a very 'eaglish' blank that is quite the similar response.
akbar24601
Member
Something good I hope!!! LOL
TribalRR
Member
...Trade Secrets!
akbar24601
Member
...Trade Secrets!
That's what I'm talkin' bout!!! LOL!!!
USAFVET98
Member
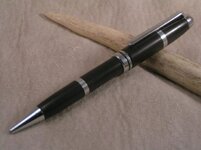
Ok, So its not fancy but its a start. I tried a bunch of things and I just cant get designs in there. Any tips would be greatly appreciated.
Here are two basic ones. I know, I know I messed up the cuts so the glue is visible.
Here are two basic ones. I know, I know I messed up the cuts so the glue is visible.
Attachments

akbar24601
Member
OK, you're givin' it the old heave ho and I commend you for that. What you have done in the second pen is good and you are half way to a Celtic knot. If you have never done a knot I recommend you check out:Ok, So its not fancy but its a start. I tried a bunch of things and I just cant get designs in there. Any tips would be greatly appreciated.
Here are two basic ones. I know, I know I messed up the cuts so the glue is visible.
http://content.penturners.org/articles/2007/celticknot.pdf
This is a tutorial from the IAP library. Look in there and you may find more.
Back to your second pen. Consider your angle, play with it. Pay attention to the end result of a cut. The way that it looks in your pre-turned blank may be radically different than after you turn. Make mental notes of these changes and consider how they can be toyed with.
Let me know if you've done the knot before and how that turns out for you. :wink:
USAFVET98
Member
OK, you're givin' it the old heave ho and I commend you for that. What you have done in the second pen is good and you are half way to a Celtic knot. If you have never done a knot I recommend you check out:
http://content.penturners.org/articles/2007/celticknot.pdf
This is a tutorial from the IAP library. Look in there and you may find more.
Back to your second pen. Consider your angle, play with it. Pay attention to the end result of a cut. The way that it looks in your pre-turned blank may be radically different than after you turn. Make mental notes of these changes and consider how they can be toyed with.
Let me know if you've done the knot before and how that turns out for you. :wink:
Thanks Steve. I have never done knot but willing to try. I will check out the tutorial and turn something. I will post with what I come up with.
akbar24601
Member
No prob. I think that you'll learn alot from the knot. Then we can go from there. Can't wait to see it, Have fun!Thanks Steve. I have never done knot but willing to try. I will check out the tutorial and turn something. I will post with what I come up with.
VisExp
Member
I know, I know I messed up the cuts so the glue is visible.
Brian, I've had some good experiences with 5 min epoxy. It sets up relatively quick, but still has a reasonable working time and it dries clear. I get mine from Walmart.
While you there you can also pick up one of those two packs of while cutting boards. Use one on your workbench while you are doing your glue ups, and cut the other one up into backing pieces to help clamp and align the parts you are gluing up.