
You are using an out of date browser. It may not display this or other websites correctly.
You should upgrade or use an alternative browser.
You should upgrade or use an alternative browser.
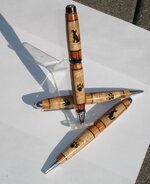
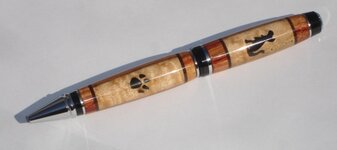
Puppy pens
- Thread starter workinforwood
- Start date
Signed-In Members Don't See This Ad
See more from workinforwood


Signed-In Members Don't See This Ad
RMB
Member
Very cool! makes me want to whip out my once-used dewalt scrollsaw!
mobrackett
Member
Very Cool Ideal!!!! Just love them!
GBusardo
Member
Awesome work!!
toolcrazy
Member
Very cool. Nice work.
hewunch
Member
Very neat! Great work.
papaturner
Member
Don`t have a dog but those pens are awesome,great work.
ldb2000
Member
Jeff , You are the Master when it comes to scrolling pen blanks . I have done some intarsa and fret work on the scroll saw and thay are bad enough , I cant imagine how nerve-wracking this must be .
TowMater
Member
Those are cool, can't let the daughter see these as she'd want one pronto!!
VisExp
Member
Very nice pens Jeff.
JayDevin
Member
very Cool!!!
Rex barks his aproval!
<------
Rex barks his aproval!
<------
novop711
Member
Jeff, that is one nice pen, any dog owner would love it.
Ligget
Member
Beautiful work and a great idea too!
philb
Member
Thats a great idea!
Does the design go all the way through the blank? Or was it done on a seperate piece, and then segmented into the pen blank once cut out? Or was it cut once the blank had been made?
Must of been a fine blade, I use size 4's, but i dont think they would do detail that small!
Does the design go all the way through the blank? Or was it done on a seperate piece, and then segmented into the pen blank once cut out? Or was it cut once the blank had been made?
Must of been a fine blade, I use size 4's, but i dont think they would do detail that small!
workinforwood
Member
I use #5 blades most the time for pens, otherwise I make everything with #9 blades. I can cut some really small fine things with a #9, it's just a matter of technique and planning. These are cut before segmenting, so the dog is half through the blank, there is a puppy paw in the piece behind the dog and it's the same in the bottom, but a puppy paw on both sides, cut individually. If you cut the paw all the way through the paws will face each other when spun and that won't make visual sense. They are very easy to make and do not require that much time. You can cast them, or just do as I did and smash them full of inlace. If you use pre-mix color inlace, that's an advantage over every other technique because if there is a void, or the inlay pops out during turning, you can re-fill it with a perfect color match. If you cast it, because of the small size, you still have the small chance of it popping out while turning, but it is a bit less likely than with inlace. The nails are the biggest issue, as they are so small it's tough to cast those without a bubble void inside, with inlace you can pack it down the hole with an old blade.
gpgsm
Member
Fantastic 
Congratulations
Congratulations
PaulDoug
Member
I really like that! My daughter and son-in-law both work in the vet business. I know what they will be getting for Christmas, if I can do it!
You don't happen to have a picture of a blank, before turning that you can post, do you?
You don't happen to have a picture of a blank, before turning that you can post, do you?
Last edited:
workinforwood
Member
I do not this time Paul, but it is very simple and almost self expanitory. You have two halves that are 1/2 thick or 3/8 thick is fine and 3/4 or 1" wide, it just isn't that important. Me I take a 3/4 thick board and rip it into a 1/2 strip then make a couple passes through the drum sander while it still has some length..and that just helps with a nice glue seam. I draw a line down the center of the strip, so if it's a 3/4 wide strip, the center is 3/8. Lets say you have a gent because I rememeber those off the top of my head and they are 1/2" wide tubes. So from the center line you measure back a 1/4" from either side, thus you have the width of your tube centered in the half blank. I draw the same thing on paper, two parrallel lines the width of the tube. Draw your picture on paper, then cut it and glue it on the blank with some thin CA is fine. Later, the paper will just turn off anyhow. I also like to mark the length of the tube so when I attach the picture I can position it in the center or above or below center. Drill hole in picture and cut it out. Do same thing for back side, or just leave back plain, whatever you want, same with lower barrel. This pen has a divider, doesn't have to. Fill with inlace or epoxy or PR, drill and turn. When I glue two halves, I just use wood glue dabbed across not too much with my finger, so the glue doesn't fill the holes you cut. I trim ends flush when dry. You can just take a picture of the side of a dog, then shrink it down to be 1/2" wide or for mine it's 3/8" wide..I do that right on the computer screen. Put paper on screen and trace the outline of the dog, real simple, doesn't hurt my flat screen monitor at all, not that I'm pushing that hard on the pencil anyhow.
You can scroll right through a 3/4 blank..for most pictures, it won't look good. That only works good for symetrical objects, like an arrow. With a dog you'd end up with a dog on both sides facing each other, which isn't that appealing, and if the blank isn't perfectly centered when drilled it will be way obvious, but if picture on back is different or no picture at all, then there is nothing that can be an obvious mistake.
You can scroll right through a 3/4 blank..for most pictures, it won't look good. That only works good for symetrical objects, like an arrow. With a dog you'd end up with a dog on both sides facing each other, which isn't that appealing, and if the blank isn't perfectly centered when drilled it will be way obvious, but if picture on back is different or no picture at all, then there is nothing that can be an obvious mistake.
Last edited:
desertyellow
Member
I can see how those are a big hit.
Nice scroll work.
Nice scroll work.
rb765
Member
Those are fantastic. Any way of getting pictures of your process. I am a visual learner, so If I don't see it, it just goes in one ear and out the other,
stolicky
Member
Great idea...
bclaws
Member
PUPPY PENS for purchase?
I'd like to purchase a couple of these puppy pens as gifts. you may contact me at brianc@systime.com
Thanks
Brian
I'd like to purchase a couple of these puppy pens as gifts. you may contact me at brianc@systime.com
Thanks
Brian
rherrell
Member
Cool Jeff! You Da "Scroll Saw" Man!
CaptG
Member
Sweet. Makes me want to dust off the scroll saw.
workinforwood
Member
Wow..didn't expect to see this thread back alive! Ok, I still have some, will contact you Brian, thanks.
There's lots of other cool things I've sent out that will be coming soon. Working on something very discrete in the shop right now that will really knock ya'lls socks off if I can accomplish my goal! Makes me smile when I'm working on something different and the plan actually begins to come together. That is why I do it. Spinning a pen, that's great, but I need to keep challenging myself because I have one of those personalities always that's competing with myself. It's you people here at IAP of course, as I always say, that motivate me and especially teach me something new on at least a weekly basis if not more than that. So thank you everyone!
There's lots of other cool things I've sent out that will be coming soon. Working on something very discrete in the shop right now that will really knock ya'lls socks off if I can accomplish my goal! Makes me smile when I'm working on something different and the plan actually begins to come together. That is why I do it. Spinning a pen, that's great, but I need to keep challenging myself because I have one of those personalities always that's competing with myself. It's you people here at IAP of course, as I always say, that motivate me and especially teach me something new on at least a weekly basis if not more than that. So thank you everyone!
bitshird
Member
Beautiful work Jeff, I agree you is the master with a scroll saw.
DKF
Member
Great work!
Mather323
Member
Great work!
DurocShark
Member
I came in here expecting to see them made OUT of puppies. ;-)
Those look great!
Those look great!