Polymer Burls. (long)

Signed-In Members Don't See This Ad
See more from el_d

el_d

Member
Joined
Apr 26, 2007
Messages
3,368
Location
Lockhart, Tx, USA.
A few weeks ago my wife went out and got me some Skulpey PC at Hobby Lobby. Toni was kind enough to let me know that Skulpey was a PIA to work with, so since I didnt have the reciept I decided to use it anyway and try making a blank from it last weekend.
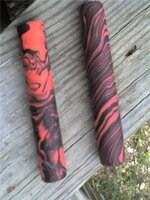
Kneaded the clays and crushed the two colors together and made a blank a little under 3/4x5. I noticed the "kneading" of the clay is important to help soften it up and make it meld together. The "Polymer Burl" was baked in the toaster oven(as per instructions on the side of the PC wrapper)and let cool. The blank came out of the oven a little soft, I could put my fingernail into it and pull out a small piece, but after it cooled for a while it got a little harder, I could still put my fingernail in it but had a smaller piece chip off. Im not sure if that normal or not , I have never worked with the clay before so I wasnt sure what to expect.
I got a little excited with the results and decided to start processing it like a regular blank Within about 4-5 hours. Drilled, tubed with Sumo glue and mounted on the lathe.
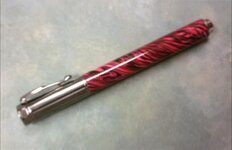
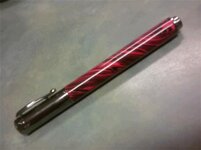
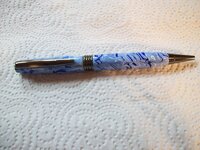
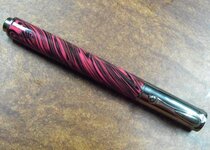
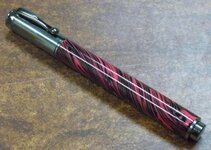
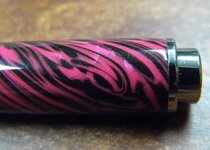
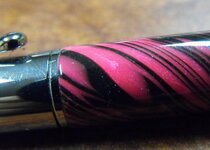
My PC Blank turned like dry butter, a little powdery but very easy to cut. At some point during the cutting I started to get long ribbons of the PC untill I came to my final dimensions. Wasnt sure how it would hold up as a pen, It was still a little soft after the fingernail test, but it was a bit harder than what I started with. I figuered I would use it as a show piece at the house and let my wife use it at her desk to see how it would hold up. Used 4 coats of med CA to stiffen it up some, sanded, polished, and put it together. After the CA it was very hard, no fingernail abuse anymore, and feels as solid as one of my wood pens.

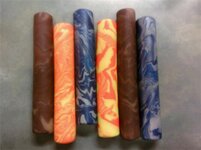
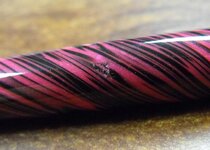
Should have let it cool over night because I did notice that there were small cracks in the PC under closer inspection and as I turned I did have small areas that didnt stick to each other and got some chiping. The chipping, I think its from the kneading of the clay(could have probably used more) and the small cracks that looked like they were on the inside seem to be from my drill bit either not being sharp enough or me being too agresive during the drilling. Other than that. I like the way it came out. I like it so much I got more clay and made some more PC burl blanks.

I figure Id do this till I get the hang of the clay before I try what Toni is doing. I know its a waste of clay but Im comfortable working with blanks, I know how to work it from there.:cool:

Sorry for the cruddy pics, Camera phone shots. I will try to take better pics later.
 

Attachments

  • pc.jpg
    pc.jpg
    30.5 KB · Views: 298
  • pc1.jpg
    pc1.jpg
    21.8 KB · Views: 390
  • pc2.jpg
    pc2.jpg
    21.7 KB · Views: 313
  • pc3.jpg
    pc3.jpg
    28.7 KB · Views: 378
Signed-In Members Don't See This Ad

el_d

Member
Joined
Apr 26, 2007
Messages
3,368
Location
Lockhart, Tx, USA.
Thanks for the coments folks. My daughter saw it and snatched the pen up quick. Its her favorite color Black and pink. She is holding it hostage till I can make her one in a long click.
 

RAdams

Banned
Joined
Apr 5, 2009
Messages
2,983
Cool blanks for sure!!

JUst a thought... Could you make the burl, and then roll it flat into a sheet and use the sheet to wrap the tubes similar to the technique used on the milifiori base layer? Then you could probably get several pens from one piece of burl.
 

Russianwolf

Member
Joined
Jul 13, 2007
Messages
5,690
Location
Martinsburg, WV, USA.
Cool blanks for sure!!

JUst a thought... Could you make the burl, and then roll it flat into a sheet and use the sheet to wrap the tubes similar to the technique used on the milifiori base layer? Then you could probably get several pens from one piece of burl.

only problem is you wind up with a seam that may be noticable.


I really like the blanks you made. Maybe when I'm allowed shop time again I'll get to take a whack at PC again, have some waiting for my return.
 

el_d

Member
Joined
Apr 26, 2007
Messages
3,368
Location
Lockhart, Tx, USA.
Cool blanks for sure!!

JUst a thought... Could you make the burl, and then roll it flat into a sheet and use the sheet to wrap the tubes similar to the technique used on the milifiori base layer? Then you could probably get several pens from one piece of burl.

Was thinking of trying that but like Mike said the seam was my worry. I dont have the mad clay skills Toni does. Never touched the stuff till last weekend. I know I would have had a hard time hiding the seam.

Good luck with the polymer burls, drill slow with sharp bits. I went either too fast or had a dull bit that introduced a couple of hairline fractures. The sumo glue should hold it together.
 

Toni

Member
Joined
Feb 23, 2010
Messages
2,042
Location
Phenix City, Alabama
I dont have the mad clay skills Toni does

Mad who ever sad I was "mad" maybe a bit off but not mad that would be Ron:)

I love the look of the finished pen you did well and am very impressed you managed to use Sculpey III!!
 

Smokey7385

Member
Joined
Dec 14, 2006
Messages
140
Location
Topeka, KS
only problem is you wind up with a seam that may be noticable.

Guys do not fret over the seam. Here is my first PC pen. It is wrapped and you are looking directly at the seam. The PC pens I've made since the seam is even less conspicuous than this.
 

Attachments

  • 231.jpg
    231.jpg
    61.3 KB · Views: 149

bitshird

Member
Joined
Aug 27, 2007
Messages
10,236
Location
Adamsville, TN, USA.
Oh Lupe Mi Amigo not you too!! We are falling under the spell of this enchantress, But it's a pretty neat looking pen, I wonder if this is the same reaction that happened when pen turners started messing with Acrylics and PR?? HUUUUM
 

Russianwolf

Member
Joined
Jul 13, 2007
Messages
5,690
Location
Martinsburg, WV, USA.
only problem is you wind up with a seam that may be noticable.

Guys do not fret over the seam. Here is my first PC pen. It is wrapped and you are looking directly at the seam. The PC pens I've made since the seam is even less conspicuous than this.
Yep, it depends on how much of a pattern there is. I've done a couple Faux Makume Gane that look nice, but the seam stands out in the overall scheme. Not bad, but I want better (myself being my worse critic).
 

el_d

Member
Joined
Apr 26, 2007
Messages
3,368
Location
Lockhart, Tx, USA.
Here are better pics of the ZEN.


And the cracks, and rip outs.
 

Attachments

  • DSCF1284.jpg
    DSCF1284.jpg
    78.4 KB · Views: 104
  • DSCF1279.jpg
    DSCF1279.jpg
    76.1 KB · Views: 99
  • DSCF1276.JPG
    DSCF1276.JPG
    60.3 KB · Views: 121
  • DSCF1277.JPG
    DSCF1277.JPG
    60.9 KB · Views: 119
  • DSCF1278.JPG
    DSCF1278.JPG
    59.2 KB · Views: 111

el_d

Member
Joined
Apr 26, 2007
Messages
3,368
Location
Lockhart, Tx, USA.
Sorry Dean, Is Cyberspace not big enough for 2 Vaders?

I like it Rusty, Maybe I can alighn the seam before I swirl it and make the pattern.......

Sorry Ken, What ever attracts the ladies WHOOO!! (walks away strutting like Rick Flair)
 

alphageek

Former Moderator
Joined
Jul 19, 2007
Messages
5,120
Location
Green Bay, WI, USA.
Sorry Dean, Is Cyberspace not big enough for 2 Vaders?

I like it Rusty, Maybe I can alighn the seam before I swirl it and make the pattern.......

Sorry Ken, What ever attracts the ladies WHOOO!! (walks away strutting like Rick Flair)

I find your lack of faith disturbing! :biggrin:

Oh - And I had to look up Rick Flair! Now I wish I hadn't! :eek:

Nice pics on the pen... If that was your first tries (and Toni says with the wrong materials.... ) I'll bet they will be GREAT in no time. And if you hadn't given us extreme close ups, we wouldn't have known. :ghost:
 
Joined
Aug 7, 2009
Messages
700
Location
Jamestown, NC
Welcome to the dark side. It is best to let it set for a day or so once baked. I have even noticed with the pens I make the clay continues to stiffen over time. I have some barrel I made about a year ago that are rock hard and much harder then anything coming out of the oven now.

The key to turning it is super sharp tools and light cuts. If you get to aggressive it will chip in a second. I try to get close to dimensions by turning and then switch to sanding. If you wet/dry with 220 dry wall screens (they don't gum up) you can remove alot of material...and fast. Then switch to more standard sanding methods.

Good luck and next time switch to Premo, Kato, or Pardo. Sculpy is the softest and most tempermental of all!
 

el_d

Member
Joined
Apr 26, 2007
Messages
3,368
Location
Lockhart, Tx, USA.
Thanks Keith. Good info. the other blanks I have are Premo and they have been sitting for a week so they feel a bit more solid than before.
 

RAdams

Banned
Joined
Apr 5, 2009
Messages
2,983
Back to the seam question...


Could you possible cut the material a bit wide and overlap the clay, then kinda work it back together to help hide the seam? Then turn the high spot down after baking?

I am waiting on my base clay to arrive so i can start playing!! My canes have been sitting here waiting too. I will also be part of teh Dark Side soon!!!

And thanks for the compliment Toni! I wish everyone understood how "mad" i am!
 

Toni

Member
Joined
Feb 23, 2010
Messages
2,042
Location
Phenix City, Alabama
And thanks for the compliment Toni! I wish everyone understood how "mad" i am!

Ron everyone knows:tongue:they are just afraid to tell you:biggrin:

As for the seams yah they are a pain in the ass, sometimes its easier to hide then others, on the dragon scales I made 4 tubes in total you can see the seams on 2 of them, hide it behind the clip:eek: or if its possible when you roll the design onto it use a tool to blend the two joints together so it doesnt LOOK like it joined there, hard to explain... try and move(not sure if thats a good description)the design when its on the tube... will try and figure out a way to word what I am trying to explain(need the cold meds to kick in):biggrin:
 
Top Bottom