After a
first experiment with a plain plaster blank, i made a second one using some sort of pigments my father was using to tint mortar or cement - no idea what it really is:
This second experiment with plaster wasn't exactly a pleasure ride. Turning was touchy because of sand grains that would pop out here and there making sharp bumps. Trying to extract them would have been hazardous so i just left them, but the surface is not 'flat' and applying the CA finish was awkward at best. Colors would leak over each others and the plywood center band that i have to redo... To top it all, it cracked a bit when i assembled the nib, then the tube went free while pushing the transmission and the lower part broke in two. I managed to glue it back together without too much damage though, and here it is.
Although plaster is definitely not an appropriate material for pens, i'm rather happy with the mineral/organic pattern that came out of this blank. :wink:
Wow, what a great second attempt...!
But I reckon you still can improve the technique using those materials and the way I would suggest you to have a go at are;
*- Do your mixes as normal and when dry, use your cutting system to remove most of the material not needed, leaving it supper over size (less dust this way...!).
*- At this point, you soak it as much as you can with super thin CA and let it harden. You may use a hair drier or a heat gun to accelerate the CA curing, at the deeper areas.
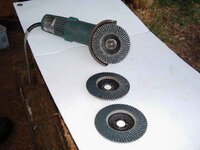
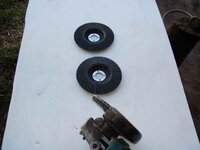
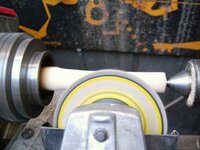
*- Now, the shaping/cutting of the material left, is going to be done with a 4" grinder and 4" "Flap" discs, grit 100 or 120 will be best for this material. Make sure to use the grinder in a gentle touch and motion with the lathe turning at the same speed you would use with the gouges.
MAKE SURE, you check for CA penetration as you go, if not totally soaked to the brass tube, apply more thin CA as you remove material, this will preserve the material stability as you work it.
Letting the CA dry properly before continuing cutting/shaping is essential.
The Flap disc (the blue ones are required or would be better for this) will cut fine stones or any harder materials mixed in the cast so you will endup with a surface that is hard and smooth.
*- After you finish with shaping and sizing (should be just a little oversize from the Flap disc work), you proceed with the hand sanding stages and in this case I would go straight to the 240 grit then, 320, 400 and 600 grits only. The 240 grit will cut right to the bushing sizes and the other grits will be worked gently to not remove too much material.
*- The barrel(s) are now ready for CA finish, use air gun and some accelerator to wipe the dust off the blanks, let it dry for a couple of minutes and give it 5 coats of thin CA. Light sand with 600 grit and proceed with another 3 to 10 coats of medium CA, depending of how deep you want it to look or if you need to built a little from cutting too much around the bushings.
*- Finish with wet sanding using whatever the method you use on other pens, removing any ridges from the finish.
*- Use some polishing compound to complete the surface polishing and shine requirements, and voila...! your barrel(s) are ready for assemby...!:wink::biggrin:
The next step is to make a pen out of concrete not only cement, that would be too easy. I'm talking about the same mix used in the building construction where "blue stone" or other hard rock is used with the cement and sand, that will be a cracker of a pen. There are easy ways to cut the concrete from around the tube, and you can either make the concrete blank (well, it would easier to go to the dump or even a construction site and grab a piece of dried concrete, take it home and cut it with a diamond disc easily found and any hardware stores...!), and them drill or make the mold/blank with the tube(s) already embedded in...!
Now, that's what I call a challenge...!

:biggrin:
Looking forwards to see "Plaster pen #3"...!:wink:
Good luck
PS: Make sure you de-burr those tubes before assembly, and look for any glue inside, use epoxy to make your gluing's and if possible use a chamfer tool to make assembly a lot easier and safer (voiding barrel cracks).
Cheers
George