MartinPens
Member
I'm working out the kinks in the making of these. It takes a lot of patience, a very sharp tool and a fair amount of thin CA glue to get it all to turn out right.
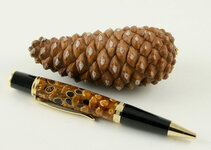
Drilling the hole true to the core is essential. I do not drill all the way through. Only deep enough for the tube and about 1/4 inch on each end.
I use thin CA glue. I put the pinecone in a small glass jar and fill the hole up with thin CA. I let it soak in and really cure for a couple days. I do NOT spray it with accelerator. It seems to cloud the CA if I do and looks bad.
I cut the tip off after drying to expose the hole and begin cleaning out the drilled hole with a round file until the tube will fit. I glue the tube in and let it set for a while.
I trim the sides off on the band saw creating a rectangular blank.
Next I put the blank to the belt sander and take off the edges, rounding things out and taking as much material off as possible.
I square the ends. If it looks really exceptional at this point, I will plug the tube and soak it in thin CA again. Unplug the tube - square up the ends again if necessary and add the bushings and mandrel.
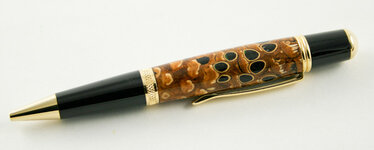
I turn at high speed with a very sharp tool, leaving it wide of the bushings. I fill the holes with blackwood dust, sealing in the dust with thin CA. Sand and gently turn to the bushings - sand some more - finish with CA - sand with 400 lightly! - then micropads. Polish, and assemble.
This is a Sierra tube and Wallstreet III bushings. The Wallstreet III (Woodcraft) gives a little extra diameter to keep things together. enjoy.
Martin
Drilling the hole true to the core is essential. I do not drill all the way through. Only deep enough for the tube and about 1/4 inch on each end.
I use thin CA glue. I put the pinecone in a small glass jar and fill the hole up with thin CA. I let it soak in and really cure for a couple days. I do NOT spray it with accelerator. It seems to cloud the CA if I do and looks bad.
I cut the tip off after drying to expose the hole and begin cleaning out the drilled hole with a round file until the tube will fit. I glue the tube in and let it set for a while.
I trim the sides off on the band saw creating a rectangular blank.
Next I put the blank to the belt sander and take off the edges, rounding things out and taking as much material off as possible.
I square the ends. If it looks really exceptional at this point, I will plug the tube and soak it in thin CA again. Unplug the tube - square up the ends again if necessary and add the bushings and mandrel.
I turn at high speed with a very sharp tool, leaving it wide of the bushings. I fill the holes with blackwood dust, sealing in the dust with thin CA. Sand and gently turn to the bushings - sand some more - finish with CA - sand with 400 lightly! - then micropads. Polish, and assemble.
This is a Sierra tube and Wallstreet III bushings. The Wallstreet III (Woodcraft) gives a little extra diameter to keep things together. enjoy.
Martin