I had to wait all week to get down to Woodworkers Emporium (the only local supply place here in Vegas for pen turning stuff I've seen so far) to pick up some more pen kits so I could practice some. Attached are the results.
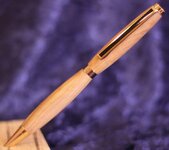
#4 is a PSI slimline 24kt kit with a stabilized olivewood blank that came in my starter kit. As an experiment I finished that pen using the MM system to 12000, then 5 coats of a Wipe-On Poly (satin), then Wet MM from 4000 to 12000 again (the next morning), meguires scratch remover and wax. I hoped to pull more shine out of the finish even though it was satin, but that didn't work (lesson learned).
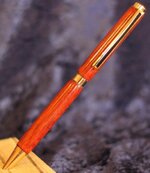
#5 is another PSI slimline 24kt with a bloodwood blank (also from starter kit). I wasn't overly excited about the bloodwood, as looking at the outside of the blank it was bland and uniform looking. I got it turned down and sanded to 600 then followed up with MM to 12000. I was surprised and delighted when i got it smoothed out and noticed a "glow" coming from the light reflecting off the barrel. The bloodwood was a burnt cinder-ish color with a yellow-to-orange luminescence that kept captivating my attention and made me change my mind about bloodwood. Unfortunately, the picture doesn't show what I experienced.
I finished #5 with the CA/BLO finish. I work out of my garage and it's probably 55 - 60 degrees in there so I used Thin CA applied 8 or 9 coats with the BLO. It's the first time I've used this process and it worked out really well for me (my first CA only finish was not good). Wet MM from 4000 to 12000, scratch remover and wax. The barrel ends aren't perfect, but I hope when my eliminator II bushings get here it'll help solve that issue.
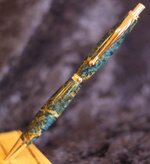
#6 is Pencil #1. I picked up a blue box elder and PSI slimline Rhodium kit to make a "show" pen for around work (I only have the slimline bushings so far). I didn't pay close enough attention to the label though and ended up getting a "show" pen-cil instead .:bulgy-eyes: S'okay...it'll still work. Anyway, turned the barrels, lightly sanded 320 - 600, Wet MM to 12000. There were "very" small pits in the barrel though when all was said and done so I used 5 coats of the thin CA/Blo finish, Wet MM from 4000 to 12000, scratch remover and wax and voila!
Well, anyway, thanks for takin your time to check out my post. I hope i didn't bore ya to tears, and questions, comments, suggestions are appreciated.
Joe
#4 is a PSI slimline 24kt kit with a stabilized olivewood blank that came in my starter kit. As an experiment I finished that pen using the MM system to 12000, then 5 coats of a Wipe-On Poly (satin), then Wet MM from 4000 to 12000 again (the next morning), meguires scratch remover and wax. I hoped to pull more shine out of the finish even though it was satin, but that didn't work (lesson learned).
#5 is another PSI slimline 24kt with a bloodwood blank (also from starter kit). I wasn't overly excited about the bloodwood, as looking at the outside of the blank it was bland and uniform looking. I got it turned down and sanded to 600 then followed up with MM to 12000. I was surprised and delighted when i got it smoothed out and noticed a "glow" coming from the light reflecting off the barrel. The bloodwood was a burnt cinder-ish color with a yellow-to-orange luminescence that kept captivating my attention and made me change my mind about bloodwood. Unfortunately, the picture doesn't show what I experienced.
I finished #5 with the CA/BLO finish. I work out of my garage and it's probably 55 - 60 degrees in there so I used Thin CA applied 8 or 9 coats with the BLO. It's the first time I've used this process and it worked out really well for me (my first CA only finish was not good). Wet MM from 4000 to 12000, scratch remover and wax. The barrel ends aren't perfect, but I hope when my eliminator II bushings get here it'll help solve that issue.
#6 is Pencil #1. I picked up a blue box elder and PSI slimline Rhodium kit to make a "show" pen for around work (I only have the slimline bushings so far). I didn't pay close enough attention to the label though and ended up getting a "show" pen-cil instead .:bulgy-eyes: S'okay...it'll still work. Anyway, turned the barrels, lightly sanded 320 - 600, Wet MM to 12000. There were "very" small pits in the barrel though when all was said and done so I used 5 coats of the thin CA/Blo finish, Wet MM from 4000 to 12000, scratch remover and wax and voila!
Well, anyway, thanks for takin your time to check out my post. I hope i didn't bore ya to tears, and questions, comments, suggestions are appreciated.
Joe