A Pen

Signed-In Members Don't See This Ad
See more from mark james

mark james

IAP Collection, Curator
Joined
Sep 6, 2012
Messages
12,752
Location
Medina, Ohio
Last edited:
Signed-In Members Don't See This Ad

magpens

Member
Joined
Feb 2, 2011
Messages
15,911
Location
Canada
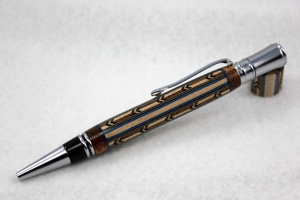
Mark, that pen is amazing ..... and so are YOU !!!

Congratulations !!!! . Extremely well done !!!

What wood did you use for the two little brown end pieces just before you get to the metal pen parts ?

They look a bit "porous" - I know that is not the right term - and I' like to know what wood they are, please.
 
Last edited:

moke

Member
Joined
Dec 30, 2009
Messages
1,225
Location
Cedar Rapids, Iowa
Mark,
That is awesome. A true work of art. On that kit, that blank is left pretty thin.....I have had issues with segmented blanks and it is one of my favorites. In fact, I only have been doing Glacia's for the one tube segmented blanks. Do you do anything special? Flood with thin CA periodically? I find nothing any more frustrating than putting multiple hours into a blank and blow it up
(stress the glue joints) while turning. Well maybe golf ranks right up there in the frustration chart.....

I get that you have to take extremely light cuts with the sharpest tools, but I have still had them come apart. Any advice?
 
Last edited:

mark james

IAP Collection, Curator
Joined
Sep 6, 2012
Messages
12,752
Location
Medina, Ohio
That is sweet. I'd like to know how many hours you invested in this ... the color scheme is really impressive.


Sent from my iPhone using Penturners.org mobile app

Thank you for the comment. About 3 hrs over 4 days. Then I finish with Polyurethane, so another 4 days. It's an opportunity to learn patience! :tongue:, and I should not waste the opportunity.

Beautiful job of segmenting . I really like how you used the contrasting colored veneers, and very small accurately cut pieces . Takes time and patience . WOW :):rolleyes:

Hi/Thanks Joe: As I have mentioned before, your encouragement several years ago to explore segmenting is a key reason I am doing this! I am in your debt!

Mark, that pen is amazing ..... and so are YOU !!!

Congratulations !!!! . Extremely well done !!!

What wood did you use for the two little brown end pieces just before you get to the metal pen parts ?

They look a bit "porous" - I know that is not the right term - and I' like to know what wood they are, please.

Hi Mal: They are Mahogany, and yes, very open grained. Also, I prefer/used a wipe on polyurethane finish, and did not build it up to close the open pores.

Thank you also for your kind comments.
 

mark james

IAP Collection, Curator
Joined
Sep 6, 2012
Messages
12,752
Location
Medina, Ohio
Mark,
That is awesome. A true work of art. On that kit, that blank is left pretty thin.....I have had issues with segmented blanks and it is one of my favorites. In fact, I only have been doing Glacia's for the one tube segmented blanks. Do you do anything special? Flood with thin CA periodically? I find nothing any more frustrating than putting multiple hours into a blank and blow it up
(stress the glue joints) while turning. Well maybe golf ranks right up there in the frustration chart.....

I get that you have to take extremely light cuts with the sharpest tools, but I have still had them come apart. Any advice?

Hi Mike - Thank you for the comments.

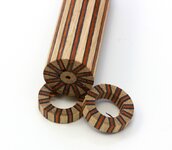
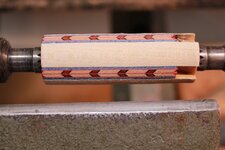
I make my inlays to be 1/2" - 1" deep. So the inlay will extend from inside the tube hole, to the outer diameter. (I can buy many beautiful inlays, but they are only 1/28" - 1/32" thick, so simply gluing them to a tube doesn't work when your final "shoulder" (OD - Bushing dimensions) is so thin. I copied this design, reverse engineered it into a 1" deep inlay).

I use Titebond Translucent to glue-up my inlays. I occasionally use CA during turning if it looks like things may splatter. For turning, I usually use a 1" roughing gouge on the side like a scraper, or my Magical skew (thats a trade name). I apply Mylands sanding sealer, then sand the final .01" to size.

Oh, it helps to get lucky!

I'll look to see if any pictures are helpful.
 

Attachments

  • IMG_3501.jpg
    IMG_3501.jpg
    164.3 KB · Views: 143
  • IMG_0544.jpg
    IMG_0544.jpg
    177.7 KB · Views: 149

mark james

IAP Collection, Curator
Joined
Sep 6, 2012
Messages
12,752
Location
Medina, Ohio
Beautiful work Mark, I really like the new variant of the chevron, lots of possibilities.

You need to try these Mark. Just change the size of the main segments, offset the colors, and you're good to go! I just started using different colored thicker veneers, and really like them.
 

leehljp

Member Liaison
Joined
Feb 6, 2005
Messages
9,329
Location
Tunica, Mississippi,
Mark, Mike (Moke),

Eagle, from long ago, taught me something on delicate segmented blanks. He actually posted it here somewhere but I think most people tended to under use the information while I tended to over do what he said.

He started off wrapping with thread and CA'ing it. (Gauze works just as well). Then he turned about 1/3 to 1/2 of the length of the blank down about 1/16 inch. Then CAed the fresh turn. then turn the other half; CA again, turn down another 1/16" halfway. CA again, and turn the rest of the way. CA. CA, CA each portion of a turn.

The point is on blanks like this, similar to snakewood, taking a few hours or even days on a delicate blank is worth it. I always worked on other items to break the monotony while waiting on Snakewood, and learned to back off on delicate segments at times when I wanted to "get it done". A none-rushed delicate artistic blank carefully crafted will bring in a few hundred more than an ordinary segment. And Boost your ego to boot! The extra time spent on a delicate blank is worth it. With the experience, one learns when a particular part of the process can be speeded up and which parts to take it easy.

I have never been a very patient person but this more than anything else helped me learn patience, and Eagle started me down this road!
 
Last edited:
Joined
Aug 13, 2016
Messages
1,460
Location
Surprise, Arizona
Simply outstanding Mark! You keep reaching new heights with your segmenting. As for your comment on having a bit of luck, I think having a lot of skill and a keen eye are the real reasons you can make these beauties, but I promise not to let your secret out!
 

mb757

Member
Joined
Jul 30, 2007
Messages
120
Location
Wisconsin.
Beautiful work Mark, I really like the new variant of the chevron, lots of possibilities.

You need to try these Mark. Just change the size of the main segments, offset the colors, and you're good to go! I just started using different colored thicker veneers, and really like them.

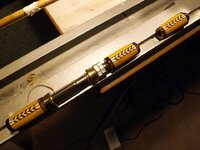
I'll give it a go, just playing with a little larger version for a fishing rod. I like the pattern, it has a lot of uses and you can build a bunch of pieces at one time.
 

Attachments

  • DSCF0973.jpg
    DSCF0973.jpg
    195.9 KB · Views: 139

mark james

IAP Collection, Curator
Joined
Sep 6, 2012
Messages
12,752
Location
Medina, Ohio
Beautiful work Mark, I really like the new variant of the chevron, lots of possibilities.

You need to try these Mark. Just change the size of the main segments, offset the colors, and you're good to go! I just started using different colored thicker veneers, and really like them.

I'll give it a go, just playing with a little larger version for a fishing rod. I like the pattern, it has a lot of uses and you can build a bunch of pieces at one time.

Looks like very tight alignment! Nice, Mark. I found some pictures of your rods - really cool. The artistry displayed in rod building and billiard cues is amazing. A lot of overlap. Nice inspiration. Keep at it!
 

moke

Member
Joined
Dec 30, 2009
Messages
1,225
Location
Cedar Rapids, Iowa
Mark-Hank Lee,
Thanks for the tips. I have been turning my segments by flooding with thin periodically during the turn and using a series of very sharp skews to turn.....I just use multiple skews so I do not have to change my focus from turning to sharpening. I have had decent success, but I usually use acrylics, which seems to be more difficult to keep together. I have decent luck with 5 minute epoxy. Now you have my interest peaked so I will give something similar a try. Thanks for the help
 
Top Bottom