Osage Orange Cigar

Signed-In Members Don't See This Ad
See more from Jon-wx5nco

Jon-wx5nco

Member
Joined
Oct 29, 2009
Messages
351
Location
Tulsa
A co-worker gave me some Osage Orange (bodark) and some cedar a few months back. With the heat of the summer, it was too dang hot to get in the garage to turn any pens. Yesterday, we had some rain move through in the morning and the rest of the day was NICE!! So, after I got off work, I hit the garage to make a pen out of the Osage Orange. I had a knot in one spot that part of it came out. I was able to patch it back up with some shavings and CA.

If you look at the second picture, you can see where.. I guess the CA separated when I took the bushings off. I didn't notice it until I started cropping the picture.
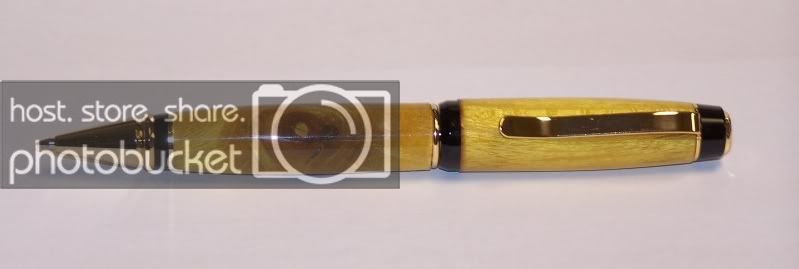
OsageOrangeCigar.jpg


OsageOrangeCigar2.jpg

All comments, suggestions, critiques and all are always welcome
Thanks
Jon
 
Signed-In Members Don't See This Ad

jttheclockman

Member
Joined
Feb 22, 2005
Messages
19,131
Location
NJ, USA.
Jon

Nice job with the blank and the kit. Just one question: isn't there a gold washer missing on top of the black coupler for the cap??? It would make the kit look more balanced. Not that it is a big deal, just was wondering if you left it off for a reason??? Thanks for showing.
 

CharlesH

Member
Joined
Oct 6, 2009
Messages
600
Location
Canada, Quebec, Laval
Hey Jon,

Let me share you my findings with you, possibility it is going to help you!

If you are having a hard time with the CA sticking to your bushings (as I did!) It happened to me numerous times!

I suggest you always get two sets of bushings when doing a kit, that way, you can cut down a set of those bushings. So when you finish the pen, you use those bushings, you can also apply Renaissance wax on the bushings.

Lately I have been using delrin bushings and I won't go back, they seem to reduce vibration and they have little adherence to CA. Save yourself some time, especially if you don't have much turning time! Here is where I got mine:

http://penturnersproducts.com/index.php?main_page=product_info&cPath=2_15&products_id=136

I would think some left over acrylic, a 7 mm drill bit and some time turning could make you nice finishing bushings as well! :)

Also when done turning, I use usually use 120 sand paper and I sand down the left over of CA on the edge of my turned pieces, I use a MDF piece (so I sand on a flat surface), I push the turned piece to it and I to rotate the sandpaper turning in both sides (beware the sandpaper can fold and damage your finish). I usually end up with 600 grit and I try to leave a bit of CA coating there so it does not crack when assembling.

Charles
 

Jon-wx5nco

Member
Joined
Oct 29, 2009
Messages
351
Location
Tulsa
Jon

Nice job with the blank and the kit. Just one question: isn't there a gold washer missing on top of the black coupler for the cap??? It would make the kit look more balanced. Not that it is a big deal, just was wondering if you left it off for a reason??? Thanks for showing.

There may be one missing. I need to check the work bench when I get home. When I was finished with the CA and wet sanding I was beat tired. I should have had the common since to stop and finish the assembly until today LOL
 
Last edited:

Jon-wx5nco

Member
Joined
Oct 29, 2009
Messages
351
Location
Tulsa
Charles,
Great tips. I have LOTS of leftover pieces of acrylic laying around that was about to go in the trash. This will give them a new lift. Thanks!!!
 

maxman400

Member
Joined
May 25, 2009
Messages
3,111
Location
Omaha Arkansas
Charles,
Great tips. I have LOTS of leftover pieces of acrylic laying around that was about to go in the trash. This will give them a new lift. Thanks!!!
TRASH!!!!:eek: There are all kinds of uses for them, There have been great looking pens posted here that have been made out of left overs. And that is a Great looking Pen BTW. :)
 

Skye

Member
Joined
Jan 3, 2006
Messages
3,487
Location
Rock Hill, SC
Heh, yeah you're missing the one that looks like a washer. Goes on the upper barrel to the right of the black part that's pressed in.

I think you're slightly underturned on the lower barrel at the centerband. Its kind of a pain because the kit piece it butts up against is rounded which means you've really got to overturn it to make a good transition. But, fit-n-finish is my pet peeve so I may be too exacting.
 

Jon-wx5nco

Member
Joined
Oct 29, 2009
Messages
351
Location
Tulsa
Heh, yeah you're missing the one that looks like a washer. Goes on the upper barrel to the right of the black part that's pressed in.

I think you're slightly underturned on the lower barrel at the centerband. Its kind of a pain because the kit piece it butts up against is rounded which means you've really got to overturn it to make a good transition. But, fit-n-finish is my pet peeve so I may be too exacting.

I appriciate it. If it weren't for ideas and suggestions like yours, how would I ever improve?
Thanks for the critique!
Jon
 
Top Bottom