This only took forever!

Signed-In Members Don't See This Ad
See more from PaulSF

PaulSF

Member
Joined
Oct 9, 2009
Messages
286
Location
San Francisco
And I have issues with it, quite a few issues. First attempt at finishing was polyacrylic urethane. Didn't like how that was working out, so I stripped it off, resanded, and tried CA/BLO using Russ Fairfield's method. Didn't like how that was working out, so I stripped it off, resanded, and tried CA using Fangar's method. Didn't like how that was working out, plus the CA fumes were making me bleed from my eyes, nostrils and belly button, so I yanked the blanks from the lathe and gave up.

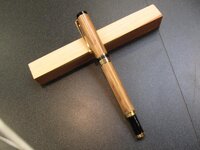
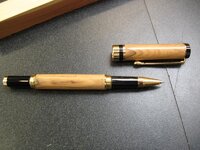
Then I saw this morning that some advocate not even using a finish on olive wood. So I came in to the store, stripped off the CA residue, resanded, then white diamond followed by carnauba wax. And while I'm not entirely happy with things, I like how the wax gives the olive wood a soft, real-wood finish. And I have to say, this particular set of blanks has some hellaciously beautiful grain to it.

So, on that note:
 

Attachments

  • IMG_0258.jpg
    IMG_0258.jpg
    63.1 KB · Views: 356
  • IMG_0260.jpg
    IMG_0260.jpg
    79.7 KB · Views: 372
Signed-In Members Don't See This Ad

randyrls

Member
Joined
Feb 2, 2006
Messages
4,829
Location
Harrisburg, PA 17112
Very nice;
I put CA finish on my BOW pens. I just hit the blank with 0000 steel wool as a final step. Makes it look like a bare wood, but gives the protection of CA.

This video shows how to do CA finish.
http://www.youtube.com/watch?v=orcgOf4siqc

Turn the blank just round, not down to the final size, apply a CA finish, Turn off the CA finish, apply the CA finish, repeat 5 - 10 times.
 

jttheclockman

Member
Joined
Feb 22, 2005
Messages
19,148
Location
NJ, USA.
Nice job. To put CA on do not play with it. 2 swipes back and forth and walk away. No fumes in the eyes. When dry come back and do it again. No fumes in eyes. Then susequent coats are the same. Did I mention no fumes in the eyes. 2 swipes, do not play with it. Works for me.:wink:
 

Lenny

Member
Joined
Jan 6, 2009
Messages
3,475
Location
Searsport, Maine
Nice job. To put CA on do not play with it. 2 swipes back and forth and walk away. No fumes in the eyes. When dry come back and do it again. No fumes in eyes. Then susequent coats are the same. Did I mention no fumes in the eyes. 2 swipes, do not play with it. Works for me.:wink:

I agree! Whenever I've had problems with my CA finish it's been due to not working fast enough (get it on and get out) or trying to go back over it too soon. Less is more in this case I think.
 

Chief Hill

Member
Joined
Aug 26, 2009
Messages
635
After all that I would of finished it with Chief hills special method a 22 oz estwing hammer. You have allot of patients. Well done.
 

PaulSF

Member
Joined
Oct 9, 2009
Messages
286
Location
San Francisco
Thank you! The problem I seemed to have with the CA was when I sanded it after application, the sanding seemed to remove a lot of the CA, leaving it patchy.
 

wb7whi

Member
Joined
Aug 29, 2008
Messages
304
Location
Spokane WA
Jently sand the CA with 4000 between coats and after the final coat puit it on your buffer (white and carnuba only). As Russ says you have to finish the finish.

That being said there are some woods I do not like to finish. One is BOW. I think it looks fine as wood rather than plastic. I feel the same about cocobollo and a few others but the traffic will pick out a plastic finish over a natural finish so these pens are mostly for me.
 

Ligget

Member
Joined
Jan 13, 2005
Messages
13,474
Location
Bonnybridge, Scotland.
Lovely pen, next time you want to practice a finish use scrap pieces of timber and not good pen blanks, this takes a lot of frustration away from the learning process.
 

PaulSF

Member
Joined
Oct 9, 2009
Messages
286
Location
San Francisco
Very nice;
I put CA finish on my BOW pens. I just hit the blank with 0000 steel wool as a final step. Makes it look like a bare wood, but gives the protection of CA.

This video shows how to do CA finish.
http://www.youtube.com/watch?v=orcgOf4siqc

Turn the blank just round, not down to the final size, apply a CA finish, Turn off the CA finish, apply the CA finish, repeat 5 - 10 times.

Huge shout-out to Randy for pointing me towards this method, and of course, a huge shout-out to William Young for posting the video. I just tested it on a scrap blank, and it seems practically idiot-proof. Meaning, it came out looking pretty darn good on my very first try!

I'm really eager to try it out on a real blank now, but unfortunately, I have to wait til next week, since I'll be AFL (away-from-lathe) for the holiday. Frustrating!

But if anyone else is having troubles with a CA finish, give that video a try. It seems pretty clear and simple, and it worked for me right off the bat.

Anyway, thank you, and have a great Thanksgiving.
 

opie

Member
Joined
Jul 10, 2006
Messages
23
Location
Fairland, Indiana, USA.
Nice Pen.

I have always had problems with olive wood cracking days to weeks after assembling whether it's a pen or bottle stopper. Bummer too, because turning olive wood is relaxing to me, it cuts so well. As for finish, I have always had great finishes with a grade of 400 reg/cloth paper, 1500-12000 micro-mesh, crystal coat (hut) or any similar friction polish, finished up with a rubbing and polishing of carnuba wax stick. I tried the CA finish thing years ago and was pretty convinced that it is messy and not friendly to my fingers or eyes...lol. Happy Thanksgiving...
 

Manny

Member
Joined
Jan 15, 2009
Messages
849
Location
Rancho Cucamonga, Ca.
Very nice;
I put CA finish on my BOW pens. I just hit the blank with 0000 steel wool as a final step. Makes it look like a bare wood, but gives the protection of CA.

This video shows how to do CA finish.
http://www.youtube.com/watch?v=orcgOf4siqc

Turn the blank just round, not down to the final size, apply a CA finish, Turn off the CA finish, apply the CA finish, repeat 5 - 10 times.


FYI
That video is CA blo
 
Top Bottom