You are using an out of date browser. It may not display this or other websites correctly.
You should upgrade or use an alternative browser.
You should upgrade or use an alternative browser.
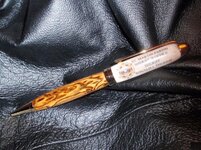
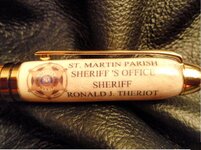
Newbie's first attempt at custom decals
- Thread starter chucklandry
- Start date
Signed-In Members Don't See This Ad
See more from chucklandry
Jim,
I utilized the decal process located at this link:
http://lumberjocks.com/Kerux/blog/3811
Kerux's process is the process I follow but I have learned a couple things along the way however, so I will share them with you so hopefully you don't repeat my mistakes and loose as I did:
1. The blank can have almost NO curvature AT ALL meaning from the center ring area to the cap as the decals can only bend one way. Try to keep your decals short or short enough to fit on the flat area of the blank. Font or design size will really be determined by the blank size.
2. The blank must be very smooth and shiny before applying the decal. Fill any grain in wood completely with CA before applying the decal.
3. Dark wood will not work well as the ink on the decal is not bright enough to over power the wood color.
4. Do not spray too much clear on your decal sheets or they will be too stiff.
5. Do not spray too little clear on the decals or your ink will rub off while you place it. I typically apply two coats.
6. Printing tips: print in draft format on paper and try it for size before printing on your decal paper, print along the bottom of the page first and work your way up and you will waste less. This way you can use the entire sheet
7. If it appears that the edge of the decal is not completely secured don't put CA on top of it, you will only be disappointed with the finish product, trust me, start over!
8. I use medium CA over the decal and spray accelerant on it each time. Be sure to rub off the residue from the accelerant each time, or you'll be disappointed when the paper towel instantly sticks to your blank, trust me!
9. If you are like me and do not have a printer at home and you are printing them somewhere else, print about five or six of each decal you intend to use or you will go to bed disappointed or you will be making another trip to the office!
10. A printer cannot print white. Areas that appear white on your logo will be whatever color your blank is.
Hope this helps you and as I work to perfect it more I will update this post!
Thanks for the comments, actually had crawfish for lunch Friday! Preparing for the Breaux Bridge Crawfish Festival next weekend! :biggrin:
Say Hi to Jake for me!
GO PANTHERS!
Great job on the pen. Decals are next on my list of things to try.
Jake lives about a mile down the road. I would imagine his nice new home may be getting nicer with that new contract huh?
Ironically, I am making a decal pen for Jake's Uncle today. He is the Mayor of Breaux Bridge and the city is one of my "real job" clients!
Signed-In Members Don't See This Ad
fiferb
Member
Looks pretty good to me! Are you sure you're a newbie? Great work.
theartist07
Member
Decal
I've never tried the decal but i went by Staples yesterday just to pick up some decal paper for this purpose, would you mind sharing a little info on this. Things like Font size, and the steps you take to cover the decal.
Jim
I've never tried the decal but i went by Staples yesterday just to pick up some decal paper for this purpose, would you mind sharing a little info on this. Things like Font size, and the steps you take to cover the decal.
Jim
chucklandry
Member
I've never tried the decal but i went by Staples yesterday just to pick up some decal paper for this purpose, would you mind sharing a little info on this. Things like Font size, and the steps you take to cover the decal.
Jim
Jim,
I utilized the decal process located at this link:
http://lumberjocks.com/Kerux/blog/3811
Kerux's process is the process I follow but I have learned a couple things along the way however, so I will share them with you so hopefully you don't repeat my mistakes and loose as I did:
1. The blank can have almost NO curvature AT ALL meaning from the center ring area to the cap as the decals can only bend one way. Try to keep your decals short or short enough to fit on the flat area of the blank. Font or design size will really be determined by the blank size.
2. The blank must be very smooth and shiny before applying the decal. Fill any grain in wood completely with CA before applying the decal.
3. Dark wood will not work well as the ink on the decal is not bright enough to over power the wood color.
4. Do not spray too much clear on your decal sheets or they will be too stiff.
5. Do not spray too little clear on the decals or your ink will rub off while you place it. I typically apply two coats.
6. Printing tips: print in draft format on paper and try it for size before printing on your decal paper, print along the bottom of the page first and work your way up and you will waste less. This way you can use the entire sheet
7. If it appears that the edge of the decal is not completely secured don't put CA on top of it, you will only be disappointed with the finish product, trust me, start over!
8. I use medium CA over the decal and spray accelerant on it each time. Be sure to rub off the residue from the accelerant each time, or you'll be disappointed when the paper towel instantly sticks to your blank, trust me!
9. If you are like me and do not have a printer at home and you are printing them somewhere else, print about five or six of each decal you intend to use or you will go to bed disappointed or you will be making another trip to the office!
10. A printer cannot print white. Areas that appear white on your logo will be whatever color your blank is.
Hope this helps you and as I work to perfect it more I will update this post!
pianomanpj
Member
You might want to consider using decal setting solution. It will soften the substrate of the decal and help it conform to almost any surface. Compunds curves won't be much of a problem. I don't know how the setting solutions would react with anything that you spray onto your decal sheets. You can get setting solution at almost any hobby store.
mickr
Member
thanks for the "tutorial" the decal work looks great on your deer ANTLER
wdcav1952
Activities Manager Emeritus
Nice work, but my opinion is that you should leave the shop and boil some crawfish!!! :biggrin:
Jim15
Member
Good looking pen. Thanks for the info.
Rangertrek
Member
Looks good to me. Thanks for the info on the process.
cdbakkum
Member
Chuck, I wish I had that ability. Very well done. Carl
stoneman
Member
Chuck,
The pen looks great from Vermont. Good job.
The pen looks great from Vermont. Good job.
chucklandry
Member
Nice work, but my opinion is that you should leave the shop and boil some crawfish!!! :biggrin:
Thanks for the comments, actually had crawfish for lunch Friday! Preparing for the Breaux Bridge Crawfish Festival next weekend! :biggrin:
sekach
Member
There are two different types of decal paper you can buy. The first is the transparent, which is what you seemed to have used. That will allow the background to show somewhat through the decal. TESTORS also sells decals that have a solid white background that you can print any color and stick on any color wood. It might have a tendency to show more flaws since you have to cut the decal logo carefully. I have usually tried to do logos on simple geometric patterns (on a white circle/square/rectangle, etc) to make it easier but have made more difficult cuts (Harley Davidson logo). You can get on the TESTORS website and order either type of paper though and make sure you order the decal bonder as well. Hope this helps other folks....
I like your method though and have felt your pain MANY times over on trying to get the decal to seal under CA....very frustrating at times. Nice looking pen though...
I like your method though and have felt your pain MANY times over on trying to get the decal to seal under CA....very frustrating at times. Nice looking pen though...
rherrell
Member
Thanks for the comments, actually had crawfish for lunch Friday! Preparing for the Breaux Bridge Crawfish Festival next weekend! :biggrin:
Say Hi to Jake for me!
GO PANTHERS!
Great job on the pen. Decals are next on my list of things to try.
Last edited:
chucklandry
Member
Say Hi to Jake for me!
GO PANTHERS!
Great job on the pen. Decals are next on my list of things to try.
Jake lives about a mile down the road. I would imagine his nice new home may be getting nicer with that new contract huh?
Ironically, I am making a decal pen for Jake's Uncle today. He is the Mayor of Breaux Bridge and the city is one of my "real job" clients!
Last edited:
hewunch
Member
Great job! And very nice work!
GouletPens
Member
Decals have thrown many for a loop, but that looks pretty good. You may be writing your own tutorial soon.


