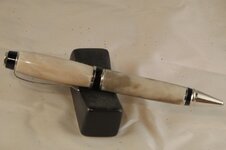
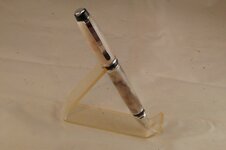
NEVER AGAIN........

Signed-In Members Don't See This Ad
See more from jallan

jallan

Member
Joined
Apr 4, 2011
Messages
577
Location
Mabank, Texas
will I ever make another pen out of Alabaster Stone. This one is my 4th try and a keeper. The other three cracked or blew out, and what a mess to turn. Wet sanded from 600 to 2500 for that great glass like finish. Pen is a Big Ben twist in Chrome. As always all comments are welcome and thanks for looking.
 

Attachments

  • IMG_0115.jpg
    IMG_0115.jpg
    119.3 KB · Views: 407
  • IMG_0116.jpg
    IMG_0116.jpg
    105.1 KB · Views: 235
Signed-In Members Don't See This Ad

Skie_M

Member
Joined
Aug 7, 2015
Messages
2,737
Location
Lawton, Ok
white/cream with chocolate/brown marbled in .... very very nice! :)


I found that it helps to really make sure the glue gets all over inside that barrel and that it's clear of all stone dust inside... I still had a blowout on my pink/peach alabaster pen last night. I'm thinking about going to gorilla glue that foams when wet, just to make sure I have proper grip in that barrel.

Always make sure you aren't applying too much pressure on the stone from the sides ... pressing it can be a heartbreaking procedure. Mine shattered while pressing the pen together.

I usually wet-sand it (micromesh) up to 12,000 grit, and then apply PlastX polish (which surprisingly works very well), followed by a coat of Turtle Wax.
 

TimS124

Member
Joined
Apr 11, 2012
Messages
735
Location
Asheville, NC
Stone has no "give" (elasticity) so pressing the parts can cause cracking, bruising, and other frustrating problems. TruStone blanks can have the same problems.

I saw a batch of "professionally made" soapstone slimline pens with horrible bruising at both ends of both the upper and lower pieces. Really detracted from the final look!

Couple ways to to try to avoid that problem:

1) Use a shorter piece of stone and have wood or acrylic (something with reasonable elasticity) at both ends of every piece. These should be at least as wide as the contact area between the tube and whatever parts are being pressed in...think of it as a form of segmenting.

2) Before gluing on the stone, press in all of the end pieces, then use knockout bars to remove them. That will pre-stretch the tube ends. Before applying glue, make sure the tubes still fit into the drilled out blanks. After gluing on the stone, turning, and polishing, assemble carefully...you may very well need to add a drop or two of Locktite, CA glue, etc to help keep the press-in parts in place but this should not cause enough stretching during assembly to bruise or fracture the stone. The exception here is if there's an alignment error during assembly (which is why I mentioned "carefully" in the re-assembly step).
 

Skie_M

Member
Joined
Aug 7, 2015
Messages
2,737
Location
Lawton, Ok
Mmm ... was actually thinking about sanding down the pen component parts and gluing them into the barrels the next time round... just a little to make sure that they go in more easily.

I don't have a pen disassembly setup at the moment .... the only way for me to do it right now would basically destroy the barrel. (grip in vise, knock out with hammer and rod... but the barrel is out of round and ruined)
 

TimS124

Member
Joined
Apr 11, 2012
Messages
735
Location
Asheville, NC
Mmm ... was actually thinking about sanding down the pen component parts and gluing them into the barrels the next time round... just a little to make sure that they go in more easily.

I don't have a pen disassembly setup at the moment .... the only way for me to do it right now would basically destroy the barrel. (grip in vise, knock out with hammer and rod... but the barrel is out of round and ruined)


Option 1 solves that by keeping the inflexible stone away from the places the tube has to bulge during assembly. :)
 

JohnGreco

Member
Joined
Dec 9, 2011
Messages
740
Location
Sewell, NJ 08080
After you turn them, you need to file out the inner diameter of the tubes to make the hardware slip in. Then epoxy in place. If you press them, even if they don't crack right away, they will over time.
 

Skie_M

Member
Joined
Aug 7, 2015
Messages
2,737
Location
Lawton, Ok
After you turn them, you need to file out the inner diameter of the tubes to make the hardware slip in. Then epoxy in place. If you press them, even if they don't crack right away, they will over time.

Now, see, that's the kind of tip I'ld want to see in that "Turning Stone?" thread! :p
 
Top Bottom